SUNDRIVE
10 W
Awww, stop it Allex, I'd at least like to finish my FLX Alpha before I start lusting after a younger slimmer model!
What motor is that ?
What motor is that ?
")
This is something that changed with V2 (and possibly the later batch of the V1s) The later models are made with thinner material along the bottom (and possibly elsewhere?) with extra reinforcing ribs to maintain strength and rigidity. I discussed it with the factory at the time but dont recall the exact specifics and numbers. Basically though the V2 is a bit lighter as a result, I think around the 800g mark from memory. Not a night and day difference on a heavy ebike but traditional mountain bikers would be wetting their pants over such a weight saving. The minimum seat height is also slightly lower with a revised seat post subframe. Obviously the V2s also have the sliding / horizontal dropouts too. Nice evolution in such a short period of timeSamd said:Lee did your frame ahve the two ribs along the bottom of the frame inside about 10mm high? Mine didnt but Sundrive's one does.
Nice progress Alex, and a very similar set up to mine. Great minds huh ?Allex said:Here is 18s6p with Midi-e inside.


Lash said:SUNDRIVE said:Hey Lash, was there any way do you think of fitting the Max E in there with the battery set ?
No chance of it fitting inside unfortunately. Close to fitting but really need another inch of height I guess or have a wider gap up top underneath the frame, where the cables run. would be nice to have it fit though. I dont think it will matter when in done with it. I like where bikes are heading like the Qulbix Q76R that is designed around the 18650 cell size. Utilizing space is where its at.
Lash

Sun drive, have you made the pack or are you undertaking a dry fit of cells alone? By my math two 18650's stacked totals 130mm by themselves. By the time you add nickel, some copper trace (I used 2mm copper wire), padding between upper and lower cell packs and then external padding 140mm sounds a little light to me. Hey your cells may be shorter than my 25R's but 3 layers of cardboard alone is 9mm and there is no way I would rely on a single layer of cardboard for protection with the controller adjacent to the battery if you are going off-road in pursuit of spills and thrills.SUNDRIVE said:Lash said:SUNDRIVE said:Hey Lash, was there any way do you think of fitting the Max E in there with the battery set ?
No chance of it fitting inside unfortunately. Close to fitting but really need another inch of height I guess or have a wider gap up top underneath the frame, where the cables run. would be nice to have it fit though. I dont think it will matter when in done with it. I like where bikes are heading like the Qulbix Q76R that is designed around the 18650 cell size. Utilizing space is where its at.
Lash
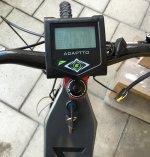
Hey Lash, what about this as an option ? Battery will need to be in two paralled 6p bricks, total height around 140mm. Had to shave 2-3 mm off inside of frame folds to slot the 80mm Adaptto up there.

Nice build so far Lee. Looks great! Love the HIGH VOLTAGE pic on the site.Lash said:Did a bit more finishing off on the bike on the weekend..
<snip>
Looking forward to a ride with 9lives and Canberra locals.
robohead said:Nice build so far Lee. Looks great! Love the HIGH VOLTAGE pic on the site.Lash said:Did a bit more finishing off on the bike on the weekend..
<snip>
Looking forward to a ride with 9lives and Canberra locals.

Samd said:Sundrive I'm thinking you'd be better with two seperate 18s 6p bricks, each with minimal electrical insulation and shrinkwrap, in order to make loading easier and once loaded, add physical insulation outside the shrinkwrap with foam/rubber etc.
Looking at it from the headstem end as below, those ribs in the base could be used to run main wires either side, and same for the adaptto having gaps up the side.
Fill in the gaps between the ribs on the base with foam and a little either side to spread the load. Not shown.
Not sure how warm those controllers get - should be a decent amount of seperation. Can it be monitored via adaptto?
Perhaps a way somehow to create a heat path from controller to frame?