Swayze
100 µW
As the title would suggest, this thread is going to be about the build process of a 1995 GSX600F, hopefully it will be interesting to read, help some people in the future and help me in the present!
A quick bit of history about myself before we dive in. I'm 27, live in Edinburgh Scotland, and currently work for one of the larger Solar EPC companies in the country, i went to university in Edinburgh where I studied Engineering at HND Level then went on to do an MSC in Energy and Environmental Engineering. I don't currently ride a motorcycle however do a lot of mountain biking, mainly Downhill racing and Enduro/all mountain riding. I see myself as a hypocrite of the renewable world as I drive a diesel car, live in a house powered by Gas, and don't have solar panels as I don't own the house.
So what do I hope to achieve from this build:
1. A fun vehicle to drive.
2. A cheap method of commuting to work (17 miles each way).
3. A slight feeling of smugness when discussing renewable energy.
4. A good project for my mate Angus who is recovering from a serious push bike incident.
5. A flick of the V's to everyone who has been negative about the project.
So without further a do, here is the beast (?)
Actually I dont have a picture of the original state it was in yet, so here is what it maybe looked like once upon a time...

We were able to pick this up from Gumtree for £150, the bike actually ran when we collected it, however had mismatching exhaust parts, worn chain, sprockets etc, and was not MOT'd or Taxed (which suited us just fine). The question was raised when we arrived as to how we were going to get the thing home. Being an optimist I told the seller that I would just pop it in the car, a look of bemusement followed, but I had an ace up my sleeve ,the toolbox in the boot.

The journey home had a faint smell of petrol fumes which is strange for a diesel but was ultimately successful, until we removed the bike from the boot and the kickstand unfolded and landed of my friend Simmo's toe, a short trip to A&E confirmed the break... This build has taken its first casualty... My dad always told me motorbikes were dangerous...
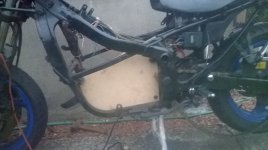
So first things first, take out the old engine and find out how much space there is available for everything else.
Being absolute motorbike novices this enevetably took 3 times longer than it should have, as originally we thought that the Engine would need to be lifted out the top like you would a car, only after we had dismantled 50% of the Engine block and discovered what the inner workings of a 600cc engine look like did we stumble across the bolts holding the lower subframe(?) on, after noticing these things got quicker until I managed to shear the head off a 6 inch long bolt that refused to come out, an evening and a half of drilling, cursing and snapping drill bits left me with this.

A few precision blows and the motor dropped out

After Many an hour of looking online at DC motors and becoming generally confused by ratings and KW's and HP I decided that the weight and size of the Agni Motors looked good, and happened across one on Ebay on sale from Enid1448.
A few days later and it arrived at work

That almost brings us up to date, the plan going forward is this (However I am very open to suggestions as this is all based on vague internet research and standard Grade Physics (I did Higher but I have definitely forgotten it all)
22 x 3.2V 40Ah sinopoly Batteries (if budget can reach that {Currently it cannot})
72V 400A Alltrax Motor Controller (SPM72400) - again alternative more economically viable solutions welcome altough this does give me the option to up to an Agni 95R if we decide more oooomf is required.
Magura 5V throttle
Cables and connectors I should be able to source (off cuts from work) either 50mm singles if I can get them or 2x25mm for the battery/controller - controller/battery links.
I'm still at a bit of a loss for Chargers and Battery management. so any help on this front would be much appreciated.
More updates to come as funds become available!
Hope you have enjoyed my story so far.
A quick bit of history about myself before we dive in. I'm 27, live in Edinburgh Scotland, and currently work for one of the larger Solar EPC companies in the country, i went to university in Edinburgh where I studied Engineering at HND Level then went on to do an MSC in Energy and Environmental Engineering. I don't currently ride a motorcycle however do a lot of mountain biking, mainly Downhill racing and Enduro/all mountain riding. I see myself as a hypocrite of the renewable world as I drive a diesel car, live in a house powered by Gas, and don't have solar panels as I don't own the house.
So what do I hope to achieve from this build:
1. A fun vehicle to drive.
2. A cheap method of commuting to work (17 miles each way).
3. A slight feeling of smugness when discussing renewable energy.
4. A good project for my mate Angus who is recovering from a serious push bike incident.
5. A flick of the V's to everyone who has been negative about the project.
So without further a do, here is the beast (?)
Actually I dont have a picture of the original state it was in yet, so here is what it maybe looked like once upon a time...
We were able to pick this up from Gumtree for £150, the bike actually ran when we collected it, however had mismatching exhaust parts, worn chain, sprockets etc, and was not MOT'd or Taxed (which suited us just fine). The question was raised when we arrived as to how we were going to get the thing home. Being an optimist I told the seller that I would just pop it in the car, a look of bemusement followed, but I had an ace up my sleeve ,the toolbox in the boot.
The journey home had a faint smell of petrol fumes which is strange for a diesel but was ultimately successful, until we removed the bike from the boot and the kickstand unfolded and landed of my friend Simmo's toe, a short trip to A&E confirmed the break... This build has taken its first casualty... My dad always told me motorbikes were dangerous...
So first things first, take out the old engine and find out how much space there is available for everything else.
Being absolute motorbike novices this enevetably took 3 times longer than it should have, as originally we thought that the Engine would need to be lifted out the top like you would a car, only after we had dismantled 50% of the Engine block and discovered what the inner workings of a 600cc engine look like did we stumble across the bolts holding the lower subframe(?) on, after noticing these things got quicker until I managed to shear the head off a 6 inch long bolt that refused to come out, an evening and a half of drilling, cursing and snapping drill bits left me with this.
A few precision blows and the motor dropped out
After Many an hour of looking online at DC motors and becoming generally confused by ratings and KW's and HP I decided that the weight and size of the Agni Motors looked good, and happened across one on Ebay on sale from Enid1448.
A few days later and it arrived at work
That almost brings us up to date, the plan going forward is this (However I am very open to suggestions as this is all based on vague internet research and standard Grade Physics (I did Higher but I have definitely forgotten it all)
22 x 3.2V 40Ah sinopoly Batteries (if budget can reach that {Currently it cannot})
72V 400A Alltrax Motor Controller (SPM72400) - again alternative more economically viable solutions welcome altough this does give me the option to up to an Agni 95R if we decide more oooomf is required.
Magura 5V throttle
Cables and connectors I should be able to source (off cuts from work) either 50mm singles if I can get them or 2x25mm for the battery/controller - controller/battery links.
I'm still at a bit of a loss for Chargers and Battery management. so any help on this front would be much appreciated.
More updates to come as funds become available!
Hope you have enjoyed my story so far.