You are using an out of date browser. It may not display this or other websites correctly.
You should upgrade or use an alternative browser.
You should upgrade or use an alternative browser.
The Ruff Tracker - MXUS3000w
- Thread starter Sean9002
- Start date
How's the clearance for the forks? Looks a bit tight. Maybe it's just the photo angle...
Thanks for posting this up. 
Bicycles with crowns that end underneath the headset require that the handlebars use only a central stem attachment. When I see forks like yours with the handlebars so close to the tubes, it seems like an opportunity missed for a robust attachment.
One advantage you might be able to exploit would be fitting rubber-friction pads where your knees are next to the faux tank. I always appreciate being able to squeeze my knees against friction pads during hard braking. It keeps your upper body more relaxed and able to respond with finesse for both steering and hand controls.Sean9002 said:As nice as it would be to fill all that space with LIPO, it was very uncomfortable sitting so bow legged.
Bicycles with crowns that end underneath the headset require that the handlebars use only a central stem attachment. When I see forks like yours with the handlebars so close to the tubes, it seems like an opportunity missed for a robust attachment.
Noph said:Hi.. This is nice to know someone is working on the same frame build. Love it. Thanks for sharing.
Hey Noph!
Yeh i think there is a couple of 'ghost' builds going on in the background. Do you have a thread going for your bike?
I love those bars! Badass! Is that rear a 100mm rim? What are your battery plans as the tank area is filled in. Ive been looking at tilising the space between tyre and seat stay, its a big area, and i could make a nice curved tank that the fender could integrate into.
nicobie said:How's the clearance for the forks? Looks a bit tight. Maybe it's just the photo angle...
I wouldn't say it is ideal, however, its not too bad. Until i get it out for a pedal i wont really know. Its got bugger all clearance under the pedals so leaning be precarious at best
It wont be used on any tight and twisty stuff, so aslong as i can get around a round-about im all sorted.
gogo said:Thanks for posting this up.
One advantage you might be able to exploit would be fitting rubber-friction pads where your knees are next to the faux tank. I always appreciate being able to squeeze my knees against friction pads during hard braking. It keeps your upper body more relaxed and able to respond with finesse for both steering and hand controls.Sean9002 said:As nice as it would be to fill all that space with LIPO, it was very uncomfortable sitting so bow legged.
Bicycles with crowns that end underneath the headset require that the handlebars use only a central stem attachment. When I see forks like yours with the handlebars so close to the tubes, it seems like an opportunity missed for a robust attachment.
You've lost me on the bottom part. Could you clarify it a bit for me, as theres still time to make solid changes. Cheers for the input!
Samd
10 MW
Heya Sean,
stuck in Malaysia with no tinker time, you are my vicarious builder buddy! get to it!
I forgot I owed you that rear tank info.
If you scroll to the bottom of Ron's excellent link below and find the sportsman flyer I think they also sell the tanks between seatstay and rear wheel.
https://www.electricbike.com/more-boardtracker-e-bikes/
Pretty easy to make your own though I am sure! Lots of ideas anyway...
Samd said:Heya Sean,
stuck in Malaysia with no tinker time, you are my vicarious builder buddy! get to it!
I forgot I owed you that rear tank info.
If you scroll to the bottom of Ron's excellent link below and find the sportsman flyer I think they also sell the tanks between seatstay and rear wheel.
https://www.electricbike.com/more-boardtracker-e-bikes/
Pretty easy to make your own though I am sure! Lots of ideas anyway...
Cheers sam! You've missed some great summer storms down here, hope there was no fires up your way!
That article gives me lots of ideas. The sportsman tank is perfect expect too small. But thats what i will attempt, ill keep you posted!
I'm referencing the difference of how handlebars attach to low-crown forked bicycles and 'dual-crown' bicycles/motorcycles. Your handlebars could easily have better twist-alignment rigidity by adding brackets from each side of the handlebar to the tube near it.Sean9002 said:gogo said:Thanks for posting this up.
Bicycles with crowns that end underneath the headset require that the handlebars use only a central stem attachment. When I see forks like yours with the handlebars so close to the tubes, it seems like an opportunity missed for a robust attachment.
You've lost me on the bottom part. Could you clarify it a bit for me, as theres still time to make solid changes. Cheers for the input!
I've had the handlebars lose alignment in a 'crash' and then tried to quickly steer the bike again. It takes a few moments to realize the bars are out of alignment and adjust myself mentally. Sometimes you have just seconds to maneuver out of danger. I prefer the motorcycle convention of tying the handlebars to parts of the fork in a way that won't allow misalignment.
I have a feet-forward stretch cruiser and I frequently think about adding spring loaded foot pegs to stand on while going over big bumps. Have you had such thoughts?
gogo said:I'm referencing the difference of how handlebars attach to low-crown forked bicycles and 'dual-crown' bicycles/motorcycles. Your handlebars could easily have better twist-alignment rigidity by adding brackets from each side of the handlebar to the tube near it.Sean9002 said:gogo said:Thanks for posting this up.
Bicycles with crowns that end underneath the headset require that the handlebars use only a central stem attachment. When I see forks like yours with the handlebars so close to the tubes, it seems like an opportunity missed for a robust attachment.
You've lost me on the bottom part. Could you clarify it a bit for me, as theres still time to make solid changes. Cheers for the input!
I've had the handlebars lose alignment in a 'crash' and then tried to quickly steer the bike again. It takes a few moments to realize the bars are out of alignment and adjust myself mentally. Sometimes you have just seconds to maneuver out of danger. I prefer the motorcycle convention of tying the handlebars to parts of the fork in a way that won't allow misalignment.
I have a feet-forward stretch cruiser and I frequently think about adding spring loaded foot pegs to stand on while going over big bumps. Have you had such thoughts?
Ah right, I get ya! Yes unfortunately the more I lowered the backbone of the bike to get the stance I wanted, the more of the upper fork went through the upper clamp. Hence the very strange bar position. The annoying thing is, its sooooo comfy once your in the saddle. I've looked at clip on bars for the forks, this is do-able, but will ruin the riding position. This bike is mainly for show anyway, my other project is for hucking trails, burnouts, general terrorising of the public, so there will be bugger all stress through the top of the steerer.
Back to work after my holidays 
Progress is still happening!
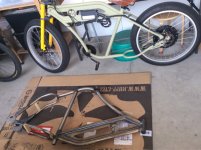
Fender mount. Just a test.


Test fitting the controller enclosure. Still alot of work to go on it but it gives you the idea. It will act as protection, heat sink and eye candy. Will be fan cooled running of the 12v accessories battery.


Progress is still happening!
Fender mount. Just a test.
Test fitting the controller enclosure. Still alot of work to go on it but it gives you the idea. It will act as protection, heat sink and eye candy. Will be fan cooled running of the 12v accessories battery.
Sean9002 said:Noph said:Hi.. This is nice to know someone is working on the same frame build. Love it. Thanks for sharing.
Hey Noph!
Yeh i think there is a couple of 'ghost' builds going on in the background. Do you have a thread going for your bike?
I love those bars! Badass! Is that rear a 100mm rim? What are your battery plans as the tank area is filled in. Ive been looking at tilising the space between tyre and seat stay, its a big area, and i could make a nice curved tank that the fender could integrate into.
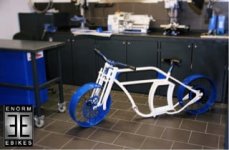
I have been thinking to cut the middle tube and weld a strong metal enclosure to support middle session, at the same time act as a battery compartment. I've seen enorm bike done it that way. I have not much time to continue working on that but that is the plan. ***The photo was from enorm site.
For the Rim i use 80 mm 26 inch. Rim I was afraid that the motor would not pull this heavy frame but i was wrong it does work very well. I could cruise around neighbor at 40 km/h easily with 72Volts.


Samd
10 MW
Sweet!
Just got a dozen of 80mm wide by 24 inch rims, don't quite fit the micargi, time to get out the drift hammer and wood blocks. Still got a few ally core fronts if you're up for dual drive!
Oh man those tyres look so sweet!
Just got a dozen of 80mm wide by 24 inch rims, don't quite fit the micargi, time to get out the drift hammer and wood blocks. Still got a few ally core fronts if you're up for dual drive!
Oh man those tyres look so sweet!
Samd said:Sweet!
Just got a dozen of 80mm wide by 24 inch rims, don't quite fit the micargi, time to get out the drift hammer and wood blocks. Still got a few ally core fronts if you're up for dual drive!
Oh man those tyres look so sweet!
Dual drive would be greaaaaaat fun
Who makes the highest quality springer bicycle fork? Ive always wanted to modify a springer to run an air shock....then I could go dual drive :wink:
Shot the first few pieces last night. The Aluminium is a Grey ash Mica and the glassed top is candy red. Not a bad match, still needs clear and wet sanding. Frame will be done in the mica ash, and the tanks in candy red.
arkmundi
10 MW
There are a rare few here on the forum that approach that meld of form, function, beauty and raw-steel-speed, when you're not sure they're artist, craftsman or part of the technorati elite. My MXUS 3K sits in a box and may stay there awhile as I now aspire to a higher standard. Please show mercy for the maker-challenged. Mucho-respecto!
Samd
10 MW
Sean9002 said:Dual drive would be greaaaaaat fun. However I'd need a soloution to make it run a 20mm through axle dirt jump axle to fit the forks.
That colour is awesome!
I've been thinking of a solution for front axles in a 20mm front and I think I have either come up with it, or I am recalling how Kingfish did it. Either way.
My solution is to remove both stanchions, run laser cut washers inside the 20mm hole and clamp the ends with both stanchions off the bike, then insert the stanchions afterward to both crowns, pretightened. It might work, need to check. Spinout could be halted by running one plate external at each end like a torque arm...
Hmm, more thinking beer needed...
arkmundi said:There are a rare few here on the forum that approach that meld of form, function, beauty and raw-steel-speed, when you're not sure they're artist, craftsman or part of the technorati elite. My MXUS 3K sits in a box and may stay there awhile as I now aspire to a higher standard. Please show mercy for the maker-challenged. Mucho-respecto!
Haha nice one :lol: . Yes there are many builds that are pure function! nothing wrong with that, im sure in a race/reliability challenge they could hand my ass to me (Atleast for this bike :wink: ). I come from the ICE scene where the 'function' objectives of their old technologies have been met, generation after generation, leaving them time to focus on the beauty, hence the Triumphs, Indians, Harleys of this world, that look stunning and have the reliability of a production car.
I hope to 'show' the bike so it needs a good fit and finish. Then I'll finish off my Bush Basher that im not worried about getting dust on.
Good luck with your build. Any idea on what frame you will be basing it on? theres a lot of interesting ways to use the MXUS.
Samd said:That colour is awesome!
I've been thinking of a solution for front axles in a 20mm front and I think I have either come up with it, or I am recalling how Kingfish did it. Either way.
My solution is to remove both stanchions, run laser cut washers inside the 20mm hole and clamp the ends with both stanchions off the bike, then insert the stanchions afterward to both crowns, pretightened. It might work, need to check. Spinout could be halted by running one plate external at each end like a torque arm...
Hmm, more thinking beer needed...
Sounds feasible!....ill tell you what, test it on your bike first
Would you need to drop the stanchions to get the tire off?
Samd
10 MW
Well strictly no, you could cut the old one off. 
But it doesn't give you much choice for getting a new one on however.
Oi! Drop yer stanchions!
I've never seen those front forks before, but was thinking of doing it on some older boxxers from the shed, for a trial with dual BPM offroad. Are they a 100mm wide hub or a 110 wide DH style 20mm axle?
But it doesn't give you much choice for getting a new one on however.
Oi! Drop yer stanchions!
I've never seen those front forks before, but was thinking of doing it on some older boxxers from the shed, for a trial with dual BPM offroad. Are they a 100mm wide hub or a 110 wide DH style 20mm axle?
Samd said:Well strictly no, you could cut the old one off.
But it doesn't give you much choice for getting a new one on however.
Oi! Drop yer stanchions!
I've never seen those front forks before, but was thinking of doing it on some older boxxers from the shed, for a trial with dual BPM offroad. Are they a 100mm wide hub or a 110 wide DH style 20mm axle?
Might be going with a springer (or leaf if I can find the right style) front end. Wouldn't trust them with a bunch of torque trying to pretzel them.
Still needs a good buffing to get rid of the cellulite. and some rubber c-edging.
Just finalising some leather parts. As the frame has such striking resemblance to my favourite board track bike (1912 Indian), I'm theming it. I've had some nice Gold and black Indian tank decals sitting in my garage for a while that im using.
Doing a leather mudflap, Backbone wrap with stitching, some small detail pieces and a monogramed leather wrap for the CA\switch box. Nice braided sleeves will hide all wiring that's visible. Now I play the waiting game while some guys in New Zealand laser up some cow hide for me! The Endless sphere logo will be mounted as the head badge as a thankyou to the community.

And before anyone says anything, yep I know, theres not much thus far that's been strictly ebike posts....but that's coming very soon. 8)
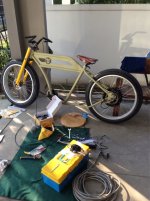
The ruff build has slowed a little as its now stripped for paint, and I have returned a few parts that were borrowed from my Oset...SO now the Oset is close than ever. Gwhy has been looking at some motors which could be promising, but for the moment Im lacing up my spare MXUS to the trials wheel to go blasting around the neighbourhood. A big thanks to Pete from Oset Australia for sending out my Sprocket carrier so quickly, It will sit in waiting until my motor decisions are made. Heres a couple of pics as a taster. Controller is a 5000w Greentime controller.

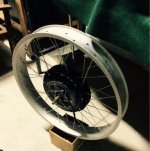
Please note the Wood swingarm extension......so pro =). I have the steel cut and ready to weld. Rear is a 45mm wide rim with 16x3 trials tire. Lots of squishy sidewall to play with.

219 Gokart sprocket carrier. only $50AUD, would be a good way for someone to go a Gokart chain on a bike. all you need is a 6 bolt iso hub (flip flop fixie style)

Used DMR Handlbar mounts and a strip of Aluminium to mount up the headlights. Perfect position. Looking forward to the first game of headlight chicken. I still have a headache from checking how bright the 'High' setting is.

Rock solid mounting. and should be relatively protected when the inevitable happens!

This will be a lot neater once all the wiring is sleeved and the panels are back on.

Please note the Wood swingarm extension......so pro =). I have the steel cut and ready to weld. Rear is a 45mm wide rim with 16x3 trials tire. Lots of squishy sidewall to play with.

219 Gokart sprocket carrier. only $50AUD, would be a good way for someone to go a Gokart chain on a bike. all you need is a 6 bolt iso hub (flip flop fixie style)

Used DMR Handlbar mounts and a strip of Aluminium to mount up the headlights. Perfect position. Looking forward to the first game of headlight chicken. I still have a headache from checking how bright the 'High' setting is.

Rock solid mounting. and should be relatively protected when the inevitable happens!

This will be a lot neater once all the wiring is sleeved and the panels are back on.
Lenk42602
10 kW
Sean9002 said:
219 Gokart sprocket carrier. only $50AUD, would be a good way for someone to go a Gokart chain on a bike. all you need is a 6 bolt iso hub (flip flop fixie style)
Nice work!
Can you provide a link to this carrier?
Cheers,
len
Lenk42602 said:Sean9002 said:219 Gokart sprocket carrier. only $50AUD, would be a good way for someone to go a Gokart chain on a bike. all you need is a 6 bolt iso hub (flip flop fixie style)
Nice work!
Can you provide a link to this carrier?
Cheers,
len
Hey Len, I just contactedpete at Oset Australia, and he sorted me out with one. it appears on the German Oset website. Bit expensive with them.
I would just contact your Local Distributor through the Oset website and request a sprocket carrier. If they don't have them, then contact Ian from oset uk!
Similar threads
- Replies
- 0
- Views
- 905
- Replies
- 4
- Views
- 925


