Trek 820 Commuter Build - good for noobs to learn basics

BATFINK

10 kW
Joined
Aug 7, 2011
Messages
598
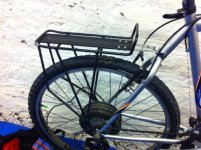
Ok guys here is a quick documentation in pictures of my trek commuter build, Can travel 30 miles at a decent speed. This is my second build, last build was an old trek 800 hard tail with rigid forks but i am slowly getting more ambitious.

Started with:
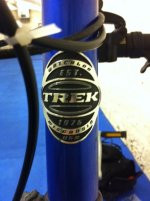
Trek 820 Single Track mountain bike - great condition and was only £50 on Ebay,
Mac 8T Speed Kit (included controller, twist throttle and Brake safety cut of levers)
Ping 48 Volt 20 Amp Batter (Came as 2 batteries to be connected)
Cycle analyst (the version with the separate cable for the speed sensor)
 
Puncture prevention, having had a few punctures for various reasons, i am doing the best i can to prevent any punctures which can be a nightmare, I have lined the inside of the wheel with 2 layers of tape to protect the tube from and pinching or spoke damage, i have also lined the inside of the tyre with another older tyre that had puncture protection too and used Slime tubes inside both tyres. I realise i will probably get a puncture again at some point but i reckon this should be pretty good measures to prevent it happening.
 
Lining wheel with a second layer of rim tape
 

Attachments

  • photo.jpg
    photo.jpg
    64.3 KB · Views: 3,347
Lining inside of tyre with another tyre, i just trimmed the outer metal edge of the tyre bead off with a razor blade
 
Slime tube will be used instead of standard tubes
 

Attachments

  • photo.jpg
    photo.jpg
    60.7 KB · Views: 3,343
My work area so far, i have a large martial arts academy so took over the area as my workshop ;)
 

Attachments

  • photo.JPG
    photo.JPG
    62.1 KB · Views: 3,341
Replaced tyre onto new rim with motor built into it and fitted it to the back wheel
 

Attachments

  • photo.jpg
    photo.jpg
    61 KB · Views: 3,340
Another picture of the motor fitted, i fitted it upside down as it was easier
 
Lined the front wheel with heavy duty rubbery plastic, the same stuff used in factories as separators for different work areas or to keep insects from gaining access through doorways, anything like this could be used to line your tyres if you don't have any spear tyres lying around
 

Attachments

  • photo.jpg
    photo.jpg
    50.1 KB · Views: 3,339
cut it to thickness for inside of tube
 

Attachments

  • photo.jpg
    photo.jpg
    44 KB · Views: 3,339
fit it inside tyre then stick in your tube as normal, i recommend slime tubes
 

Attachments

  • photo.jpg
    photo.jpg
    48.7 KB · Views: 3,339
Fit the throttle/cruise controller
 

Attachments

  • photo.jpg
    photo.jpg
    47.1 KB · Views: 3,338
Fit a rear rack to carry any batteries or luggage
 

Attachments

  • photo.JPG
    photo.JPG
    66.5 KB · Views: 3,101
Affix a cycle analyst onto the handlebars
 

Attachments

  • photo.JPG
    photo.JPG
    49.8 KB · Views: 3,101
Fit the speed sensor to your front fork and the accompanying magnet so that it spins past the sensor within around 2mm
 

Attachments

  • photo.jpg
    photo.jpg
    65.7 KB · Views: 3,101
I would have changed the brake lever for the special brake lever that has a power cutout safety switch built in but unfortunately my gears and brake lever are an all in one unit, i will just cut the brake lever off later and fit the safety lever next to the gears that will still be on the bar. Here is a picture of the combined brake lever and gears which will cause a little problem for you so remember to double check your selection when choosing a bike to convert.
 

Attachments

  • photo.jpg
    photo.jpg
    40.9 KB · Views: 3,098
Tidy up your cables to the frame by using a few cable ties
 

Attachments

  • photo.jpg
    photo.jpg
    74.7 KB · Views: 3,097
Connect the wired plugs that come from your throttle, Your brake cut off, your cycle analyst and your motor to the controller box. This part is very easy if you have bought a complete kit as all the connectors pretty much go in 1 place. I recommend CELL_MAN 8T kit. So simple and connected my Cycle analyst computer with one simple cable.
 

Attachments

  • photo.jpg
    photo.jpg
    63.9 KB · Views: 3,095
Fit a rear pannier bag if you are going to keep your batteries in here, the one I'm using in the picture is way to big for my needs and not aerodynamic but i will replace it with a hard shell unit or some sort of lockable ammunition box, The problem is my batteries came as 2 batteries and i can't put one on each side of the bike as i haven't had time to make the wires that connect them together longer. You will see what i mean from the pictures.

Anybody have any good suggestions for a hard shell pannier bag?
 

Attachments

  • photo.JPG
    photo.JPG
    46.9 KB · Views: 3,094
heres my batteries from PING, great batteries but the wires between batteries and the connectors that connect both batteries to the on board battery management system are too short so they must be mounted on the bike very close together, i will fix this at a later date
 

Attachments

  • photo.jpg
    photo.jpg
    51.5 KB · Views: 3,094
Wrapped the batteries up in the polystyrene casing they were delivered in and applied lots of electrical tape around the, to keep them safe when the bike falls
 

Attachments

  • photo.jpg
    photo.jpg
    37.2 KB · Views: 3,093
Back
Top