slam
1 mW
- Joined
- Aug 16, 2016
- Messages
- 13
Hey folks!
I have blown MOSFETs. Should I attempt to rebuilt the controller, replace it, or upgrade it?
I picked up a 2008 Zapino scooter with known problems. This is my first EV and a bit of a learning curve coming from TDI VWs! My first time on this forum as well.
The scooter reportedly was stuck in "limp mode" going no faster than 10 MPH. Previous owner replaced the throttle (no effect) and the controller (apparently it wasn't the right replacement) before garaging the unit for a year. When I got it I hooked the controller up and... drove it home! The batteries were low but I was able to cart my 200 lb self about 2.5 miles at 15-25 MPH (depending on hills).
That night I have it a full charge. The charger LED never turned green (possible dead cells — tbd). The dash voltmeter was in the green so I took it for a spin. I got about 1 block before it started to stutter badly. I limped it home, sometimes stuttering sometimes not, then ran it on the center stand to evaluate the issue. Something started to smell like badly burning electronics and I shut it down.
I disassembled the controller and what a mess. At least five blown MOSFETs and one blown capacitor. Apparently the previous owner had opened up the controller to examine it and put it back together without fresh heat conducting paste and I suspect overheating caused the MOSFETs to blow, but I need your advice.

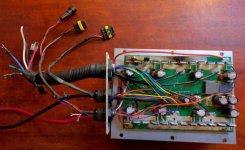
Here's the whole controller. From what I can gather this is a six-phase configuration? I have six 12 Ga/2.5mm2 wires to the motor not three as the manual wiring diagrams says. There's ten 22 Ga/0.3mm2 wires via a white connector from the controller to the motor (Hall sensors, and?). There's one 4-wire, one 3-wire, and one 2-wire connector (throttle, key set/braking switch, and LED diagnostic, but I don't know which is which), a pair of white wires (for the "high speed switch" I think), and the battery wires.

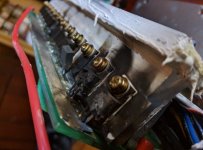
Here's the blown MOSFETs. The first four are blown and the seventh one has a fried connector.

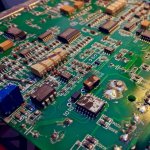
Here's the blown capacitor on the flipside of the first four blown MOSFETs.
Is there any point to sourcing replacement MOSFETs? I'm handy enough with an iron to take it on, but I can't tell for sure why they blew or if there's more damage elsewhere on the board, or even damage to the motor.
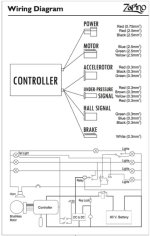
Another issue I have is the bad wiring diagram. It's next to useless since it doesn't resemble my actual wiring:

I do have a slightly better wiring diagram in the printed manual.
Long-term I'm probably want to upgrade the SLA batteries with Li-Ion batteries with similar or greater total voltage. Short term I'd just like to get this rolling again.
Advice?
I have blown MOSFETs. Should I attempt to rebuilt the controller, replace it, or upgrade it?
I picked up a 2008 Zapino scooter with known problems. This is my first EV and a bit of a learning curve coming from TDI VWs! My first time on this forum as well.
The scooter reportedly was stuck in "limp mode" going no faster than 10 MPH. Previous owner replaced the throttle (no effect) and the controller (apparently it wasn't the right replacement) before garaging the unit for a year. When I got it I hooked the controller up and... drove it home! The batteries were low but I was able to cart my 200 lb self about 2.5 miles at 15-25 MPH (depending on hills).
That night I have it a full charge. The charger LED never turned green (possible dead cells — tbd). The dash voltmeter was in the green so I took it for a spin. I got about 1 block before it started to stutter badly. I limped it home, sometimes stuttering sometimes not, then ran it on the center stand to evaluate the issue. Something started to smell like badly burning electronics and I shut it down.
I disassembled the controller and what a mess. At least five blown MOSFETs and one blown capacitor. Apparently the previous owner had opened up the controller to examine it and put it back together without fresh heat conducting paste and I suspect overheating caused the MOSFETs to blow, but I need your advice.

Here's the whole controller. From what I can gather this is a six-phase configuration? I have six 12 Ga/2.5mm2 wires to the motor not three as the manual wiring diagrams says. There's ten 22 Ga/0.3mm2 wires via a white connector from the controller to the motor (Hall sensors, and?). There's one 4-wire, one 3-wire, and one 2-wire connector (throttle, key set/braking switch, and LED diagnostic, but I don't know which is which), a pair of white wires (for the "high speed switch" I think), and the battery wires.

Here's the blown MOSFETs. The first four are blown and the seventh one has a fried connector.

Here's the blown capacitor on the flipside of the first four blown MOSFETs.
Is there any point to sourcing replacement MOSFETs? I'm handy enough with an iron to take it on, but I can't tell for sure why they blew or if there's more damage elsewhere on the board, or even damage to the motor.
Another issue I have is the bad wiring diagram. It's next to useless since it doesn't resemble my actual wiring:

I do have a slightly better wiring diagram in the printed manual.
Long-term I'm probably want to upgrade the SLA batteries with Li-Ion batteries with similar or greater total voltage. Short term I'd just like to get this rolling again.
Advice?


