2WD Electric Yuba Mundo Build

BB7 Installation

I installed my BB7s this week. (Yahoo! :)) They work great and the super easy adjustment certainly lives up to the reviews. This was a huge improvement and well worth the trouble of pulling battery boxes, sideloaders, torque arms, and wheels. I was also pleasantly surprised to find the rear torque arm and the necklace of assorted washers, spacers, and nuts on the phase wires slipped through the rotor without needing to unsolder the connectors.

But, as per normal, the Mundo threw in a twist - the BB7 185mm does not install properly in the rear using the special Yuba adapter (which is for 180mm rotors) that accommodates the Mundo's non-standard caliper mounting tabs. So, after a bit of monkeying around and checking to try to avoid having Bad Things happen, I got them installed using the stock Avid caliper adapter and a shim. Here's a link to a post about the procedure: Yuba Mundo BB7 Disc Brake Installation. Considering the odd Mundo mounting tabs, this frankly doesn't seem like it should have worked, but....
 
Stunningly good build! I'm jonesing for that rear light cluster - the two turn signals and brake light!
 
It is a beautiful build with a lot of great ideas to share.

I picked up a 120 tooth blade for my chop saw similar to the one mentioned in this thread. I had been wanting to do that for some time but reading about it in this thread prompted me to go ahead and do it. The blade I got is an Oshlun from Amazon. This is the non ferrous and plastic cutting type for a 12" saw. I also got some blade lubricating wax.

This blade cuts aluminum like butter. Almost no noise or vibration. Excellent!! :D

edit - fixed spelling of Oshlun
 
Thanks guys - appreciated!

Alan B said:
The blade I got is an Oshun from Amazon. ... This blade cuts aluminum like butter.
I'm thinking you are talking about the Oshlun SBNF-120120 which seems to have a tri-chip grind similar to that of the Freud. This is a more economical blade than the Freud and it's great to hear it performs so well. Thanks for the heads-up! :)
 
Oops – Rear Dropout Washers

While pulling the wheels to install the disc brakes, I had a chance to check the torque arms, etc. The front looked the same as when installed, but the rear wheel installation showed dishing of the SS washers placed inside the dropouts to prevent the small diameter BMC shaft from sinking into the dropouts.

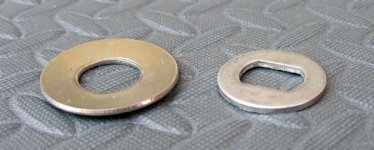
The rear dropouts have a shallow indentation on the inside with the same shape as the slot but about an inch wide. The washers that I had on hand were fairly large and bridged the indentation, but I figured they would squash down sufficiently when the axle nuts were tightened. Well, sort of. They actually dished quite a bit, and although nothing came loose or deformed, only a small portion of the face of the motor shaft is actually contacting the dished washer face.

I had ordered some cutout SS Safety Washers (pn: EBK-IS-WSHR) from E-BikeKit for another build and so popped one onto the Mundo axle in place of the larger washer -- a perfect fit into the dropout indentation. I left the original washer on the side with wiring because I didn’t really want to unsolder connectors, etc, but I did replace the washer on the derailleur side.

The e-BikeKit washers appear to be a very effective choice to support the rear motor shaft inside the Mundo rear dropouts... :)

27-02.JPG
 
I have been riding 2 hours daily for last 3 months and yuba saddle started to get real painful after a while. So replaced mine with a brooks flyer springed saddle and couldn't be happier (also looks great on the yuba ... pic at ourgaia.net). Excellent work, bit too heavy for my liking but horses for courses.

Congrats, glen

PS where did you get the mirror from?
 
glend said:
I have been riding 2 hours daily for last 3 months and yuba saddle started to get real painful after a while. So replaced mine with a brooks flyer springed saddle and couldn't be happier (also looks great on the yuba ... pic at ourgaia.net)
Thanks for the Brooks eval. I like the looks of the Brooks as well but have been looking at the Gyes knockoffs. I haven't ordered anything yet - but I'm leaning towards the Black Black GS-07 or Black GS-12. I'll probably take the plunge before summer - more waffling is in order first :)

glend said:
PS where did you get the mirror from?
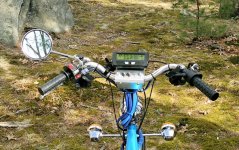
It's a clamp-on motorcycle 3 7/8" mirror from eBay ('KEN SEAN UNIVERSAL MOTORCYCLE MIRROR CHROME') with 8" stem pn 951038. It's a nicely made mirror, but frankly I can't recommend this clamp style which is known to have problems holding adjustment regardless of manufacturer. To prevent the stem from rotating in the threaded clamp pin, I drilled and tapped the center of the round end of the pin to accept a 5mm SS set screw. I discarded the steel clamping sleeve that was supposed to accomplish that. To prevent the clamp pin from rotating in the handlebar U-clamp. I outfitted the pin with star lock washers on each side of the U-clamp (no flat washers at all). It works fine now but an alternative is to use a 10mm clamp-on mirror adapter for 7/8" bars (eBay 'motorcycle mirror adapter') allowing use of any motorcycle mirror.


I've always used the slightly rectangular mirrors which have a very good field of view but went with the round one this time for the retro look. To compensate, I looked for a large diameter one that was near 4" and it's worked out well - can't imagine riding without one.
 
Here's a quick shot to give you some idea of the reach of an 8" mirror stem. My bars have a lot of stuff on the left which eats up stem length - this one works fine in shirt sleeves, but I do sort of wish for a bit more stem - it's a tad shy when wearing a bulky winter jacket.

28-04_iv300.jpg
BikeMaster has some interesting choices if you go with the adapter above. Beware of Yamaha right mirrors - these have a reverse 10mm thread - see BikeMaster Mirrors for size info, etc - these are available from many sources - including over the counter at your local motorcycle shops.
 
Had a question for the yuba riders now that I have ridden mine some under pedal power. Still waiting for some things to electrify.

Anyway I find the sweeping handlebars to feel weird. My Giant i ride now has a bar straight across and I feel more in control. What do you guys
with yuba's think about the handle bars any comments ?

Also thanks again for the brake posts I need to run the cables , but I have my bb7's seated and level now looking good.
 
ohzee said:
... I find the sweeping handlebars to feel weird. My Giant I ride now has a bar straight across and I feel more in control. What do you guys with yuba's think about the handle bars any comments?

I do only light pedaling (sometimes none) and so the bike is really set up for comfort not for good kinetics to maximize pedaling efficiency. But this is like saddles - kind of a personal thing. I prefer to ride in an upright position and also prefer a wider bar with a downward cant to the grips like many motorcycle bars - no weight on the hands, no stiffness from the throttle, etc. In the unloaded unpowered state the Mundo is pretty nimble as cargo bikes go, but loaded, I think you will appreciate the leverage and comfort from wider bars. Unless you are passionate about a particular configuration, I would hold off on changes until you get power and ride it a while.

ohzee said:
Also thanks again for the brake posts I need to run the cables , but I have my bb7's seated and level now looking good.
Excellent news! I'm sure you'll like them as much as I do :)
 
Anybody else see this?
http://everydayadventurers.com/2012/03/the-edgerunner-series-the-future-of-the-cargo-bike/

Looks like Xtracycle is teaming with Justin to make an e-cargo bike.
 
Very interesting!

Ben Sarrazin seems to have made quite an attractive and successful one-size-fits-95%-of-folks bike with the Mundo as a pedal-directed re-evaluation of the Big Dummy product, but converting it to an ebike is not all roses. The eMundo is clearly an evolutionary afterthought.

It will be interesting to see the Xtracycle take on a cargo bike designed specifically as electric, although I suspect they will leverage the bulk of the existing Big Dummy/Xtracycle add-ons. It would be nice if it has some sort of in-frame battery solution other than just an eZee battery slide-in behind the seat.
 
This is an incredible build log, wow. Very nice work on the build itself.
 
Oh, you're in CT, whereabouts? I'm from the central area, loved the number of secondary roads in CT, never get bored road biking there. Now I'm down in TX enjoying a better climate.
 
Yea I have read that Ohio now has more paved trails then any other state.

I know you can go from Cinci all the way to Lake Erie on paved path.. It's not far from where I live that's why
I wanted the yuba so I can load it down with everything I want and go away for a few days..
 
teklektik, this Yuba Mundo build is incredible. You sure can't argue with the cargo capacity and plenty of places on the bike with which to install the ebike components. Your use of the nice blue wire loom, heat shrink and aluminum is incredible.

Two questions:
1) How do you like the Thudbuster seatpost? (my apologies if this is in the thread somewhere already, I didn't see any mention.)
2) Do you plan any future mods to make the existing battery boxes more compact, add more range, etc? Anything about the bike you would change, whether it's a "do" or "un-do"?

JKB
 
Thanks for the kind words - it has been an enjoyable build.

jkbrigman said:
1) How do you like the Thudbuster seatpost?
Love it! Please see: Ride Fixies.

jkbrigman said:
2) Do you plan any future mods to make the existing battery boxes more compact, add more range, etc?
Yes, I've been riding with three different battery configurations: 16s2p, 20s2p, 16s3p to see how the bike handles and how the range/speed fit with my typical trips. With changing seasonal temperatures and Other Things in Life, good comparisons have been a little slow in coming. But - I'm about to pull the trigger on the new battery enclosures - posts coming this spring. Please see: Batteries, Enclosures.

jkbrigman said:
3) Anything about the bike you would change, whether it's a "do" or "un-do"?
A few things - mostly it's worked out really well - a pleasure to ride :). Please see: Project Checkpoint - Quickie Assessment.
 
Thanks so much for this detailed build log. I'm about to pull the trigger on a V4 Mundo, and your thread has answered so many questions. I know when you contribute the large amount of time to log a thread like this, you've got to hope someone finds it useful! You've done so many awesome things. Your cable routing through the tube is one of my favorites!

I'm looking at installing a single rear MAC much like your BMC, perhaps an 8T on 12s LiPo. Expect to see many of your great ideas imitated!

Thanks again!
 
I'm delighted that the thread has proven helpful :)

GMUseless said:
Your cable routing through the tube is one of my favorites!
I found it easiest to push the wiring up the top tube from the butt end between the seat stays (bike inverted) and hook the wiring with a hook-shaped dental pick when it appeared under the elongated hole near the head tube. Lots of extra wiring length at each end was trimmed down appropriately after bike was righted and other components fitted.

GMUseless said:
I'm looking at installing a single rear MAC much like your BMC, perhaps an 8T on 12s LiPo.
I do the bulk of my riding using only the single rear BMC (just crossed the 1500 mile mark) and I'm sure you will be pleased with the performance of your motor/battery choice - particularly since your LiPos will weigh a bunch less than my Headways.

For what it's worth, I can tell you that I have been running with 20s2p (66v@20Ah) and expect to finalize the build with this configuration. 60v seems to be the rule of thumb max for the BMC to keep it from self destructing without CA limiting, but since the CA is generally in control, this slightly over the top voltage works pretty well. The increase in available Whrs translates into additional range without upping the parallel cell count, the higher voltage gives better performance in the cold weather when cell resistance increases, and when running without CA limiting, the higher voltage gives a few extra mph which makes occasional traffic sprints a bit nicer. The 16s/52v is great, but since the 20s configuration is within my packaging constraints and the cells are in hand, I think I'll be going that way for the reasons above and to build in some extra headroom to absorb normal aging of the batteries. I'll be putting together a post or two about this in coming weeks, but this is sort of the short form preview in case it affects your imminent battery purchase :wink:

Best of luck with your project!
 
GMUseless said:
Thanks so much for this detailed build log. I'm about to pull the trigger on a V4 Mundo, and your thread has answered so many questions. I know when you contribute the large amount of time to log a thread like this, you've got to hope someone finds it useful! You've done so many awesome things. Your cable routing through the tube is one of my favorites!

... Expect to see many of your great ideas imitated!

I second GMU...your work on this build is incredible. Lots of forethought, creativity and skill! I pore over every word and photo....
 
Houston - We Have a Problem...

As mentioned in an earlier post, I smoked the front controller a while back. This happened while puttering along a bike path on the front motor (rear clutch was acting up). Ilia at Ebikes SF wasn't concerned since these old Crystalyte controllers are known to give up the ghost unexpectedly for no apparent reason. However, a month or so later, the front controller shorted a FET again - this time when both motors were engaged. This was genuinely suspicious and also very odd, since the front motor spends most of the time disabled and the front and rear are wired identically with the exception of the length of the phase/hall wiring. After replacing the controller again (Thanks Ilia!) I decided to be careful to crank the throttle closed before switching on/off a controller/motor.

Yesterday, the front controller shorted a FET again when walking the bike up a step with both motors engaged (Big Sigh).

Needless to say this is very puzzling since the failures are not occurring under stress, but seem to occur during light use and are occurring on the controller that is seldom in service. If the rear controller was failing as well, then some fundamental electrical design flaw in the build would appear more likely, but as it is, the only material difference between the two controllers (other than the phase wire length) is use-oriented: the front controller logic is powered up and down while underway and the rear controller logic always remains on.

Bench voltage measurements of the harness/controller wiring have not been not illuminating and instrumentation of the internals of the controller for active monitoring during use is problematic - particularly for such intermittent (although catastrophic) failures.

At this point my operative theory is that the controller logic is failing because the current build design uses the 'logic enable' control line as a means to enable/disable the motors on the fly instead of simply as a onetime pre-ride power-up feature as intended by Crystalyte. Presumably, some component stress/damage occurs and sets the stage for a later failure under seemingly innocuous circumstances. Although an analytical resolution would be comforting, the current plan is to revise the build design to eliminate this potential operational trouble spot by leaving both controllers powered up regardless of the enable/disable state of the motors. Although there is no hard evidence that this will be The Remedy, it is easy to implement and will eliminate a noteworthy problem variable if failures continue. Ilia is on board with the plan and is going to try some bench power cycling to try to induce a similar failure.

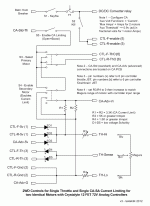
The diagram below shows a modification that uses the motor control switches to manipulate the controller 'Throttle Override' inputs (used by the CA) to disable motors by replacing the normal CA override signal with Gnd to suppress the operator throttle voltage. This requires a rebuild of the tiny electronics board, but other dashboard and handlebar wiring is unaffected. All existing switch functionality is preserved. (Original design here.)
controls_v3.gif
Since tax preparation is eating available time this week (too much bike riding = procrastination :) ), my plan is to swap in a new controller and temporarily run the bike with both motors always engaged until I can tack together a new board. If nothing else, it will be peppy!

News to follow... :wink:

EDIT: A new circuit design was implemented and installed at the same time as the CA v3 upgrade. See this post.
 
Thanks! I'm very pleased that you found it interesting. The build itself was fun (obviously a tinkerer at heart) but I can't tell you how much I enjoy riding this bike. I just finished a couple of 50 mile trips down some nearby Rails to Trails bike paths in a bit of warm weather we had - really nice. I'm a little bummed by this current controller snafu, but I'm hoping these revisions will cure these little Crystalyte hissy fits...
 
Back
Top