Brakes

-dg said:
full-throttle said:
Floont said:
I see no significant disadvantage due to weight between hydraulic and cable actuated disc brakes.
An extra 500g per wheel. You decide. I'm just pointing it out.

Could you please provide a link to a hydraulic disc system that is 500g lighter per wheel than, for example, an Avid BB7?

Avid Juicy hydraulic disc 395g with 85cm hose
Avid BB7 mechanical disc 329g, Avid Speed Dial lever 88g, cable + housing 62g per 85cm, total 479g

Equivalent systems by the same manufacturer, 84g weight difference per wheel. Cable actuated is cheaper.

He's wrong.
 
full-throttle said:
Hillhater said:
One major point overlooked on disc brakes is the huge extra loading they put on the spokes and rim nipple sockets as all the braking loads are transferred through the hub, spokes and nipples to the rim and tire.
Rim brakes leave the spokes and nipples to their intended role of supporting the rim.
Disc brake compatible rims are designed for the extra load. Not an issue if the wheel is properly built. Rim brakes also stress the spokes, so does pedaling/motoring.
you are either ignoring , or avoiding the issue of braking torque on the spokes.
All brakes put "extra" load on the spokes ( weight transfer etc), but hub brakes rely on the spokes to transfer all the braking torque to the rim.
That is NOT the case with rim brakes
So, another "con" for disc brakes is they require special rims and spokes ...according to yourself !

full-throttle said:
Hillhater said:
Loose and broken spokes as well as wheels out of true become a more frequent issue with heavy use of disc brakes
Are you saying rim brakes tolerate those issues better? :lol:
No ! ..im saying the extra braking loads on the spokes etc cause more frequent issues with loose and broken spokes as well as wheels out of true.
 
Today I demonstrated a fallacy of the marketing hype about disc brakes.

I rode my bike equipped with an Avid Mechanical (ancestor of the BB7) disc in the back and a nice new BB7 with 200mm rotor in the front. The BB7 is freshly installed, in service just a couple of weeks, and is nicely broken in to the point of being relatively quiet, with no scraping or singing in normal conditions.

I rode home from work to get some refreshments early this evening, and on the way there I was caught by a terrific downpour that soaked me to the skin in just a minute or so.

I was disappointed, but not at all surprised, that the new Avid brake changed its behavior dramatically when wet, honking like a mournful goose and losing much of its braking power. In its loss of braking power when wet, it was very much like a rim brake-- which it is, only with a tiny surrogate rim made out of material that has a lower coefficient of friction than aluminum.

While I was at home, I switched out to my old reliable rain bike equipped with Sachs drum brakes. It braked the same way in the rain on the way back to work as it does in the dry, or in summer heat, winter cold, fog, sleet, whatever. That is exactly what discs are claimed to do, but in fact they do not.

My first disc brake, an early 1990s Mountain Cycle Pro-Stop 9" full-floating hydraulic unit, honked and lost power in the wet. I attributed this to first-generation technical teething issues, because the marketing spin about discs in that they are totally impervious to water and even mud. But it turns out they are by nature open systems, and as such they are affected by moisture and contamination as easily as any other open systems, and in similar ways.

Here's something that the manufacturers and advertisers don't tell you: Things that can get wet, get wet in the rain. Brakes are affected by water on their braking surfaces. The fact that you have a mini-rim sticking out to the side of your real rim does not exempt it from these basic principles.
 
You should get a young guy in the shop fit your brakes :lol:

I don't have any problems with my Avids in the wet and neither has this guy (but he's got real bike mechanic working for him)
[youtube]EqYgAX6D43Q[/youtube]
Watch the bit @ 2:32
 

Although I value Chalo's comments on open-system braking mechanisms, I must say that video debunks the myth that muddy, wet disc brakes fade significantly due to road/terrain conditions.

I would not be surprised by a small amount of fade, but nothing overly significant.

FA
 
Now what about doing that on a 1980's bike Chalo! Same applyes to riding down that on a motorcyle with canteliver brakes. Or a rigid fat tire bike with rim brakes :shock:
 
I know BB7's have been brought up before, but keep them dry and they will perform! I was not expecting much out of a mechanical brake that cost right around $100. But when I first gave them a shot, I was floored by the breaking power they had. Comparing them to $400 brakes I saw, I was doubtful about how these things would work well. But they do.
When wet, they do squeal like hell though. But what are you going to do?
 
Whenever you have a great abundance of braking power, you can afford to lose a lot of it to wetness or other contamination. That's the same for rim brakes as for discs. I have some rim brakes that will stand my bike on its nose no matter how wet the conditions. It's just that they are even stronger when it's dry.

The real test of a bicycle brake isn't any kind of racing. Bicycles don't have such abundant power that they have to burn off high speeds for every corner like a motor racer. Downhill racing bikes were the entry point for today's generation of disc brakes because such bikes need powerful momentary braking (not sustained braking for the most part), and they must cope with bashed-up rims on a normal basis. Discs are more forceful than drums, and more tolerant of damaged wheels than rim brakes.

The hardest job for bicycle brakes is tandem touring. You have the weight of two riders and a double load of luggage, the aero resistance of roughly one rider, and a bike that's too long to tip up under forceful braking. Recreational touring often happens in mountains. If you check out what kind of brakes touring tandems use, you'll find that they still use mostly rim brakes, sometimes with a drum added as a drag brake for long descents. There are discs here and there because that's the fashion of the day, but discs have not been able to prove themselves advantageous in that most difficult application. A tandem's heavier than normal wheel makes its rim brake more capable (with more thermal mass in the rim), but has no effect on a disc's power.
 
bzhwindtalker said:
Now what about doing that on a 1980's bike Chalo! Same applyes to riding down that on a motorcyle with canteliver brakes. Or a rigid fat tire bike with rim brakes :shock:

Honda's race bikes with linear-pull rim brakes had to pull down from 140mph for corners. I'd say that takes more than any bicycle brake provides. But they used them for multiple seasons of racers, so they must have found them satisfactory enough.

If the conditions in that video are like those of your commute, then by all means use suspension and hub brakes to do it. But my riding, and that of almost all of us, is on streets almost all the time. On my continent, good roads were first built for bicycles, after all.

Riding a specialty bike like that on the street at regular city-street speeds is like wearing a wingsuit to the office. Sure, you can do it, but it doesn't do anything beneficial for you, it wastes a lot of money in the process of not doing anything beneficial for you, and it makes you look like an Xtreme dork. And pretending that you might go skydiving at any moment when in fact you don't, is a genuinely dorky thing to do-- just like the folks who use electrified downhill racing bikes to ride on quiet side streets and bike paths at 20-something mph.
 
Chalo said:
Honda's race bikes with linear-pull rim brakes had to pull down from 140mph for corners. I'd say that takes more than any bicycle brake provides. But they used them for multiple seasons of racers, so they must have found them satisfactory enough.
If those Honda brakes were so great why no one used them in the last 50 years??
 
How about some tip and tricks for maintenance and adjustments for all brake types, cause currently I have a bike with rim caliper, centre pull cantilever, side pull Vee, drum and one with disc so not so much about choosing a brake type but dealing with what I have
 
dingoEsride said:
How about some tip and tricks for maintenance and adjustments for all brake types,
I'd go here first:
http://sheldonbrown.com/brakes
 
I been looking at some of the dedicated ebike hydraulic brakes but I think I like the idea of just buying any regular hydraulic bike brakes and putting in sensors.
Any one tried these sensors for ? http://www.aliexpress.com/store/product/E-bike-hidden-wire-brake-sensor-wholesale-very-very-hot-products/705369_387037952.html
They seem to be on a lot of the dodgey chinese sites.
Failing that has any one used these ones from BionX for any regular bicycle hydraulic breaks? http://www.ebike-easy.com/products/Bicycle-Parts/BionX-Press-Switch-for-Magura-brakes.html
 
bzhwindtalker said:
Now what about doing that on a 1980's bike Chalo! Same applyes to riding down that on a motorcyle with canteliver brakes. Or a rigid fat tire bike with rim brakes :shock:


penny-farthing with spoon brakes ftw.


Chalo said:
If the conditions in that video are like those of your commute, then by all means use suspension and hub brakes to do it. But my riding, and that of almost all of us, is on streets almost all the time. On my continent, good roads were first built for bicycles, after all.

Riding a specialty bike like that on the street at regular city-street speeds is like wearing a wingsuit to the office. Sure, you can do it, but it doesn't do anything beneficial for you, it wastes a lot of money in the process of not doing anything beneficial for you, and it makes you look like an Xtreme dork. And pretending that you might go skydiving at any moment when in fact you don't, is a genuinely dorky thing to do-- just like the folks who use electrified downhill racing bikes to ride on quiet side streets and bike paths at 20-something mph.

a dh ebike isn't a specialty bike.
it is the exact opposite, the ultimate general purpose 2wheel machine.
it is the closest thing yet to a go-anywhere, do-anything, true ATB not bounded or restricted by curb or stair.
a point & shoot vehicle that will take me wherever, whenever my heart desires is the prime benefit for me.
as for looking like an Xtreme dork, i do anyways just standing there breathing, so no loss there.


full-throttle said:
Chalo said:
Honda's race bikes with linear-pull rim brakes had to pull down from 140mph for corners. I'd say that takes more than any bicycle brake provides. But they used them for multiple seasons of racers, so they must have found them satisfactory enough.
If those Honda brakes were so great why no one used them in the last 50 years??


my guess, con #4, rim wear.
for me that's the only incentive to go with a disc.
the wear element should be a separate & replaceable maintenance item.

back in the day when rims were made of steel, rim wear wasn't an issue for the life of my bike.
but now with alu rims i've ground the wall down exposing the seam enuf times to switch, on the front at least.
i think discs on the rear are kind of a waste since v-brakes lock the wheel at the slightest touch & provide little braking anyways.
and with regen in the back, having rim brakes that don't get used that much as a backup i can live with.
 
TheBeastie said:
I been looking at some of the dedicated ebike hydraulic brakes but I think I like the idea of just buying any regular hydraulic bike brakes and putting in sensors.
Any one tried these sensors for ? http://www.aliexpress.com/store/product/E-bike-hidden-wire-brake-sensor-wholesale-very-very-hot-products/705369_387037952.html
They seem to be on a lot of the dodgey chinese sites.
Failing that has any one used these ones from BionX for any regular bicycle hydraulic breaks? http://www.ebike-easy.com/products/Bicycle-Parts/BionX-Press-Switch-for-Magura-brakes.html
A simple switch on the brake leaver is prob just as good. I've got some sealed micro switches if you need. I prefer a normally closed design approach, so it doesn't interfere with the brake.
 
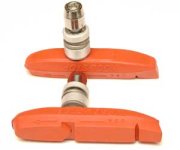
Thanks Aw, although i was aware of Sheldon Brown and his site that is so full of information just thought with so many experts here that maybe could throw some tips into rim brake pad adjustments similar to these

supra2.jpg

My problem is getting all the angles right while trying to tighten the holding bolt but

This gets close

Shoe Adjustment
Brake shoes can be adjusted in 5 different directions:
Height
This is the most critical adjustment. The shoe should contact the rim fully, but not overlap it. If the shoe is set too high, it will rub on the tire, destroying it very quickly. If the shoe is set too low, it can "dive" under the rim and get caught in the spokes, causing dangerous wheel lockup.

Most rim brakes have a slot in each brake arm. Height is adjusted by sliding the brake shoe post or eyebolt up or down the slot. Different brakes have different ranges of adjustment. Sometimes, getting the height correct may require replacing a brake.

On mountain bikes with narrow rims and big bulgy tires, it may be quite difficult to get a good height adjustment with a cantilever brake, which has frame or fork-mounted pivots below the rim. The shoe may clear the tire when the brake is engaged, but it may rub on the sidewall of the tire in its rest position.

With these cantilever brakes, as the brake shoe material wears down, the shoe hits lower and lower on the rim, increasing the risk of "diving" into the spokes. With other rim brakes, the shoe migrates up toward the tire. Periodic checking is in order.

also may he be enjoying his ride somewhere

450px-SheldonBrown.jpeg
 
dingoEsride said:
My problem is getting all the angles right while trying to tighten the holding bolt
On bad days when I can't really hold a pair of needlenose or other pliers, I use a pair of vise-grips to hold the pads on the rim in the right spot, one on the front and one on the rear end of the pad set, with a piece of plastic about as thick as a credit card on the rear edge (to help give toe-in), while the holding nut/bolt is loose. Then I tighten the holding nut/bolt.

Just don't set the vise-grips too tight or you can crush the brake pads or your rim. :lol: If possible put them pretty close to teh brake arm since most pads seem to be stiffer there than on the ends, especialy the longer thinner types.


If I am building a bike or a wheel up the first time, I will do this without the tire on there cuz it's way way easier to see WTH I am doing, but I am way too lazy to take the tire off just to setup the brake pads. ;)


Oh, and what SB says about brake dive under rim--absolutely be careful about that, cuz I have had that happen when I wasnt' careful enough to set them up right, or I didn't have the holding bolt/nut tight enough and they wandered. (or in one case, at Undead Race 2010, where the front motor wheel must've wiggled in the dropouts a little bit, sideloading in a turn plus braking pushed one pad under the rim and the other pad slightly into the tire, scraping it up).
 
dingoEsride said:
Thanks Aw, although i was aware of Sheldon Brown and his site that is so full of information just thought with so many experts here that maybe could throw some tips into rim brake pad adjustments similar to these

My problem is getting all the angles right while trying to tighten the holding bolt

Not all rim brakes require toe-in to be quiet. Start with little to none, and if that works, you're all set. Pretty much all of them will naturally wear an appropriate amount of toe-in as the pads abrade away. Use only as much toe-in as you must, because it adds mushiness and reduces pad clearance from the rim. The less you can get away with, the better.

Most Kool Stop pads and some others come with a bump or raised edge on the rear of the pad when new, so it holds its own toed-in angle while you gently tighten it down. Here's how I do it with most linear-pull brakes and caliper brakes, where the pad has some angle adjustment built in:

First, I lightly snug the pad at about the right height on the rim-- near the top edge for cantilevers and V-brakes; near the bottom edge for centerpull calipers, U-brakes, and the short side of a dual-pivot; and near the middle for single-pivot calipers and the long side of a dual pivot. I only tighten it just enough to keep it from moving around.

Then lightly pull the brake lever with my left hand. I bring the pads to the rim so they'll grip it as I fine-tune the adjustment with the other hand. At this point I compensate for the brake's tendency to swing up or down from the force of drag on the rim. Center bolt mounted calipers swing toes up. Cantilevers and V-brakes swing toes down. I bias the pads so that they align to the rim when braking. Then if the height on the rim is still good, and the pad faces are flat against the rim, I snug them down just a bit more firmly. I don't want them to twist in the direction of fastener torque.

Then I let go of the brake lever, and I use my left hand to hold the pad as I tighten it fully, to keep it from twisting around. It is at this point that I'll apply some English to the wrench and the pad to toe it in (if I think that it needs toe-in).

For me, after some twenty-five years and way too many brake adjustments on thousands of bikes, this method works maybe three times out of four attempts. I often have to try it again, and sometimes I try again anyway because I want to further refine the amount of toe-in.

Depending on the specific brake, this procedure can be fussy and frustrating-- but never so much as trying to true a warped disc rotor.
 
Thanks Chalo & Amber, they can be tricky little suckers so any advise is welcome and heeded, and once set up right they do give good stopping power and you do need that especially on e bikes, the avid disc brake bike I have slows good too but do howl a bit while braking but different pads seems to help and maybe a touch of emery paper on discs
 
Whew Chalo! that was a well written tutorial on how to adjust rim brakes. I do the same. The only thing that I could add is that if you are working with the least efficient rim brake- the side pull, the BMX bikers use clear pads. The brand Bachelor Pads are the only pads that would work great for me on a low speed cruiser build. The pad compound is so grippy that it makes noise, no matter how you adjust them.
 
full-throttle said:
Yes, Beavis and Butthead it was a typo. It is still heavier.

Chalo said:
Cable actuated is cheaper.
Hydro: AU$48
http://www.chainreactioncycles.com/Models.aspx?ModelID=85972

Cable: AU$46 + AU$10 + AU$13 = AU$69
http://www.chainreactioncycles.com/Models.aspx?ModelID=67747
http://www.chainreactioncycles.com/Models.aspx?ModelID=22388
http://www.chainreactioncycles.com/Models.aspx?ModelID=47551

Cable is more expensive

YOU are wrong
Yeah been looking at some 29er bikes and some are just as cheap with with hydraulic then getting a cabled one.
One of them even has the Avid Elixir model.
So yeah been thinking its kind of dumb to get cabled if a practical solution can be done with Hydraulic brakes.
 
Back
Top