You are using an out of date browser. It may not display this or other websites correctly.
You should upgrade or use an alternative browser.
You should upgrade or use an alternative browser.
Custom_CHRoMo_CRuiSER
- Thread starter AussieJester
- Start date
AussieJester
1 TW
Idontwanttopedal said:I got a 18fet controller and the ca plugs into it. It uses the shunt in the controller
Firstly, this isn't a stock 18fet Infineon, it doesn't have a connector for CA built on it
secondly, the CA i have was a beta release Justin did specifically to hook to a RC ESCs
so i don't know if it will run properly or how i am to connect it all up complete
on a e-bike controller... I have an external shunt that was used with the RC ESC
the throttle wiring is amongst the cabling BUT i also used the current
throttle option i forget if this is on/off capable?
Off to look for info on that now as wiring is about to begin!
I went and picked up my Phone last night, so pics will be upped this arvo!
Be NO wicker basket on this bike, i leave the gay shit to Hyena, he will likely
have wicker basket on his Stealth fighter whilst wearing an assless bunny outfit
as he delivers the eggs to the kiddies :-|
Back soon chaps
KiM
Farfle
100 kW
The rc ca fan be hooked up like any other. You just have to get in and solder some wires. Ill write up a lil diagram for ya
AussieJester
1 TW
Farfle said:The rc ca fan be hooked up like any other. You just have to get in and solder some wires. Ill write up a lil diagram for ya
That would be very appreciative mate, i haven't gotten to it yet i just fitted main power switch
or should i say tried to, the damn gear change setup is in wrong spot so had to 'attend' to that lunch now then wiring... thanks buddy
KiM
Farfle
100 kW
I sent ya a PM, won't be able to get the CA-LRC wiring diagram until tomorrow. But the controller end of things should keep you busy till then 
AussieJester
1 TW
Cheers for that Farfle ma man, BIG help indeed shall soon let you know how
i getz on, hopefully with minimal sparks and lots of revs LoL
I just got in the door, had the interview regarding the public speaking 'job'
i'm taking on, good news its $120 an hour plus travel expenses so should
be good 'pocket money' for future projects...
So... pictures, i had the girlfriend take these when she came around to pick me up yesterday
arvo, as of now this is where i'm at-->
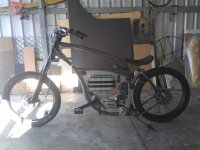
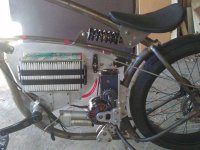
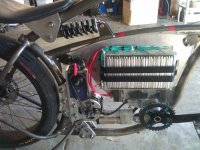
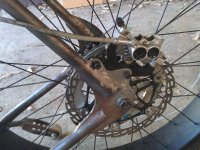
^^new brake caliper mount added!

^^And the 'mandatory' yours truly on the bike shot...gets Jay all excited
Ride video very soon folks, been a bit of a broken day for me but i'm getting motivated
now to jump into some soldering... Few hours work for me, as i will sleeve all the wiring
not just solder and tape it up like Hyena does
Back with more soon, thanks again Farfle major help my friend
KiM
i getz on, hopefully with minimal sparks and lots of revs LoL
I just got in the door, had the interview regarding the public speaking 'job'
i'm taking on, good news its $120 an hour plus travel expenses so should
be good 'pocket money' for future projects...
So... pictures, i had the girlfriend take these when she came around to pick me up yesterday
arvo, as of now this is where i'm at-->


^^new brake caliper mount added!

^^And the 'mandatory' yours truly on the bike shot...gets Jay all excited
Ride video very soon folks, been a bit of a broken day for me but i'm getting motivated
now to jump into some soldering... Few hours work for me, as i will sleeve all the wiring
not just solder and tape it up like Hyena does
Back with more soon, thanks again Farfle major help my friend
KiM
Farfle
100 kW
Ok, bear with the poor photochop, I did it on my phone while hauling ass over a mountain pass lol. (Rding shotgun. Gf is at the wheel )
What you want to do is move the green wire at the top to the th pad
and if you are not using the wheel sensor, then move the yellow wire to the sp pad.
Plus, you can remove the three throttle wires at the bottom to clean things up.

What you want to do is move the green wire at the top to the th pad
and if you are not using the wheel sensor, then move the yellow wire to the sp pad.
Plus, you can remove the three throttle wires at the bottom to clean things up.

Farfle
100 kW
If you don't need the throttle limiting features to work, and have a wheel sensor, then you don't need to crack open the CA at all. Just run your sensor and hook up the B+, B- and the two shunt wires. (The blue wire goes with the black B- and the white goes on the other side of the shunt)
Idontwanttopedal
1 kW
Can't wait to see video of this running. Nice workaday always on your builds
AussieJester
1 TW
Idontwanttopedal said:Can't wait to see video of this running. Nice workaday always on your builds
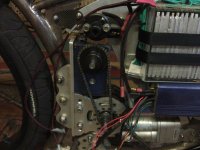
Cant wait to shoot it right now i'm up shit creek without any solder speeeeewin' ran out round lunch time have half the wiring finished all wires sleeved with black cable sleeving looks schmick...I have a
pre-charge resistor setup on my main switch also another first on one of my e-bikes i
have used a FUSE on the battery wiring!! -->
Apologies for the blury picz :-(
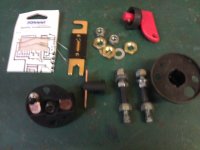
View attachment 3
I used liquid tape to cover the exposed metalz..Lovz electric tape
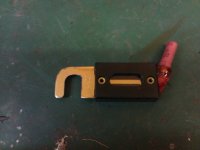
^^250amp fuse, if it blows while riding i will have more issues than the fuse i know, but
if i need to i have made a solid wire i can connect to switch/battery
to get home...
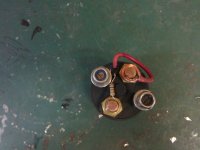
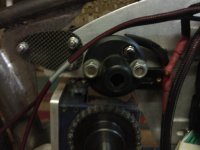
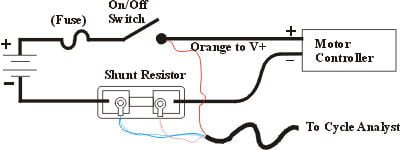
Farfle, or anyone that knows
as per Justin's instructions at the time it has the wiring as per you instructed Farfle, i think...
just wanted to run it by to make sure i have it correct, two black wires i.e negative power, and current measuring leads B- and shunt - / S- I am unsure where i hook these on the CA
lead, obvious ..i think? one (B-) goes to the black wire on the CA? but what about the (-/S)
the second black wire, where do i hook this on the CA lead? I have the rest right...i think?
I run a red wire on the positive power battery wire then a white wire on the negative wire
controller side on the shunt and a blue wire on the battery side on the shunt
then connect these to same coloured wires on CA lead...correct?
Soz for the noobness...i checked the diagrams on ebikes CA and it confused me a lil more
:-| I should know this shit, pissess me i'm so dense with electric stuff aaaagh...
While i have everyones attention lol...by that i mean Farfle LOL ... buddy, you mentioned in PM
the throttle overide connections i.e the green wire. I run this too the signal wire on the throttle
while checking the ebikes.ca website i spotted a diagram explaining the connection
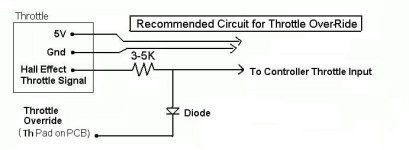
However, it shows a diode in the mix along with a current limiting resistor in the 3-5k
My question, what size diode do i use?
Cheers in advance guys, still kicking myself i ran out of solder tellz ya... Can pick
some up first thing, hoooopefully i can get some forward motion come tomorrow
arvo, i only have tomorrow before i head north to do some roo shooting on my girlfriends
fathers farm sooo, pull the ol finger out and get a carry on i shall!
KiM
Spicerack
10 kW
Its lookin good there Kim. No nipples this time either! 
Well done with the job too- it's really good to have a bit of money coming in hey!
Well done with the job too- it's really good to have a bit of money coming in hey!
Farfle
100 kW
The other shunt wire goes to the blue ca wire. and as for the diode, pretty much anything will work
AussieJester
1 TW
Thank you again Mr Farfle  it's 5-30am I'm laying in bed watching the minutes tick by, chomping at the bit too catch a cab to Jaycar for more solder aaaargh, damn it!
@Andy..rofl..and I thought it was only Jay that wanted the nip slip
pics :-| .. is there something your not telling us...oh wait hang on, haha silly me you have a frock motor of course your info guys
back with more this arvo fellas, and Andy... aaand Jay
KiM
edit: dam predictive text typos
@Andy..rofl..and I thought it was only Jay that wanted the nip slip
pics :-| .. is there something your not telling us...oh wait hang on, haha silly me you have a frock motor of course your info guys
back with more this arvo fellas, and Andy... aaand Jay
KiM
edit: dam predictive text typos
AussieJester
1 TW
Sorry Thud & Farfle and dedicated followers, I'm not going to get the bike done this weekend...I'm not willing to compromise the "form" side of the wiring, pet hate, messy wiring, if its visible absolutely must have sleeving so takes me forever, I have done the shunt, thanks again Farfle, bought solder and assorted shit this morning tried my best to get it completed but got a call around 1Pm from a mate inviting me or for drinks hey I'm Aussie Deportable offence if I say no  and lunch, Soooo, how could I say no lol...aaaaand..... KiM is off roo shooting first thing tomorrow and won't be back late Monday night...sorry peoples..but we its close...promise midweek fellas..missus is kicking my ass to, to get this finished so she doesn't have to keep driving me around...
KiM
KiM
AussieJester
1 TW
So close i teased myself..motor is running wiring 99% done....
KiM
KiM
Farfle
100 kW
Woooot!!!
Thud
1 MW
YER KILLING ME!
You got a test pilot all ligned up yet?....been biting my tounge all week trying to be patient.
You got a test pilot all ligned up yet?....been biting my tounge all week trying to be patient.
AussieJester
1 TW
LOL...soz fellas, when you see the writings I thinkz you will understand...Thud, one thing I did notice, the motor doesn't seem to scream like it did in Dannys controller might be that the gearbox is interfering shall wait and see...test rider, looks like it will be yours truly, haven't been able to tee up a time for Danny to swing by, Matt P is trying to get up tomorrow though...about to order A taxi so I can get home...more soon
KiM
KiM
Hyena
10 GW
Looking good jelly legs 
The stance with the 24" rear looks much better than your old one IMO - it was a but too low to the ground but this one sits up at a more reasonable level. It would even look good with a 26" up front.
Are you going to put clear side covers over the battery to keep it as a feature ? Looks pretty cool so it'd be nice to retain that look. Solder and tape is fine if it's going in a padded battery bag never to be seen again
Is that resistor supposed to be your precharge ? It's a bit light on if it is, I'd be atleast doubling it up if not finding a bigger one.
AussieJester
1 TW
Hyena said:Looking good jelly legs
The stance with the 24" rear looks much better than your old one IMO - it was a but too low to the ground but this one sits up at a more reasonable level. It would even look good with a 26" up front.
Are you going to put clear side covers over the battery to keep it as a feature ? Looks pretty cool so it'd be nice to retain that look. Solder and tape is fine if it's going in a padded battery bag never to be seen again
Is that resistor supposed to be your precharge ? It's a bit light on if it is, I'd be atleast doubling it up if not finding a bigger one.
HAHA cheers Jay...re:side covers...as you know i intend to do these in carbon fiber but i have been
toying with a cutout in said covers so the battery is visible and installing lexan in cuttout, i will eventually have some blue LEDs
around the pack so it will light up, along with a row under the bottom tube of the frame
ala the ricer cars with their fluros underneath LoL.... Add another resistor you say!? can do no worries at all.
never played with these pre-charge gizzmos before was told that would work so went with it
Cuts the voltage to ~30v when the lil button is pushed...has to be better than 74v rushing into controller no?
i even installed a fuse this time Jay!?!?##?$?!@?><#!!!111one one wonders never cease LoL
KiM
Hyena
10 GW
The precharge resistor is not about lowering the voltage as such, just slowing the inrush to the caps. A little one will still work just get quite hot and become a possible source of failure. Do a search, there's been plenty of discussion on it. Off the top of my head you probably want somthing like a 200 ohm 5 w jobbie.
Clear cut outs with LEDs will look cool. A bit ricey as you say but it's something I've wanted to do for a while too - on the right bike. Yours being more showy than strictly a commuter or offroad basher lends itself to this quite well. I wanted to do the same with the controller too, with a clear window in the top or better still have it removed from the case and heatsinked to a custom frame with a cutout showing lit up controller guts. Uh oh, our old PC overclocking/ricing interests are starting to show through :lol:
Clear cut outs with LEDs will look cool. A bit ricey as you say but it's something I've wanted to do for a while too - on the right bike. Yours being more showy than strictly a commuter or offroad basher lends itself to this quite well. I wanted to do the same with the controller too, with a clear window in the top or better still have it removed from the case and heatsinked to a custom frame with a cutout showing lit up controller guts. Uh oh, our old PC overclocking/ricing interests are starting to show through :lol:
AussieJester
1 TW
Hyena said:The precharge resistor is not about lowering the voltage as such, just slowing the inrush to the caps. A little one will still work just get quite hot and become a possible source of failure. Do a search, there's been plenty of discussion on it. Off the top of my head you probably want somthing like a 200 ohm 5 w jobbie.
Clear cut outs with LEDs will look cool. A bit ricey as you say but it's something I've wanted to do for a while too - on the right bike. Yours being more showy than strictly a commuter or offroad basher lends itself to this quite well. I wanted to do the same with the controller too, with a clear window in the top or better still have it removed from the case and heatsinked to a custom frame with a cutout showing lit up controller guts. Uh oh, our old PC overclocking/ricing interests are starting to show through :lol:
Yes im an old pc case modder/watercooling tragic, fluros and coloured fans were par for the course
the water in my pc is even fluro coloured, glows in the dark LoL...
shall look into a larger resistor not a biggy if it fails easily swapped out...
Still waiting for a frocking cab aaaargh taking foreveeeeer
KiM
Hyena
10 GW
Maybe you need a nice reliable frock motor powered bike to get around on in the mean time ? You could have paid for it with what you're spending on taxis lately 
AussieJester
1 TW
Hyena said:Maybe you need a nice reliable frock motor powered bike to get around on in the mean time ? You could have paid for it with what you're spending on taxis lately
HAHA seeeeef... thankfully its a 7 dollar trip, i get 75% taxi vouchers Jay
said, its usually at least an hour wait to get one from home to girlfriends
shes 5 minutes from airport so get taxi quick from her place...usually. Just wheeled in the door, cig and then
into the bike!
KiM
Spicerack
10 kW
Well? That's 10 hours gone now matey- what' the progress? I'm busy rewiring a 9C 8x8 frock to fit in mine.....not quite your power levels but also I won't have ghey ricer led strips sucking power out of the battery pack... :lol:
Maybe pink leds would be better?
Maybe pink leds would be better?
Similar threads
- Replies
- 4
- Views
- 478
- Replies
- 5
- Views
- 203
- Replies
- 0
- Views
- 185
- Replies
- 3
- Views
- 430
- Replies
- 0
- Views
- 268

