The F3: "N minus one"

Glad you are OK! :D

-JD
 
Hello

Those brackets would work great as a BB shell mount for a 1-1/2" square tube trike. Could you point me in the right direction on where to find them, need to know where to get the special eye bolts also.


Thanks a lot.

Afton Rider
Dom


MattyCiii said:
OK, hopefully by next weekend I'll have my drive mounts upgraded.

Remember this?
DSCF3335.JPG

DSCF3337.JPG


That's right, I'm just one broken hose clamp away from getting the chain sucked into my rear wheel at speed, ruining my whole day and likely my pretty face too. I'll be upgrading my drive mount with real steel nuts and bolts.

Lookie here:
DSCF3376.JPG

and...
DSCF3379.JPG

The button head socket caps bolts are fixed into nutserts. Those rod-ends are 1/4" x 20, and will have nice lock nuts on the far end. I found some steel drawer slide hardware laying around with a very nice "C" channel shape, they will be nice and flat against the square aluminum but with those flanges will be very strong against bending. I'll take and post pictures of the install, but again that'll wait till next weekend, I have too much going on to start this job today.

Oh and of course my safety supervisor, sleeping on the job as usual...
DSCF3381.JPG
 
Aftonrider said:
Hello

Those brackets would work great as a BB shell mount for a 1-1/2" square tube trike. Could you point me in the right direction on where to find them, need to know where to get the special eye bolts also.


Thanks a lot.

Afton Rider
Dom


I actually designed the part myself and had it custom water-jetted from .625" aluminum. It takes two pieces to make each full part, so it ends up being 1.25" wide. Here's a little more info from the same thread:
https://endless-sphere.com/forums/viewtopic.php?f=6&t=39928#p594607

Dahon%2520mount.jpg


Total cost was $138 (production + shipping); this was for six pieces, or since each bracket is two-piece, three complete brackets (so each bracket cost about $46 apiece). I never used the extra two sets of brackets so if you're interested (and if I can find them - they're in the basement somewhere) I can sell you a bracket at cost ($46 plus shipping to you).

The eye bolts were not cheap - Almost $12 apiece times four. I got them from McMaster
http://www.mcmaster.com/#6251K3

Note I have a pair of 2" long 1/4" x 20 bolts through the brackets holding them together/holding the rod-ends on (packet of 25 for $10; if I can find any I'll throw in a pair for free http://www.mcmaster.com/#91792a550/=11qin4l)

You'll also have to provide your own bottom plate - mine is 8mm thick 6061 aluminum. 8mm might be overkill.

https://endless-sphere.com/forums/viewtopic.php?f=6&t=39928&start=75#p682707
DSCF3859.JPG


DSCF3868.JPG
 
Hey there

Thanks so much for the reply. I'm thinking about using the bracket as a BB shell clamp. It's going on 1-1/2" square tube so that would be a perfect fit. Is the bore 1.5" ? If so what's your thoughts on using this like I intend to? I need a good strong mount as I'm going to be driving the BB with a Cyclone 3000w kit. You obviously have a better understanding on this sort of stuff then I do. This is my first build and I'm learning as I go.

Thanks so much and I'm hopeful I'll get a positive reply. The price you quoted is ok with me. I have some steel I can use for the bolting plate.


Thanks again for the reply.

Afton Rider
Dom
 
Aftonrider said:
Is the bore 1.5" ?

Alas Dom, no the bore is 1.375" (35mm), and there's definitely not enough material to bore it out to 1.5"

You might want to try your hand at designing something custom. You see from that first modest bracket to my second waterjetted item (see link below) that with a bit of imagination I was able to - in this case - get a motor mount and rear dropout all in one. You might be able to pull off the same stunt - make a BB mount and Cyclone mount all rolled into one...

https://endless-sphere.com/forums/viewtopic.php?f=6&t=37207&start=125#p669510
 
Hi matty

Darn, I'll take your advice and design one that possibly does double duty. Thanks for the great advice.

Afton Rider
Dom

MattyCiii said:
Aftonrider said:
Is the bore 1.5" ?

Alas Dom, no the bore is 1.375" (35mm), and there's definitely not enough material to bore it out to 1.5"

You might want to try your hand at designing something custom. You see from that first modest bracket to my second waterjetted item (see link below) that with a bit of imagination I was able to - in this case - get a motor mount and rear dropout all in one. You might be able to pull off the same stunt - make a BB mount and Cyclone mount all rolled into one...

https://endless-sphere.com/forums/viewtopic.php?f=6&t=37207&start=125#p669510
 
The rear end of the bike started to get... wobbly. With each pedal stroke the rear would flop back-and-forth. I took the bike off the road to ensure it would not get worse. This post is about Dahon Jetstream suspension pivot maintenance. I'm going to say that again three times, because when I searched the Internet for any information on this topic, there was nothing. So here goes:

Dahon Jetstream suspension pivot maintenance!

OK, Google bot... come find me!

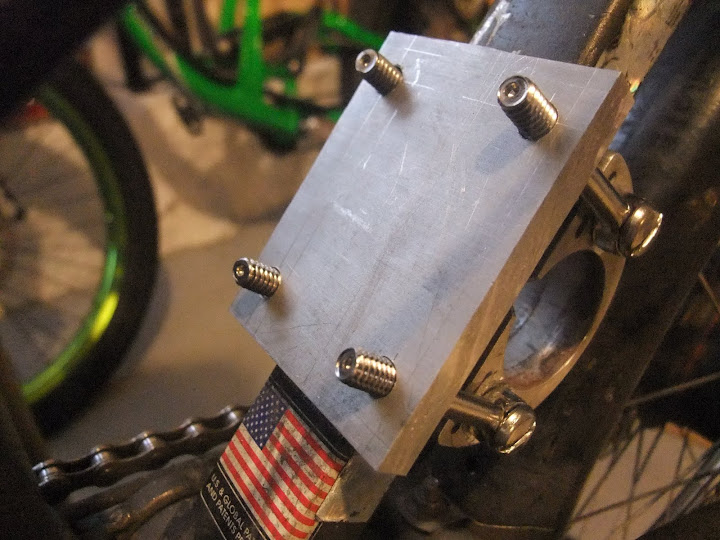
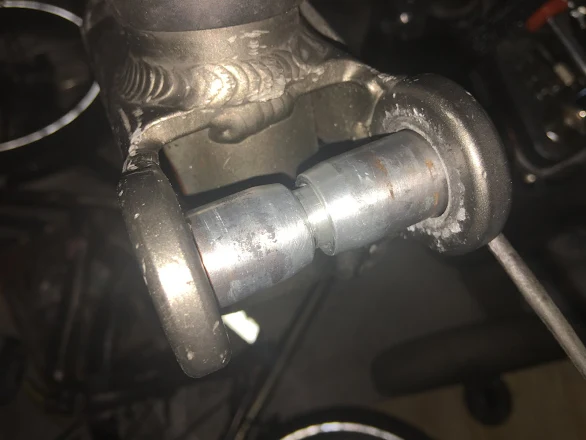
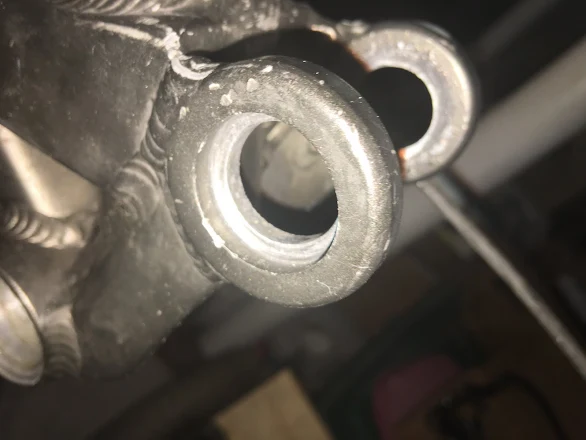
So at first I tried to just casually remove the pivot by removing its retaining bolt - a coarse threaded 8mm bolt with a hex cap - and coaxing out the pivot pieces (two pieces). See the pic below, the suspension pivot is centered, the frame is to the left and the rear triangle to the right. The bottom bracket is seen, crankless, to the lower left:

0rlBr3Z7AcsJN4iHkOVP1yhRvvpNGRgnmB5OH46rTohSMfktkIgssDDbeR9kA291L2R_E0oCDw35I6KbIbTXWvfMk74dHs3myqrGwQ=w330-h440-rw


It would not budge. I decided rather than escalate my efforts slowly I'd just go right to max effort - so I took the entire bike apart! This way the frame would be lighter and less junk would be in the way. This turned out to be a very good decision because It let me find another unknown problem...

With the bike on the stand and stripped of all parts, it was not hard to get the pivot out. Sure, I had a few false starts, including the (likely unnecessary) use of a blow torch to heat the pivot up/expand it...

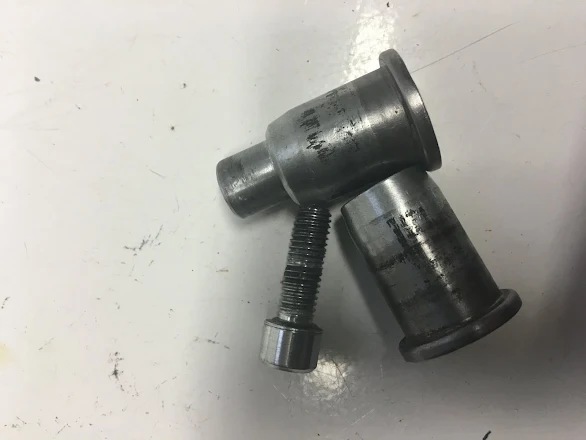
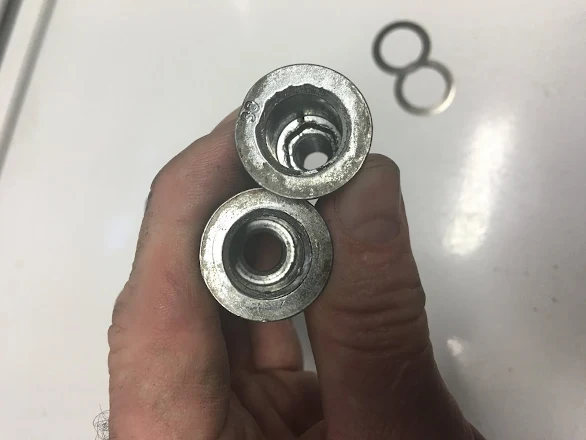
So let me show you what these parts look like:

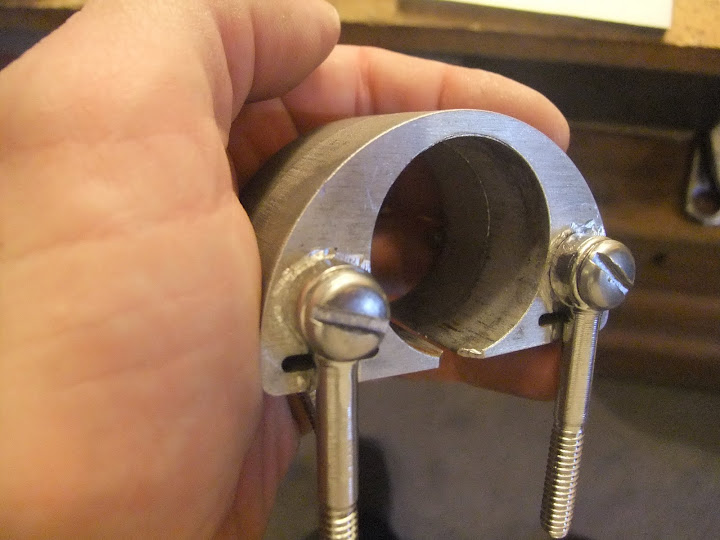
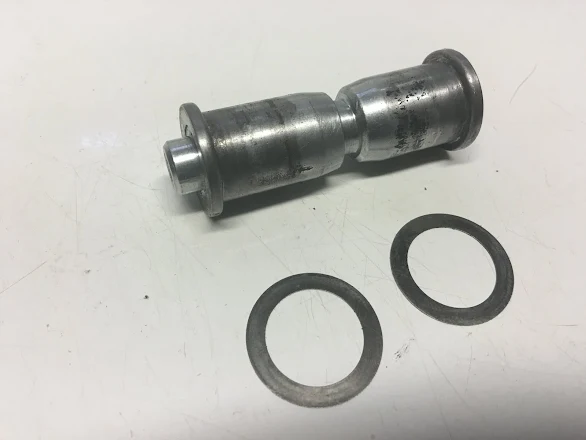
Here they are extracted and cleaned up. They were a fair bit dirtier prior to this pic. You can see 1/2 of the pivot is "male" and the other is "female" - see next pic for more on that...

UCK1BBvcziPiRx954aOYEa_nG58XebwL2RU5RDOUElbuyf5SACaRnW48gMRn5l6SQLgLw94iyGgbiqb0Nyh-h6ohzTR1SNLazWUanw=w586-h440-rw


The two halves of the pivot mate together, and the 8mm bolt threads into the male half: Also shown, some stainless steel 0.2mm thick, 20mm ID x 28mm OD shims.

9dhsmXhEWaEIp1Soj_mRfrLe-UikuGiRkKu5NwIPN5fyZyTErLlF1AtaZ3lHAxYOmIopMubBCEGTGTOwn_g7cEAyMnOV6XSsHI00cw=w586-h440-rw


Prior to this teardown, I could wiggle the rear triangle back & forth and I'd see the suspension pivot heads moving relative to the front of the bike frame. But after removing and cleaning them, when I bolted them back in tight they basically locked to the frame as one solid piece. Sure, I don't have the leverage of the rear triangle as a moment-arm, but these are definitely seated right and are likely ready to go...

LycH6MvIsvyP5V6OEabs8GO7xDdqhwxppD1HBMeQaGHMUKcQp7K3_UMqIAiDpkzuc3RY6FLL_CMlCkJiQkDFwYl7ZXrwfYilIaVh7g=w586-h440-rw


Oh yeah - forgot to say how I got those parts out. Well I bought an 80mm long bolt with matching thread pattern, hand-tightened it into the male half of the pivot coming in through the female side, and tapped its hex head firmly with a hammer to drive the male half out of the bike frame:

vzcXsT1yq59MDcI4TNlMBgZhxb1quAAyv-HEv4wSrr3TF-Z5gbhMXS4c_9R8Ra1K5s0IeoIutczihHju6KxhkuzZ-zAsIvtdrT7jiQ=w586-h440-rw


Once that half was out, I placed a deep socket that was ever so slightly narrower than the pivot into the now vacent right side of the pivot, and hammered that until the female half came out.

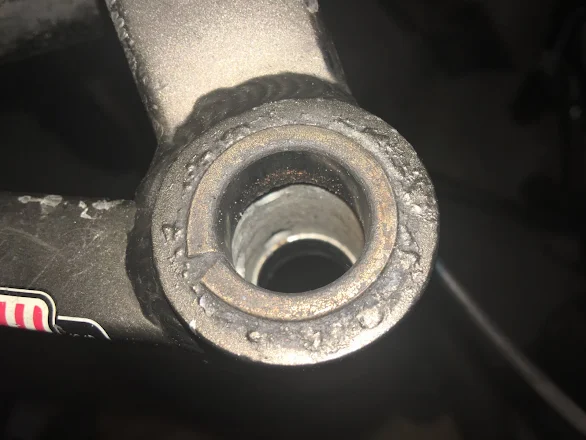
Here's a look at the front half of the frame: Look carefully you might see the aluminum is warn a bit from when the pivot came loose

H-jvTssliPKu_Yvb1IpX-zjf0FblMk-lFxyM6Jbo2xCQm5beasaXNr6-ouLFM120jIbvxqXtrro4wGwgRtMP24dRWqqH714opVip-Q=w586-h440-rw


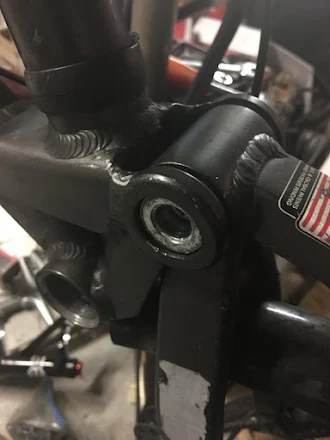
Here's the rear triangle. Notice the brass bearing insert. The bubbled paint is probably from when I used the blow torch, unfortunately.

3n_zVlhrovHbXCIVH9r86Ay44ex9HEku_Rkrr2wruGNGXvjfNg5jFvR6xK86QMWcvPJgxc8pWYGBTjWa9wsA81Yf3bYgW7i2NRQauQ=w586-h440-rw


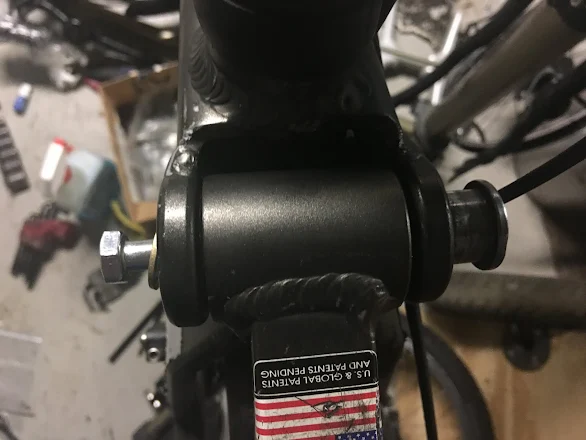
What next? Well, I had to put Humpty-Dumpty back together again. I put new thereadlock blue on the retaining bolt, and grease on the suspension pivot outer diameter. I held the rear triangle in place, hand-inserted the suspension pivot (then drove it lightly with rubber mallet - tight fit!), then hand-tightened the retaining bolt into place. Note the male half of the pivot has a hex shape molded into it so you can keep it from turning when you tighten the retaining bolt

rRnfKmGkH6r17HF5wRUkrlcKAQpI1Hz4CtiAD3Qeb5s8xyZs3zIiMLPGRnueFumD63Vv4lAob4kfsseWHNotQdPAR7kKThuswDq5yw=w586-h440-rw


Oh and remember those shims - seen blurry in the background above? Their inner diameter is perfect for the suspension pivot halves, but about 1mm larger in diameter than the lip on the outside of the suspension pivot halves. This is almost a best case scenario. To help mitigate the aluminum wearing off the front half of the frame where the pivot seats, I placed one shim on each side of the pivot assembly essentially as washers. Then as I tightened the two halves of the pivot until the retaining bolt bottomed, the stainless steel sort of curved up and alongside the flanges of the pivot halves. Think of a bearing race pressed into a shaft housing. The entire assembly fits together nice and firm and the rear triangle pivots without any sideways slop.

Mission Accomplished

As a post-text - I mentioned early on that disassembling the bike led me to find another latent problem. I'll talk about that in another post, but it all boils down to the fact that shock eyelets come in both 12mm and 0.5" sizes...


(32,242)
 
Today might mark the end for this bike :(

I found a crack in the frame. The crack is tiny - so although I no longer trust it as an electric bike, I am holding onto it for now as a regular pedal bike. Details follow. Below is the last picture of it configured as an e-bike (the battery is normally slung under the mono tube, but is off for charging)

image0.jpeg
 
I was doing maintenance on the bike and I noticed it was "floppy" when I lifted it. I thought maybe there's play in the shock bushings, or in the suspension pivot - I'd better find out! So I picked it up/lowered it over and over till I saw where the "play" was. I was horrified to see it was in the folding mechanism of the frame.


image7.jpeg

image6.jpeg

image8.jpeg

image4.jpeg


"But alas - no worries!" I thought. I have a spare.


image5.jpeg
 
Then I saw it. A hair line crack on the frame at the hinge. It's right above the folding mechanism clasp. slightly right of and above center in the below pic.


I made the decision to:

First: replace the clasp. Why not, I have no other use for it. Then,

Next: Take the electric drive system off the bike.

image2.jpeg

image0.jpeg


I stopped taking pictures when my hands got completely greasy. So in narrative form:
Next I removed the CAv3 from the handlebars, and the controller attached to the mono tube. I removed a lot of wires, including the speedometer pickup on the front wheel.

Remaining e-bike remnants include: e-brake cutoff wires attached to the two brake lines, and throttle (not connected to anything). All three of these are just dangling off the front of the bike for now.
 
"So what's next?"

Here are my main options:

1. If a Dahon Jetstream comes available (specifically the 2010 and later model with the rear suspension triangle made of square tubing), I could buy it and basically rebuild this bike on a new frame. This option is highly unlikely, Dahon does not make this frame anymore and they rarely come up for sale!

2. Make my own replacement frame. This sounds ridiculous at first. But I've been preparing myself for a new bike build anyway, and this could be a practice run. I would remake the front half of the bike in carbon fiber - and definitely drop the folding capability. So I'd be building basically a partial frame with geometry already established for the head tube, bottom bracket, seat tube mount, one suspension mount and one suspension pivot. I could make the frame hollow, an inside shelter the controller, most wiring and batteries. And it would be "practice" because I'm making 1/2 a bike, not a whole bike!

3. My third option is to just toss the working parts into the parts bin, trash the frame, and get started with my next build straightaway.

Oh, and in case anyone is wondering what I'm trying to pull off for my next build: Something inspired by the Deviate Cycles "Guide" model pictured below. Except in my version, that high pivot is a jackshaft where human power is mixed with RC drive electric power. RC motor and reduction (likely 2-stage) have to fit into the main triangle of the bike. Hey, a man can dream, right?


https://www.deviatecycles.com/guide
image.jpeg
 
Back
Top