What shall we do with a 3D printer...early in the morning!

some spools of PLA/etc that's been sitting a long while after they gave up trying to fix
Good find, but FYI, old/unwrapped filament can expire, go stale. If you use it and your prints turn out badly, it might not be your fault but rather the filament.

Skip to 9:20
(And watch the rest of his videos, he's both informative and hilarious)

It's unfortunate but true that not all filaments are equal, and there are brands that make better quality PLA and PETG than others. Sometimes a bad print is because of low quality filament.
 
Good find, but FYI, old/unwrapped filament can expire, go stale. If you use it and your prints turn out badly, it might not be your fault but rather the filament.

I've seen a fair bit of info that it has to be either kept dry or re-dried before use (thankfully it's pretty low humidity here most of the time, and I have a small toaster oven that I can use with a temperature controller to use for this when needed).

The only other thing that *should* affect plastic age is if it uses a "plasticizer" (an oil or some other solvent) that evaporates or leaches out of it because of improper mixing or bonding during manufacture (lots of experience with this kind of plastic aging problem, not much you can do about it).

While I'm not an expert by any means, I have more than a couple of decades of experience with using and forming (thermally mostly, like vacuform, etc) many kinds of plastics in both good and bad ways; I used to scratchbuild plastic (and ohter materials) models of various kinds, primarily scifi stuff, and handheld and costume scifi props (mostly "ugly guns" and the like), and learned quite a lot about what you can and can't do with different kinds, how they age (well or badly, etc), adhesives you can and can't use, and so on.

Some plastics I stayed away from because they aren't easy to join, or paint, or some other characteristics, so have less experience with those (PE and HDPE, for instance). Some, like TPU, didn't exist or weren't something available to me back then, but I've since worked with forming and shaping and sculpting some versions of TPE and TPR, which experience may apply to the TPU if I'm lucky. ;)

Apparently most of the images of things I've built are gone, but there's a few of a very crudely-built giant ugly-gun here:

1697256088621.png


Skip to 9:20 youtube MqirgLJnmZM
(And watch the rest of his videos, he's both informative and hilarious)

It's unfortunate but true that not all filaments are equal, and there are brands that make better quality PLA and PETG than others. Sometimes a bad print is because of low quality filament.
Yeah, I've been seeing that in hte old world domination thread and in other reading around I've done when looking for filament sources, and in what might happen when recycling the various kinds of plastics.
 
Last edited:
I watched the linked video and saw the bit about the MOISTure problem ;) and see the problems with filament...I've never seen those "broken spaghetti" problems with plastics before, so filament is something quantitatively different than any form of plastic I've ever dealt with before (even though I've worked with at least some (most, AFAICT) of these plastic types before).


I do like his video style, though--it's not terribly annoying, like most, and is reasonably well-edited, and some of the humor is funny.
I also watched the "Every Single Filament Part 4: CURSED FILAMENT!" video, and it was good and useful, too.
Again, aside from being hilarious, his whole series of "Every Single Filament" is actually a nice concise summary of, literally, every filament that could be printed.
 
I dozed off (as usual) a bunch of times during the #4 linked above, and I'll have to finish it and watch the rest of the ESF set just to get to know more of the potential issues with different types. I was pretty aghast at some of the stuff that has been *intentionally* put into filaments...but I can imagine some uses for various things.

I will need some pretty flexible and some stretchable filaments for a few of my projects'*** pieces, and some of his "cursed" stuff actually seem like they would do what I want, if I can live with the crap that's going to happen when using them. :lol:


Seeing a few of the filament-creation bits within that number four vid, even just the few seconds they were on screen, has already advanced my recycled-plastics-filament-making project. Now I just need to look around for more vids and images that include filament factory and DIY for more details of what they already do, which should lead me down a more helpful path.


***I really need to write up the main project that will need those and start a thread for it; it's a very complex non-EV robotics project that I still have to learn a whole bunch of stuff to be able to finish (or really, even to get started with the majority of the control systems).
 
Here's the Ender5 "carcass", including the original board (it has the silent upgrade motherboard installed) and some extra guide hose for the filament to the head, etc. I didn't remember to take a pic of the four spools of filament (two unopened, two opened a long time ago (probably unusable; we'll see if it dries out or not once I make a dehumidifier or find one at goodwill, etc).

It appears to POST partially, resetting the BT touch sensor on the printhead, but nothing moves to physically reset positions, and the screen never displays anything. Well, it's a(nother) project for another day anyway, as I have too many things on my plate right now (as usual) to do anything with it yet.


Hmmm....I wonder if that original mainboard is reprogrammable to use for a separate robotics project, since it has four servo drivers, sensor inputs, etc? .....
 

Attachments

  • 20231018_170244.jpg
    20231018_170244.jpg
    2 MB · Views: 3
  • 20231018_165802.jpg
    20231018_165802.jpg
    2 MB · Views: 4
  • 20231018_165746.jpg
    20231018_165746.jpg
    2 MB · Views: 4
  • 20231018_165449.jpg
    20231018_165449.jpg
    968 KB · Views: 4
  • 20231018_165432.jpg
    20231018_165432.jpg
    931.6 KB · Views: 4
  • 20231018_165423.jpg
    20231018_165423.jpg
    2 MB · Views: 4
  • 20231018_170527.jpg
    20231018_170527.jpg
    835.8 KB · Views: 4
I still have the original motherboard (see the images) vs the silent-upgrade that's presently installed, so I can swap that if I find no other issues. The previous owner said that he's replaced all the sensors and limit switches and even that board, I forget what else (motors I think?) and it's "wierd problem" still happens...but I don't know what that problem actually is; I forgot to ask. :oops: :roll: Pretty sure it's not related to this problem, though, and this is something new either from sitting untouched a couple years, or something from transport (him to me or me to home), etc.

Either way, it was only $100 for the whole "project"; even if it's not usable as a printer for some reason, just for all the little parts (motors, pulleys, belts, drive screws, frame, etc) it's still cheaper than buying them individually to use for the plastics recycler or the other robotics stuff I will eventually get to. And a significant portion of the Ender5 is identical to the Ender3, so spare parts for my working one too. :)


Unfortunately, it's gonna be some time before I can do anything with it. First I still have a couple things on the SB Cruiser I really need to finish (the leftside Ultramotor wheel build to replace the old MXUS wheel), and the left turn signal on the handlebars/mirror (I probably damaged it during one of the many times I have recently had to lay the bike on it's side for fixing the rightside motor/etc stuff). Then I have a bunch of things around the yard and house I have to get done--at least two weeks worth of work, to be done mostly in a few hours on each weekend. :(

Need to win the lottery so I can pay someone else to do all that other stuff and have my time back to do the things I really want to. :lol:
 
Last edited:
I watched the linked video and saw the bit about the MOISTure problem ;) and see the problems with filament...I've never seen those "broken spaghetti" problems with plastics before, so filament is something quantitatively different than any form of plastic I've ever dealt with before (even though I've worked with at least some (most, AFAICT) of these plastic types before).


I do like his video style, though--it's not terribly annoying, like most, and is reasonably well-edited, and some of the humor is funny.
I use old filaments and have no problems at all. Like 20 rolls nicely place here inside the fireplace with the 3d-printer next. Not so much fire hazard though with all the sensors but I'm always around as a precaution and if an event would even unfold it would be like all luck (unluck) to happen at the same time after one another. I do only PLA as it has no toxics like ABS or PET? And I like expertise in my material as I'm a beginner so I can just implement all the other stuff in the future at minimal time cost. I watch videos at 2x so that saves me some time.
Need to win the lottery so I can pay someone else to do all that other stuff and have my time back to do the things I really want to. :lol:
Sure. Time has more value than money. It is so already for me so I get it clearly.

What is your current projects holding you back from starting up your 3d-printer?

I know myself that I was too much into researching all the web for things to print and a month later, that stage, stage one was completed.

So stage two. To start printing with your printer is to know that you can and that you don't need to invent the wheel again. You can print pre-made designs that will perhaps blow your mind. Yes, almost everything exists there, you can print anything by downloading and simply change, cut and paste it like a windows paint file but in a 3d- slicing program and modify that item to anything you want. I recommend to find stuff at thingsverse.com or printables.com. The Google of 3d-printing searches.

Stage three as I am at I need to even find spare minutes to start my prints because I need a few minutes to start up a print with the program and then send it over the wifi to my printer to start. Kids running around

Please let us know if you not already have about ongoing bike repairs. Sharing and writing it down. I usually say. I sleep on it and the next day the solution just magically appear. I mean by writing you get input you would never have gotten and that simple reason may get you on your way faster than no input and being on your own. That is why I am writing some threads here in Endless Sphere regarding some current projects that is but a hiccup for me but it really gives me understanding fast, almost to fast like I never could have believed. I really like knowledge and understanding and I must find internal ways to cool it down. I guess I have to sleep on it.
 
Last edited:
The printer should work. All night long.

What I will soon put together is a 4x pieces of an item to large to print in one go. So I made 4 prints, one by one with the total base of 2x2 of about 7" or 150mm each as that is my maximum size for my 3d-printer.

All items can't be printed like this but this one is the toilet rool holder Shaun. I will make it work. A friend of mine is currently modifying and making his own type 2 ev vehicle connector too. I searched around on the anderson connectors yesterday and found one file I will print as a test, I'll try using a some of the PP75 parts if they are inter-changeable or not.

Dreams may come true even though your print area is not sufficiently large enough. A little glue and screw and: woalllaaah: There you go.
 
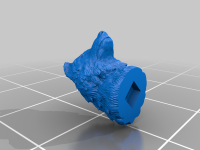
So I finally had a moment to stick a model on the memory card and put it in the printer, but it didn't work out so well. (mostly because I keep forgetting to get that glue stick). I'd been hoping the first print would be trying to do something useful, but haven't had time to build those models yet. So I used a tiny little not-very-good wolf-head model I'd saved, since it would print quick (about 7 minutes) and not take much plastic, less than a quarter meter (1gram).

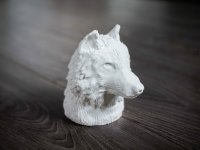
The model and gcode generated by the Creality slicer is attached, along with what it *should* look like, and some pics of the attempted prints numbered in order.

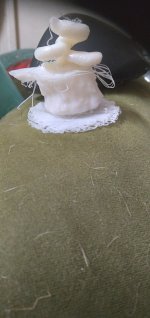
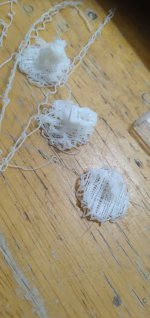
The first four tries failed each for one of two reasons: print detached from plate, or print detached from "waffle" pad the printer created to help hold it there.

The first was because I didn't have anything to keep ti stuck there. Thought I'd fixed that by setting the plate to a higher temperature (had been 50%, changed to 100%), but it happened again on the last print too.

The other problem happened because the model itself is built to be printed with a teeny tiny point connecting it to the plate, so everytime the printhead moved it wiggled the print a bit and eventually pulled the print off the waffle (so even though the waffle stayed stuck to the plate, the print was being moved around enough to trash it.

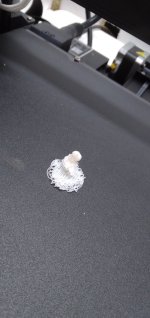
The fifth print I went back and rescaled it 400%, and tilted it 90 degrees to place the neck base onto the waffle instead. This made the waffle bigger, for more surface area grip to the plate, and made the connection from print to waffle much better, so it lasted over 50% of the print, but eventually the waffle came off the plate again. :( (the rescaled model would've take about two hours to print, 4.6m of filament (27g)).

So I gave up for the night, no more time or energy to work on it. :(
 

Attachments

  • Ender-3 S1_Head.zip
    2.1 MB · Views: 0
  • Ender-3 S1_Head rescaled 400.zip
    1.2 MB · Views: 0
  • Ender-3 S1_Head original.zip
    80.5 KB · Views: 0
  • should be.JPG
    should be.JPG
    497.5 KB · Views: 4
  • model.png
    model.png
    231.9 KB · Views: 2
  • 5a.jpg
    5a.jpg
    964.8 KB · Views: 2
  • 5.jpg
    5.jpg
    859.7 KB · Views: 3
  • 4.jpg
    4.jpg
    1.5 MB · Views: 4
  • 1, 2, 3.jpg
    1, 2, 3.jpg
    988.1 KB · Views: 4
  • Head.zip
    2.1 MB · Views: 0
For a print like that on my ultrabase I would not use a raft, and do it with a large brim. The large brim helps keep it in place. I also have a high quality print settings saved that heats the bed up to 80C, raises the nozzel to about 205C and slows down the print head movement. This helps everything stay in place and produces higher quality print. The catch is it just takes longer and you often get stringing.

Cheers
 
PLA, right?

Check your Z-height. PLA likes to be "squished" into the build plate for the first layer, a little bit. First layer should be 35-50mm/s, and 10 degrees higher than whatever the nozzle will be for the rest of the print. Bed temp should also be 10 degrees higher. Agree with @Cowardlyduck , you shouldn't need a raft for a model like that.

Dont get discouraged!
 
☝️

Yep the Z offset is the hardest thing to get right for everybody, including myself. It's kind of like getting the halls and phase wires right here on ES. There is a specific procedure that needs to be followed for the first time for calibration. I promise you will know when you get it right. :mrgreen:

Don't worry about wasting filament, you'll never learn the finer aspects of 3D printing without experimenting. What new colors would you like? I'll send you more.

Nick
 
For a print like that on my ultrabase I would not use a raft, and do it with a large brim. The large brim helps keep it in place.
I haven't found the place in the software or printer settings for any of that--it isn't part of the model, and it doesn't show up in the slicer preview, etc., so i will have to dig into all that to figure it out.

I would think the raft (what I called the waffle?) would be required for the original orientation of the print, as it only had a teeny tiny single-point contact with the bed (plate)? Reoriented so it is flat-base-of-neck down on the bed, it wouldn't, but as noted above I don't know how to turn that off yet.


I also have a high quality print settings saved that heats the bed up to 80C, raises the nozzel to about 205C and slows down the print head movement. This helps everything stay in place and produces higher quality print. The catch is it just takes longer and you often get stringing.
I can live with stringing; that just needs a bit of cleanup. I did already change to the max bed temperature, whatever that is, and it didn't make a difference to bed adhesion.

I haven't played with print temperature yet, I just let it use the defaults for the type of plastic I was using (PLA, the small white unspooled lenght that comes with the printer). I did decrease speed a little (I forget how much) on one of the first four tries, but no change there.

I have yet to find where I can change the actual printer settings except in the "tune" option while it is printing. I'll be digging around the menus of pritner and software more to see where these are.


PLA, right?

Check your Z-height. PLA likes to be "squished" into the build plate for the first layer, a little bit. First layer should be 35-50mm/s, and 10 degrees higher than whatever the nozzle will be for the rest of the print. Bed temp should also be 10 degrees higher.
Another set of things I'll have to figure out how to change. :)


Dont get discouraged!
I'm not, I just don't have much time/energy to work with it yet. (since ti takes more than 5minutes here and there to do this stuff, I need a block of time and that is hard to get).


Don't worry about wasting filament, you'll never learn the finer aspects of 3D printing without experimenting. What new colors would you like? I'll send you more.
ATM I've got plenty to play with, with those rolls from the broken printer deal. (part of why i went with it)

But I might take you up on that later once I have some idea of what specific plastics / colors I'll need. ;)
 
If it makes you feel any better, right now my printer is out of action due to arduous hotend issues I gave up trying to fix. A mix of old (water logged) PLA and worn out teflon inside the throat just kept endlessly clogging. Even after changing to fresh PLA it kept swelling in the throat and blocking during prints.
So instead I finally bought one of the newer 'all metal' hotends to see how that goes....hoping that means I no longer have to go through these periods of taking apart the hotend to unclog it 15 times before it works well again.

Cheers
 
I know from various experiences that teflon coating when damaged tends to peel at the edges and curl. It probably wouldn't take much curl to jam between the filament and the throat.

If that's the cause, a new throat should fix it? (I'm assuming every little individual part is probably available from somewhere).
Technically yes. However this is the 4th or 5th time I've had massive issues with this setup and I'm sick of it. It will work ok for months, sometimes over a year, but inevitably I will have massive issues with the hotend, throat, nozzle area that takes weeks if not months to sort out. Similar to what I originally had with the bed which was completely solved by the ultrabase. I'm still looking for the ultrabase equivalent for the hotend....hopefully this is it:
All-Metal-I3-Mega-Hotend-Upgraded-V5-J-head-High-Quality-0-4mm-Nozzle-For-Anycubic.jpg


Cheers
 
ATM I've got plenty to play with, with those rolls from the broken printer deal. (part of why i went with it)
That's fine, but as I mentioned earlier, those old rolls could very well be stale and bad to print with. Once you have experience, you may find you'll want to see if you can use up old filament. But as you're learning, figuring out how to get everything tuned, you don't want to be doing that with old stale filament. Ask me how I know... I did the same thing when I first started, got 20 opened rolls of pla for 50 bucks thinking I hit the motherload. Turns out almost all of them were awful.

I'll gladly chip in with Nick: As you're starting out, don't use any of the old stuff, yet. Pm one of us and we'll send you a full kilo roll of PLA for tuning purposes.


I have yet to find where I can change the actual printer settings except in the "tune" option while it is printing. I'll be digging around the menus of pritner and software more to see where these are.
Software. You'll probably want to use Cura. It seems like you're using pre-sliced files for test prints?
Cura lets you change everything, including things that we mentioned like removing the raft (waffle), slowing down the first layer, and heating up the hotend. Those tuning adjustments you found on the interface pad offer you limited control during a print for minor adjustments, nothing big. You'll want to have the settings already figured out and sliced for each print.
 
And ideaMaker from Raise3D is not a bad slicer software either.
 
It sounds to me that you are having a problem with the 1st layer. This will solve all your problems. It's not as complicated as he makes it sound but he is trying to cover all the steps. He knows what he is talking about. This is just a section of his calibration series.


Didn't the machine come preloaded with a couple simple projects? I recommend using one of them to start, and not mess with any of the settings.

Have fun!
I second it may be a problem with the first layer and also heat.

PLA bed temp should be around 50-60 celsius and higher than that the 3d print will start to look melted.

Using a paper glue on the bottom and just leaving residue or residue from packing tape can make a good stable. Also having a glas bed from start makes things easier I think. Making a big raft makes good grips, like a glass coaster for the 3d print.

DIY projects tend to take some time. Sometimes you just click on a button and everything works but at other times it takes some nicky picky brain cells to do some work.

I did have to level my bed sometimes but it was easy with my 3d printer. It still takes a few minutes because it was laying out the 3d material like 1 inch above the bed once. A child teddybear was put inside the printer while it printed something which made it go nuts.

Right now I'm printing this one making use of the spool material as well.
FlashForge Spool Drawers by RJP-Retired

Very funny how you change your way of thinking of things when everything can become anything else.
 
Back
Top