
Very funny how you change your way of thinking of things when everything can become anything else.
You are using an out of date browser. It may not display this or other websites correctly.
You should upgrade or use an alternative browser.
You should upgrade or use an alternative browser.
What shall we do with a 3D printer...early in the morning!
- Thread starter amberwolf
- Start date
So I only just got my printer back up and running after weeks of it not. I changed to the hotend/nozzel posted above which did fix my clogging issues, however it was still not printing right...
My next issue was the Z axis not raising up properly during printing. I've had this issue before and it was the voltage on the stepper motor driver not being high enough. Playing with that a whole bunch did not really help this time however.
I've also had issues in the past with the Y split for power going to each Z axis stepper motor, but when that happened previously it resulted in one side moving faster/slower than the other, not the whole thing failing to move or moving slowly like this time.
In the end, none of the tips from the internet were right and I figured out for myself I had a bad stepper motor driver. Swapping it over to a spare had things back up and running instantly.
When these issues happen, I keep thinking I should just buy a more expensive 'dialed in' 3D printer rather than my hodgepodge kit setup, but then when I research how to fix things almost all the 'fixes' being shown/demonstrated are on far more expensive 'dialed in' printers. I don't think spending more on a printer is necessarily the answer to reliability for me at this stage.
Anyway, hopefully that helps add to the list of things that can break/cause problems others can check also.
Cheers
harrisonpatm
10 kW
- Joined
- Aug 8, 2022
- Messages
- 824
Totally agree with this. Bambu is getting a lot of good rep right now for a series of great printers with a ton of smart features that print extremely well and very fast, right out of the box. I'm holding off and sticking with my Ender though, simply because it is a "dumb" printer and theres very little that can go wrong with it that I can't immediately fix myselfWhen these issues happen, I keep thinking I should just buy a more expensive 'dialed in' 3D printer rather than my hodgepodge kit setup, but then when I research how to fix things almost all the 'fixes' being shown/demonstrated are on far more expensive 'dialed in' printers. I don't think spending more on a printer is necessarily the answer to reliability for me at this stage.
endlessolli
100 W
- Joined
- Jul 31, 2020
- Messages
- 199
Totally agree with this. Bambu is getting a lot of good rep right now for a series of great printers with a ton of smart features that print extremely well and very fast, right out of the box. I'm holding off and sticking with my Ender though, simply because it is a "dumb" printer and theres very little that can go wrong with it that I can't immediately fix myself
Totally agree with the Ender statement. Plus, the Ender community is very active and therefor for every problem one encounters there seem to be already solutions on the web available. I am running a std. Ender 3v2 without any issues since a year. The two upgrades I can recommend is a leveling sensor and the (oem) metal replacement for the filament feeding mechanism. Since I have these, the printer just prints w/o need for tinkering.Totally agree with this. Bambu is getting a lot of good rep right now for a series of great printers with a ton of smart features that print extremely well and very fast, right out of the box. I'm holding off and sticking with my Ender though, simply because it is a "dumb" printer and theres very little that can go wrong with it that I can't immediately fix myself
One additional thing I recommend:
Stick with one Filament-Type first and spend time on dialing in its Process-Parameters (mainly Bed Temp, Hotend-Temp and Retract Distance. Everything else leave at default). There is lots of info on the net on how to do that including printing temperature-and retract- towers. Once you have done that, printing works really plug and play - at least for PLA / PLA plus filaments. And for odd shapes having bed-adhesion issues, I use cheap ‚extra stron hold‘ hairspray on the bed. One brief spray of the beed is usually good for the next 5 to 10 prints.
(I was initially skeptical about 3d Printing. I thought this would not be a tool, but more a toy where you spend more time and money fixing / improving / upgrading your printer than actually using it. But I was wrong. I use it now regularly ~twice a week, printing exact sized shims, little boxes for (Arduino) projects, things my wife needs for her hobbies (i.e. brush cleaning holder) …. For designing i use Fusion360 which they offer a full feature Version for private use. That takes some learning and I am far from an expert, but I can (clumsily) design what I need.
Sorry for the long post - I got carried away. To sum it up: The ease of use and versatility of 3d printing (with a cheap printer) was wayy beyond my expectations
harrisonpatm
10 kW
- Joined
- Aug 8, 2022
- Messages
- 824
I thought about that, but after having gone without for a year or two, I actually like leveling the bed manually and not having a program doing leveling for me. It's not that hard, and it doesn't need major adjustments once you have it dialed it. I will concede there is a skill to it, at least to getting good at it. Having automatic leveling removes the need for that skill. But it does fall solidly into the realm of: I'd rather not hand off a skill to a computer when I am perfectly of capable of doing it myself.upgrades I can recommend is a leveling sensor
I didn't have time to learn so I got one of the "Pre-configured" 3d-printers out there. More $ but vert fast to learn even though I knew nothing from the start. Now I use the slicer and cut and paste within and from other 3d-files. The next steep I guess is making more my own 3d-prints with a program that allows me do it. There're a few choices.Totally agree with this. Bambu is getting a lot of good rep right now for a series of great printers with a ton of smart features that print extremely well and very fast, right out of the box. I'm holding off and sticking with my Ender though, simply because it is a "dumb" printer and theres very little that can go wrong with it that I can't immediately fix myself
Yeah, me too. I didn't know what I could do really so I just waited a few years before I really could print something useful after buying a 3d-printer of course from it and bam*. I really can print anything now and it fits perfectly of my way of being. Research, work, home, projects, toys and gifts....
(I was initially skeptical about 3d Printing. I thought this would not be a tool, but more a toy where you spend more time and money fixing / improving / upgrading your printer than actually using it. But I was wrong. I use it now regularly ~twice a week, printing exact sized shims, little boxes for (Arduino) projects, things my wife needs for her hobbies (i.e. brush cleaning holder) ….
For designing i use Fusion360 which they offer a full feature Version for private use. That takes some learning and I am far from an expert, but I can (clumsily) design what I need.... To sum it up: The ease of use and versatility of 3d printing (with a cheap printer) was wayy beyond my expectations
In the start it was a little slow to get it working properly but I got the hang of it making the speed slower in the start of the 3d-print and then I also like to use a raft. Lately I have started to use some tape on the raft so my stuff don't fall mid-print and well worth the small effort even though most my prints would be successful that rod printed straight up in the air needs some holding on to.
The rest of my print settings are way fast at almost full 100% and 50% higher than standard speed settings. I guess my prints are going in the range of 100-150mm/s and fastest acceleration between jumps. The speed doesn't get to high sometimes when you do small objects when it keeps trying to accelerate to the highest speed time. This makes my prints go very fast in general. I started to print for usage so the need for a lot of infill (20-35%) although I focus more on the shells number which can sometimes take over all the planned printing "space". The last settings I spotted today on Reddit was something that you can turn of the fan for the first layers to make the filament stick even better.
I had to cheat the system as I do too much things and have too little time so that's what I did....
In the end, none of the tips from the internet were right and I figured out for myself I had a bad stepper motor driver. Swapping it over to a spare had things back up and running instantly.
When these issues happen, I keep thinking I should just buy a more expensive 'dialed in' 3D printer rather than my hodgepodge kit setup, but then when I research how to fix things almost all the 'fixes' being shown/demonstrated are on far more expensive 'dialed in' printers. I don't think spending more on a printer is necessarily the answer to reliability for me at this stage. ...
Last edited:
Haven't got back to the Ender calibration yet, but I have read thru the linked page and watched a few YT vids here and there that should help me do it right.
In the meantime Aliexpress had some "deep" sales on 3D-printer stuff, (well, on lots of things, but this is just about that stuff--see the most recent posts in my "End of the world" thread for the rest of the stuff, End of the World. Beginning of a new one. The Life of Amberwolf. and the SB Cruiser thread The SB Cruiser : Amberwolf's 2WD Heavy Cargo Trike & Dog Carrier ).
So I spent a few bucks (literally just a few, most things being $1.99 with free shipping) and got:
--some spare nozzles for when I clog the first one up, for quick swap outs (and can just clean the others later if they're cleanable), including some harder metal ones for trying out some of the nontypical types of filament that might damage regular brass nozzles.
--a Creality all metal extruder, for when I eventually break or wear out the one on the Ender.
--a "detailing" tool to trim flash/etc, with a bunch of extra blades
--also, because it was only $4, a 3D printing "pen". Not sure how much use it will be, but I can think of a few things I could "sculpt" with plastic-deposition this way, if it works at all like it should, without having to build a model for them (because they don't have to be precise, and would just be "let's see if this idea works out" kind of things. ) It works better than I expected, though my dexterity and control is limited so I won't be "sculpting" any masterpieces with it.") It's more just a "fun" thing, because it was cheap. It may be also useful for welding other 3D printed parts (with the Ender) together, or filling gaps and seams, etc. I used some of the already-open PLA and ABS I got with the broken-printer deal, and both worked well enough with it, without breaking or crumbling or bubbling. So they may work fine in the Ender as well...but we'll hold off on that test.
It's more just a "fun" thing, because it was cheap. It may be also useful for welding other 3D printed parts (with the Ender) together, or filling gaps and seams, etc. I used some of the already-open PLA and ABS I got with the broken-printer deal, and both worked well enough with it, without breaking or crumbling or bubbling. So they may work fine in the Ender as well...but we'll hold off on that test.


In the meantime Aliexpress had some "deep" sales on 3D-printer stuff, (well, on lots of things, but this is just about that stuff--see the most recent posts in my "End of the world" thread for the rest of the stuff, End of the World. Beginning of a new one. The Life of Amberwolf. and the SB Cruiser thread The SB Cruiser : Amberwolf's 2WD Heavy Cargo Trike & Dog Carrier ).
So I spent a few bucks (literally just a few, most things being $1.99 with free shipping) and got:
--some spare nozzles for when I clog the first one up, for quick swap outs (and can just clean the others later if they're cleanable), including some harder metal ones for trying out some of the nontypical types of filament that might damage regular brass nozzles.
--a Creality all metal extruder, for when I eventually break or wear out the one on the Ender.
--a "detailing" tool to trim flash/etc, with a bunch of extra blades
--also, because it was only $4, a 3D printing "pen". Not sure how much use it will be, but I can think of a few things I could "sculpt" with plastic-deposition this way, if it works at all like it should, without having to build a model for them (because they don't have to be precise, and would just be "let's see if this idea works out" kind of things. ) It works better than I expected, though my dexterity and control is limited so I won't be "sculpting" any masterpieces with it.
It's more just a "fun" thing, because it was cheap. It may be also useful for welding other 3D printed parts (with the Ender) together, or filling gaps and seams, etc. I used some of the already-open PLA and ABS I got with the broken-printer deal, and both worked well enough with it, without breaking or crumbling or bubbling. So they may work fine in the Ender as well...but we'll hold off on that test. I'm nowhere near done writing up what I already have thought out, planned, done, etc., but I started a thread for the project I've been mentioning, Snuggles, The Wolf:

 endless-sphere.com
The Ender printer should be very useful for this, once I learn enough to use it correctly. Stil working on that.

Robotics Project: Snuggles, The Wolf
Technical discussion and idea-workout thread for Snuggles, The Wolf, a robot intended for emotional support interaction. Discussion of the project itself is welcome; ridicule or other negative feedback about the idea itself, etc is not. ;) The project concept is pretty complex, so reading all...
The Ender printer should be very useful for this, once I learn enough to use it correctly. Stil working on that.
j bjork
1 MW
How do you know if the filament will be enough for the part you prepaire to print?
Do you weigh the spools? I guess it would work if you have an identical empty one to compare to. And what about all the spools with some left on them, that is hard to tell if it will be enogh for a print?
Do you weigh the spools? I guess it would work if you have an identical empty one to compare to. And what about all the spools with some left on them, that is hard to tell if it will be enogh for a print?
harrisonpatm
10 kW
- Joined
- Aug 8, 2022
- Messages
- 824
When you slice a file to get it ready to print, Cura will give you an estimate of how much filament will be used, in weight. Not all filaments will have the same density, but they'll all be close enough for an estimate, providing you aren't using the crazy exotic speciality filaments like copper- or tungsten-filled. Spools are 1kg, mostly. I do sometimes do your idea, if I want to start a big print: keep an empty spool handy, and weigh what's left of a used spool to see if it's enough (with a 20% margin or so). You can also install a filament runout sensor, which will pause your print when the spool is empty and beep you to reload a new spool, then continue the print. A stock Ender 3, doesn't have it, but there are easy mods available if you want to add it, and lots of new out-of-the-box printers come with it pre-installed. I don't bother, because for the most part, you don't use nearly as much filament as you think you're going to use. My huge battery case that I just printed, including the mounting pieces, still used less than 1kg for everything, including a couple of reprinted parts due to errors.How do you know if the filament will be enough for the part you prepaire to print?
Do you weigh the spools? I guess it would work if you have an identical empty one to compare to. And what about all the spools with some left on them, that is hard to tell if it will be enogh for a print?
Or if you have a bowden setupm, and you don't care what colour your parts are, you can cowboy filament swaps like I do....when I see one is finishing I hang around till it's nearly done, or cut it short, then just plonk on the new filament roll and feed it into the extruder motor behind the other filament. I unscrew the Teflon tube just above the extruder motor, manually push through the last bit of filament and ensure the new filament makes it's way in behind the old to push it through....all while still printing.
The only real catch is that occasionally it will hang up when it reaches the nozzle. I had about an 80% success rate with the older teflon lined hotend and so far, 100% success rate on the all metal hot end I recently installed.
It can also result in some cool looking parts when it switches colour half way through.
Cheers
Mine has a runout sensor, and I also have the bowden setup from the other (broken) Ender I could move over if I needed to, including spare tubes and feed "cups" (don't knwo what they're called officially).
FWIW, I have yet to get Cura (5.4.0) to run. It installs without errors, but it "instantly" gets this when I start it

I haven't done any serious troubleshooting yet, beyond uninstalling and reinstalling once.
ATM I'm relearning CAD using FreeCAD Portable; it's slow going as the interface and usage is very different from the Lightwave3D I spent so much time with earlier this century.
FWIW, I have yet to get Cura (5.4.0) to run. It installs without errors, but it "instantly" gets this when I start it
I haven't done any serious troubleshooting yet, beyond uninstalling and reinstalling once.
ATM I'm relearning CAD using FreeCAD Portable; it's slow going as the interface and usage is very different from the Lightwave3D I spent so much time with earlier this century.
Tried the 5.6 version of Cura, same error.
Went backwards to 5.3.1 and it opens and runs, so I'll check it out and see how it works with the Ender, if it is easier to get things to print right (after I get the calibration done per that page previously linked).
Went backwards to 5.3.1 and it opens and runs, so I'll check it out and see how it works with the Ender, if it is easier to get things to print right (after I get the calibration done per that page previously linked).
Wherever I look at others that have this error, people tell them that it isn't anything to do with the python version or other python specific stuff, though I don't know what that actually "means" in that I don't know about python yet other than it is a scripting language usually used for linux-type coding, and many programs use it via a commonly-or-separately-installed interpreter on Windows.
The same types of threads for those errors also indicate that the fixes for this error, when there is one posted, are to update the OS to the latest version, which is not an option for me for various reasons.
Since the 5.3.1 runs, I'm not too worried about it; if it works better than the creality software and is easier to use, and does the job....
Now if I could just go get thru the calibration process and retry some printing....
What I really need is a few dozen clones of myself, or a few million dollars (cuz inflation is only going to get worse) so I could retire and just do a tiny portion of the things I have in my head instead of spending almost all my time working to live, and resting to work. :lol:
:lol:
The same types of threads for those errors also indicate that the fixes for this error, when there is one posted, are to update the OS to the latest version, which is not an option for me for various reasons.
Since the 5.3.1 runs, I'm not too worried about it; if it works better than the creality software and is easier to use, and does the job....
Now if I could just go get thru the calibration process and retry some printing....
What I really need is a few dozen clones of myself, or a few million dollars (cuz inflation is only going to get worse) so I could retire and just do a tiny portion of the things I have in my head instead of spending almost all my time working to live, and resting to work.
Good video about recycling to make new filament:
Probably not going to get to it anytime soon, though.
I held onto old/prototype prints for the longest time, before recently realising I would never get around to recycling them due to lack of space for anything to process them, so I threw them all out.
Seems a shame, but realistically compared to the energy used in bulk manufacturing and the fact that it will eventually biodegrade (for PLA at least) I don't really mind buying new filament.
Cheers
Seems a shame, but realistically compared to the energy used in bulk manufacturing and the fact that it will eventually biodegrade (for PLA at least) I don't really mind buying new filament.
Cheers
I'd like to do it partly for environmental reasons, but realistically it's just to see if I could. Since there are essentially already professionally-made systems for (rich) home users to do this (see that video) and kits and open source projects for cheaper systems, I have a lot less reason to spend time on it when I have so many other more important projects that no one else has done / is doing / will do, that I personally need to exist (like the Snuggles The Wolf robot).
So if I ever get to it...might be fun.
For now, I'll concentrate on learning how to print with the new stuff, and start making things (well, have to finish relearning CAD and build some models of things I need, but that won't stop me learning how to print using existing stuff).
Since there are essentially already professionally-made systems for (rich) home users to do this (see that video) and kits and open source projects for cheaper systems, I have a lot less reason to spend time on it when I have so many other more important projects that no one else has done / is doing / will do, that I personally need to exist (like the Snuggles The Wolf robot). So if I ever get to it...might be fun.
For now, I'll concentrate on learning how to print with the new stuff, and start making things (well, have to finish relearning CAD and build some models of things I need, but that won't stop me learning how to print using existing stuff).
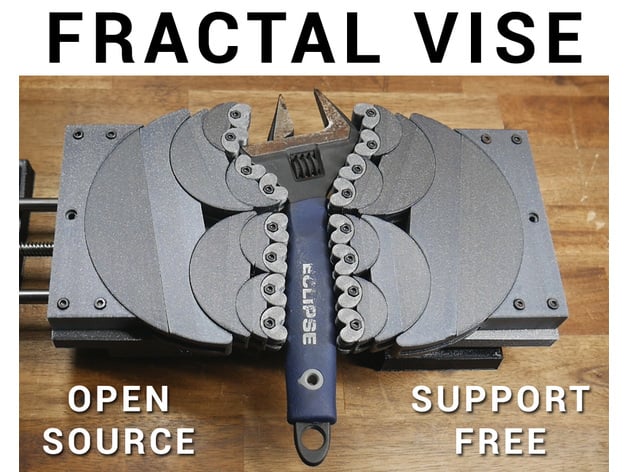
A very useful print project for many of us, a Fractal Vise:

 www.thingiverse.com
 thangs.com
I'll probably print a version of one once I get this thing calibrated and working; I have done so many things over the years to hold odd-shaped objects securely while working on them....
thangs.com
I'll probably print a version of one once I get this thing calibrated and working; I have done so many things over the years to hold odd-shaped objects securely while working on them....
I'll need it to sit much higher off the rails than the existing version does, because most things I have to work with (that don't fit properly in normal vises) are not flat, or when flat enough to use this on (but not flat enough to hold in a regular vise), the edges that would be in the clamp are what I need to work on (often with a grinder). Most of them are some "fat" 3D shape of some type....
There are things you can actually buy that do this job...but...I can make the exact version I want now.
Fractal Vise by TeachingTech
A 3D printed fractal vise inspired by the original seen on a Hand Tool Rescue video: https://www.youtube.com/watch?v=QBeOgGt_oWU I wanted to make my own version that was: Functional Fully constrained Printed without support material Used minimal filament Open source It works...
www.thingiverse.com
Fractal Vice - Helping Hand + Ringlight Mod - 3D model by Link The Cat on Thangs
Model originally uploaded to Thingiverse at https://www.thingiverse.com/thing:5650360. When I saw this fractal vice by Teaching Tech I couldn't resist making i
I'll need it to sit much higher off the rails than the existing version does, because most things I have to work with (that don't fit properly in normal vises) are not flat, or when flat enough to use this on (but not flat enough to hold in a regular vise), the edges that would be in the clamp are what I need to work on (often with a grinder). Most of them are some "fat" 3D shape of some type....
There are things you can actually buy that do this job...but...I can make the exact version I want now.
I finally got thru that calibration page, but at early stages I managed to get plastic stuck to the bed hard enough in the center and the home (back left) corner, that it can't be removed. Some of it was able to be removed after printing the calibration over it again, but some of it still wont' come off, either by preheating the bed and trying that, or at room temperature, or by removing and freezing the bed topsheet. It doesn't appear to be "in the way" of printing yet.
I think I can use the bed top sheet off the broken Ender5 if I have to (it's a bit scarred up from it's previous owner's usage).
I then thought I might try a print of a portion of a dog paw skeleton, from the elbow down, so I could use that to have in my hand to work out hinging and motor control for it for the Snuggles project. I used Ultimaker Cura to position and slice it, and was using the option to "monitor" the printer during the print, over USB. It does not actually *do* any monitoring, however, it just connects to it and reads the temperature. It also can't actually directly command the printer, though it seems to imply that it can based on the onscreen controls and options. It does not show what the printer is actually doing, either. I used the standard method of copying the gcode file generated by Cura to the memory card and put that into the printer's slot, and the onboard menu to print it.

I'm still learning how best to orient things for printing, so I incorrectly decided to print it as parallel to the bed as I could, instead of vertically, so it took a very long time (hours) to print the support material for the actual part, only printing a tiny portion of the elbow and one of the toes before something wierd happened:
The printhead stopped heating. There was no jam, no feed issue, no stringing...at some point less than a centimeter above the bed it just ceased melting the plastic and trying to feed it. Printing kept going, though, as when I woke up from actually fallling asleep from exhaustion hours later it was well above the print height for all of the object except the bit of leg above the elbow; it would have finished that part in perhaps another few minutes to half an hour, if it had been actually printing anything.

Since I had Cura open doing that monitoring thing, I was hoping it might have logged what happened, but it doens't do any logging either. But...I was using the spare Win10 laptop (that doesn't have anything else installed on it ATM but the printer stuff, and has all the background Win10 crap disabled, and no networking, etc), and while I'd disabled all the screensavers, timeouts, etc., somewhere in some setting that I don't have access to yet (probably have to do a registry hack), Win10 has a sleep timeout, not just a screen blanker, so sometime after I dozed off the laptop went to sleep. I suspect that this is the moment the problem happened, but why it would happen I can't imagine, since Cura wont' directly control the printer, and the printer was doing all it's stuff by itself, why would the laptop going to sleep turn off just the printhead heating/extruding? It didn't turn off the heated bed, nor did it stop the rest of the process.
Before I did anything else I pulled gently on the PLA leading into the (direct-feed) head, and it was definitely gripped by the rollers in there. Then I verified the printhead didn't have a problem by using the onboard menu to turn on preheat, and it very rapidly was hot enough for me to use the manual control on the head to extrude some PLA, proving it wasn't clogged or jammed and that the heater works fine.
I couldn't (shoulnd't) have been any form of overheating, as the room was <60F and I'd fallen asleep wiht the printer enclosure door open halfway, so it wouldn't have been heat trapped inside the styrofoam enclosure. (besides, I would expect an overheat or any other error to shut down the entire printing process, as there isn't any point to continuing if the printhead isn't doing anything).
After a bit of poking around online to see what programs *could* directly control the printer and hopefully log the process, and finding that most that say they will do it are reported in various forums' posts to not actually work for that for one reason or another (including Cura), I decided to try out Printrun/Pronterface+Slicr, since that is reported to correclty work (with this specific printer even) and not only monitor a print but actually direclty print over the USB, and even display the printing progress graphically. Turns out that part of that grpahical monitoring doesn't actually work because Slicr can't generate correct "SVG" code that it itself can read or that Pronterface can read either, and both of them generate errors trying to do so, regardless of the model I tried to do this with. But it does draw the layers as they print (or rather, it turns them from red to green) in the top-view-only of the bed / progress view of Pronterface.
I successfully used it to print that little wolf-head that failed to print using the Creality software, though Slicr's "supports" are wierd--they get placed not only below the object, but *above* it in some places, where it is most definitely not needed. Since it doesn't show you in either Slicr or Pronterface what those supports are going to look like (they can't be made visible for some reason), you can't know what wierdness it's going to do or how much time and plastic will be wasted by it. (and you can't edit the supports in any way). This print was tiny, only a couple of centimeters across/high/wide, so no big deal, but it would be at least annoying to have this happen on a large print.


But neither Slicr or Pronterface have much in the way of control options (unlike Cura) unless you know and write Gcode to send along with your print to do these things, or manually edit the gcode files generated, etc. So I'll probably stick to using Cura to generate the gcode and use the memory card to print from using hte onboard printing control panel, as that worked well enough before the problem. I just won't connect the printer via USB to the computer, and then the computer can't cause any problems with the print process. Hopefully that will prevent having that same problem again.
I'm testing that theory now using a portion of a different paw that will be more like 1:1 scale ratehr than the 1:6 scale I was printing as a first test, and this one is printed vertical, using trees instead of normal supports, and it shaves a couple hours off the print time estimate to 9 hours+ instead of almsot 12.


I think I can use the bed top sheet off the broken Ender5 if I have to (it's a bit scarred up from it's previous owner's usage).
I then thought I might try a print of a portion of a dog paw skeleton, from the elbow down, so I could use that to have in my hand to work out hinging and motor control for it for the Snuggles project. I used Ultimaker Cura to position and slice it, and was using the option to "monitor" the printer during the print, over USB. It does not actually *do* any monitoring, however, it just connects to it and reads the temperature. It also can't actually directly command the printer, though it seems to imply that it can based on the onscreen controls and options. It does not show what the printer is actually doing, either. I used the standard method of copying the gcode file generated by Cura to the memory card and put that into the printer's slot, and the onboard menu to print it.
I'm still learning how best to orient things for printing, so I incorrectly decided to print it as parallel to the bed as I could, instead of vertically, so it took a very long time (hours) to print the support material for the actual part, only printing a tiny portion of the elbow and one of the toes before something wierd happened:
The printhead stopped heating. There was no jam, no feed issue, no stringing...at some point less than a centimeter above the bed it just ceased melting the plastic and trying to feed it. Printing kept going, though, as when I woke up from actually fallling asleep from exhaustion hours later it was well above the print height for all of the object except the bit of leg above the elbow; it would have finished that part in perhaps another few minutes to half an hour, if it had been actually printing anything.
Since I had Cura open doing that monitoring thing, I was hoping it might have logged what happened, but it doens't do any logging either. But...I was using the spare Win10 laptop (that doesn't have anything else installed on it ATM but the printer stuff, and has all the background Win10 crap disabled, and no networking, etc), and while I'd disabled all the screensavers, timeouts, etc., somewhere in some setting that I don't have access to yet (probably have to do a registry hack), Win10 has a sleep timeout, not just a screen blanker, so sometime after I dozed off the laptop went to sleep. I suspect that this is the moment the problem happened, but why it would happen I can't imagine, since Cura wont' directly control the printer, and the printer was doing all it's stuff by itself, why would the laptop going to sleep turn off just the printhead heating/extruding? It didn't turn off the heated bed, nor did it stop the rest of the process.
Before I did anything else I pulled gently on the PLA leading into the (direct-feed) head, and it was definitely gripped by the rollers in there. Then I verified the printhead didn't have a problem by using the onboard menu to turn on preheat, and it very rapidly was hot enough for me to use the manual control on the head to extrude some PLA, proving it wasn't clogged or jammed and that the heater works fine.
I couldn't (shoulnd't) have been any form of overheating, as the room was <60F and I'd fallen asleep wiht the printer enclosure door open halfway, so it wouldn't have been heat trapped inside the styrofoam enclosure. (besides, I would expect an overheat or any other error to shut down the entire printing process, as there isn't any point to continuing if the printhead isn't doing anything).
After a bit of poking around online to see what programs *could* directly control the printer and hopefully log the process, and finding that most that say they will do it are reported in various forums' posts to not actually work for that for one reason or another (including Cura), I decided to try out Printrun/Pronterface+Slicr, since that is reported to correclty work (with this specific printer even) and not only monitor a print but actually direclty print over the USB, and even display the printing progress graphically. Turns out that part of that grpahical monitoring doesn't actually work because Slicr can't generate correct "SVG" code that it itself can read or that Pronterface can read either, and both of them generate errors trying to do so, regardless of the model I tried to do this with. But it does draw the layers as they print (or rather, it turns them from red to green) in the top-view-only of the bed / progress view of Pronterface.
I successfully used it to print that little wolf-head that failed to print using the Creality software, though Slicr's "supports" are wierd--they get placed not only below the object, but *above* it in some places, where it is most definitely not needed. Since it doesn't show you in either Slicr or Pronterface what those supports are going to look like (they can't be made visible for some reason), you can't know what wierdness it's going to do or how much time and plastic will be wasted by it. (and you can't edit the supports in any way). This print was tiny, only a couple of centimeters across/high/wide, so no big deal, but it would be at least annoying to have this happen on a large print.
But neither Slicr or Pronterface have much in the way of control options (unlike Cura) unless you know and write Gcode to send along with your print to do these things, or manually edit the gcode files generated, etc. So I'll probably stick to using Cura to generate the gcode and use the memory card to print from using hte onboard printing control panel, as that worked well enough before the problem. I just won't connect the printer via USB to the computer, and then the computer can't cause any problems with the print process. Hopefully that will prevent having that same problem again.
I'm testing that theory now using a portion of a different paw that will be more like 1:1 scale ratehr than the 1:6 scale I was printing as a first test, and this one is printed vertical, using trees instead of normal supports, and it shaves a couple hours off the print time estimate to 9 hours+ instead of almsot 12.
harrisonpatm
10 kW
- Joined
- Aug 8, 2022
- Messages
- 824
Yes, do all this, good plan. Not with my Ender, but with a different printer, I had similar issues when trying to print from the computer instead of off the SD card. I don't know why, but I figured it was something like the computer corrupting the gcode.But neither Slicr or Pronterface have much in the way of control options (unlike Cura) unless you know and write Gcode to send along with your print to do these things, or manually edit the gcode files generated, etc. So I'll probably stick to using Cura to generate the gcode and use the memory card to print from using hte onboard printing control panel, as that worked well enough before the problem. I just won't connect the printer via USB to the computer, and then the computer can't cause any problems with the print process. Hopefully that will prevent having that same problem again
I was actually printing off the SD card using the onboard print function when it happened...the computer wasn't controlling anything (the only thing Cura does is display the bed and head temperatures when it is USB connected and active).
It was probably, somehow, the computer going to sleep while USB was still connected...I suspect it would happen whether or not Cura was even running, but I don't plan on testing to find out.
The wolf-head printed perfectly fine (despite the wierd supports from Slicr) being controlled completely by the computer over USB. :?
Print above is still going ok, 7h remaining. The Schmoo says it's boring and she protests, and went for a nap:
Skim read it, so may have missed parts, but I use the free version of Repetier which shows progress and allows full control over USB to most common printer firmware's.
As well as that, I use the Microsoft Power Toys tool Keep Awake as a quick/easy way to toggle sleep modes, switching to keep awake indefinitely when kicking off a long print.

Hope that helps.
Cheers
- Repetier Software
1Object Placement Import one or more 3D models and place, scale, rotate or duplicate them on your virtual bed. 2Slice Slice your plate with different slicers and optimal settings for perfect results. 3Preview Check the result completely, in regions or Continue reading →
www.repetier.com
As well as that, I use the Microsoft Power Toys tool Keep Awake as a quick/easy way to toggle sleep modes, switching to keep awake indefinitely when kicking off a long print.
Microsoft PowerToys
Microsoft PowerToys is a set of utilities for customizing Windows. Utilities include ColorPicker, FancyZones, File Explorer Add-ons, Image Resizer, Keyboard Manager, PowerRename, PowerToys Run, a Shortcut Guide and more to come.
learn.microsoft.com
Hope that helps.
Cheers
Thanks. I went ahead and snagged the Repetier free but wont' have a chance to try it out for a bit. I already have the powertoys and had used that plus all the usual places the sleep settings are hidden, but for whatever reason the laptop went to sleep anyway.
As a test to see what would happen, I left everything running on it just like before (except not connected via USB, cable not connected to the printer end), and just let it sit there for the 9+ hours of this print (which was done via the card on the printer itself). It did not go to sleep...
So I have no idea why it went to sleep, or what exactly caused the printer to keep moving but stop extruding/heating.
But, this print went very well for what it is, without any real tuning of the print process. It also took much less time than it predicted, around 8h vs almost 10.


There were some "lost filaments" in a couple places where supports didn't get generated for certain stuff internal to the joint areas,


but since they're inside the joints it's irrelevant--I'm gluing the pieces together with clear silicone caulk to simulate cartilage and give me a bit of flexibility at them to play with the paw to let my mind wander and wonder and figure out how I can move it with motors (remotely, via cables) simply and cheaply and easily. (as much so as possible).

As expected, the bones pretty much fell out of the supports as I "scraped" the print off the plate and pulled gently at the supports, since they have gaps in them in the model itself (if I were printing this "for real" I'd have all the bones laid out as separate parts to print them cleanly, but I have to learn how to use FreeCAD (or something) to take apart the model into separate objects before I can do that.****)


I took a few pics including the one below to compare size (it's almost full size, needs to be a little bigger, and the claws are modelled wrong for wolf claws, but I will have a separate model for the claws as a negative mold to cast them in silicone for softness so they can't poke eyes out as easily if the robot smacks me in the face like dogs do)

and then roughly glued the bones together with the silicone, so they can cure overnight and I can work with it a bit in the next few days.

Seeing the supports sitting there gave me a potential moneymaking idea: I could build rough abstract sculptures or tabletop-gaming scenery with them and sell them as one-of-a-kind art pieces on Etsy. :lol:
**** In LIghtwave3D this would be ridiculously easy, and would take me about a minute, but FreeCAD is not designed for this so I'll have to work out how to do this sort of thing in it, since it's functionality is broken up into a bunch of different modules instead of all being available to experiment with at the same time, and it's selection tools...well, so far they seem to suck. Once i learn them they might be more usable, but at present there are things I literally cannot do with them at all, and super simple common things just don't work well or correctly for how I've already learned to do things in Lightwave, which was "obvious" and "easy" to learn to model and modify and even hack meshes in, even back when I knew virtually nothing about it.
As a test to see what would happen, I left everything running on it just like before (except not connected via USB, cable not connected to the printer end), and just let it sit there for the 9+ hours of this print (which was done via the card on the printer itself). It did not go to sleep...
So I have no idea why it went to sleep, or what exactly caused the printer to keep moving but stop extruding/heating.
But, this print went very well for what it is, without any real tuning of the print process. It also took much less time than it predicted, around 8h vs almost 10.
There were some "lost filaments" in a couple places where supports didn't get generated for certain stuff internal to the joint areas,
but since they're inside the joints it's irrelevant--I'm gluing the pieces together with clear silicone caulk to simulate cartilage and give me a bit of flexibility at them to play with the paw to let my mind wander and wonder and figure out how I can move it with motors (remotely, via cables) simply and cheaply and easily. (as much so as possible).
As expected, the bones pretty much fell out of the supports as I "scraped" the print off the plate and pulled gently at the supports, since they have gaps in them in the model itself (if I were printing this "for real" I'd have all the bones laid out as separate parts to print them cleanly, but I have to learn how to use FreeCAD (or something) to take apart the model into separate objects before I can do that.****)
I took a few pics including the one below to compare size (it's almost full size, needs to be a little bigger, and the claws are modelled wrong for wolf claws, but I will have a separate model for the claws as a negative mold to cast them in silicone for softness so they can't poke eyes out as easily if the robot smacks me in the face like dogs do)
and then roughly glued the bones together with the silicone, so they can cure overnight and I can work with it a bit in the next few days.
Seeing the supports sitting there gave me a potential moneymaking idea: I could build rough abstract sculptures or tabletop-gaming scenery with them and sell them as one-of-a-kind art pieces on Etsy. :lol:
**** In LIghtwave3D this would be ridiculously easy, and would take me about a minute, but FreeCAD is not designed for this so I'll have to work out how to do this sort of thing in it, since it's functionality is broken up into a bunch of different modules instead of all being available to experiment with at the same time, and it's selection tools...well, so far they seem to suck. Once i learn them they might be more usable, but at present there are things I literally cannot do with them at all, and super simple common things just don't work well or correctly for how I've already learned to do things in Lightwave, which was "obvious" and "easy" to learn to model and modify and even hack meshes in, even back when I knew virtually nothing about it.
Last edited:
I've had issues similar to that where the nozzle blocked....but if that happened it would still be hot.
I've also had similar issues with my PC 'sleeping' even when using Power Toys to prevent. Not sure why, but sometimes the USB connection to the printer seems to corrupt causing jibberish on the printer LCD, but the print continues regardless.
As for CAD software....call me old-school but I'm a fan of Sketchup Make. Specifically Sketchup Make 2017 which was the last free, standalone version google offered before forcing you to sign in/up to use. It still has a decent following for that reason and many plugins including STL conversion and 3D print 'checking' for holes and other issues.
Cheers
Similar threads
- Replies
- 71
- Views
- 1,677
- Replies
- 7
- Views
- 1,109
- Replies
- 43
- Views
- 2,094
- Replies
- 48
- Views
- 5,626