Dogmans mixte cargo bike. (long tail)

dogman dan

1 PW
Joined
May 17, 2008
Messages
36,392
Location
Las Cruces New Mexico USA
Inspired by the edgerunner, mixte frames, and many great builds on this forum with a small rear wheel, here's my next experiment frankenbike.

For those not wanting to look at the whole thread, here's the finished bike.


The mixte frame is a low step over frame with great strength. Early MTB riders used to choose a mixte because they were very light, yet very hard to break in jumps. The main feature is that the seat stays continue right through to the headset, giving the top tube extra stiffness from side to side.

I wanted to try the mixte concept, except I planned to make the distance between the two top bars wide enough for an 18650 pack, including some protective packaging. Instead of the top bar of the bike limiting the battery space, it will be open on top, allowing the use of affordable square packs. Also, it should be very easy to drop in a battery, then remove it for storage, or security when parking at stores. Ideally, it will just look like a purse or camera bag in the shopping cart.

The concept starts as a rouch sketch, not to scale. It should be possible to have two battery trays, one in front and the other behind the seat.

Mixte style cargo frame.jpg

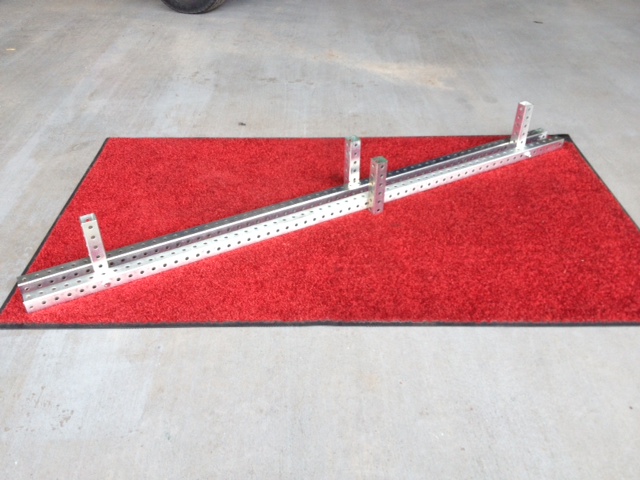
The next drawing is to scale. A trick I learned building houses, is to draw right on the cement floor in 100% scale. This makes measuring and cutting pieces easy, and can reveal design flaws that don't get noticed as easy on a paper drawing.

Floor drawing..jpg

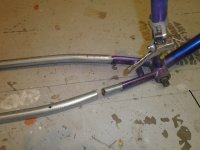
I'm not quite ready to build a bike 100% from scratch. My welding is still like a monkey on LSD did it, so I don't trust myself to weld head tubes, and bottom brackets. So for that reason, a donor bike is needed. A shame really, to cut up this vintage cromoly frame. Some will recognize it as the bike I raced in Tuscon, at 50 mph with a front hub. (steel fork then)

Donor frame.jpg
 
Hard to see the floor drawing, but in the next few pictures, I'm laying frame pieces on the floor drawing to check for alignment of things. Will it work in steel?

The donor frame is cut, removing most of the chain stays, all of the seat stays, and most of the top bar. No battery can fit in the last few inches by the headset anyway, so I left a stub, that I will use to weld the seat stays to. At this point I'm looking at things like will the headset angle work, and will the crank land too high off the ground, or too low. Also looking at where the seat stays will land. There has to be at least enough seat tube to attach them there. I wasn't entirely sure how the geometry would really play out once the donor frame is placed in position.

Cut down frame.jpg

Now for the chain stays. I was going to use some beefy square tube I have, but it's just too thick. It's crazy heavy. But I noticed that some 3/4 conduit was exactly the same diameter of the cut down chain stay. Hmmm. Hate using conduit. But it's there, and it's the right thickness to be light. It bends so nice with my conduit bender. And,,, I'll regret this one later. :roll:

But meanwhile it was easy to fabricate the joint. A couble slight bends, and then a piece of 1/2 inch conduit inside for reinforcement. This will be a pretty critical weld, so the inner tube is just there as a backup, if my welds break. If the weld fails, the inner tube will help keep me from going splat at 20 mph.

Before welding, the main tubes had some small holes drilled in them. Then when I welded, I filled the holes so the inner tube is spot welded to the outer tube.

From various angles. Another floor drawing helped me get the tubes attached straight, so one tube is not straight and the other at some kooky angle. Once straightened up, I used some sandbags to hold them in place for the first tack welds. A jig would be nice next time.

View attachment 2

View attachment 1

View attachment 1
 

Attachments

  • Chain stays 3.jpg
    Chain stays 3.jpg
    55.9 KB · Views: 16,891
Next the dropouts. I used some flat steel I have laying around, about 1/8 inch thick. To make things easy, I cut them like a cheap walmart steel bike. This makes it easy to use the same cheap wall bike derailleur. Though heavy, these steel 7 speed shimano derailleurs are quite rugged. The end result works fine, and doesn't really require torque arms. The tabbed torque washers will be enough with this type dropout. I'm only building for 1000w, not a cromotor. Next one might be though, and without pedals of any kind. :twisted: Anyway, this design will work fine for my purpose, an ongoing road test of the E-bikekit heavy duty motor. ( a 6x9 dd)

One dropout is cut bigger than the other, for mounting a disc brake.

dropouts cut.jpg

Then welded to the chain stay. Here's where I really frocked up. I slotted the tube in the center, then welded on the dropout. I should have flattened one side of the tube, and welded it to the inside edge. Later on, I'll find that the fat tube, and welding the center means the chain will rub. I made it work, with some help from a grinder, and a sledgehammer. But next time I'll know better. Not such fat tubing, or attach it on the inside edge.

Dropouts welded.jpg

Now the seat stays weld on.

Seat stays in place.jpg

Detail of how the seat stays attach at the headset. Not exactly beautiful, but functional. 4" space between the top bars.

Headset detail.jpg

Turning out prettier than I thought it could.
 
First look at it with both wheels. a bmx wheel temporarily bolted on.

Test with bmx wheel..jpg

A few shots of it in rolling chassis, now the hub motor is in place for the first time.

Rolling chassis rear view.jpg

With loose fit of rear rack support bar in place

Rolling chassis with loose fit rack bar..jpg

And finally, pedaling chassis. Now with pedals and a front brake hooked up, the first pedaling test. Will it ride straight? Will it pull to one side? Will it fold in half immediately?

Success! It pedals beautifully! Rides no hands easily, which is the test of a bike frame and wheels.

Pedaling chassis.jpg
 
Next, filling in the rear rack, and the battery boxes. Fitting the rear disc brake, cabling the derailleurs, ordering some mirrors, etc.

Got some of the rack built last evening.

Rear rack started.jpg
 
Close up of front battery tray

Front battery tray.jpg

Battery tray 90% finished. Front battery in the tray.

Battery in tray.jpg

View from other side.


The battery is now naked, and will need a protective box. I'm thinking about doing that in wood, making it fit the tray nearly perfect. Then the battery inside cushioned with foam spacers.
 
And still more.
 
Awesome, I like it!

Once you put a hub in a smaller diameter rim (for the newer members), there is a dramatic improvement in the magnet speed per distance traveled, resulting in less amps/heat the motor will have to wrestle with. The new work with ferro fluid is making direct drive hubs less worrysome, and more applicable across a wider range of jobs.
 
The 26" cruiser bike I brought to interbike rides nice, but the same 1000w motor in 20" rim will perform much better on that steep hill leaving the walmart, towing a trailer full of groceries. Keeping the rpm's up is where it's at with hub motors.

The cruiser? It's got a 26" 5304 now, so its good too. (2000w) This was part of the master plan, test that heavy duty E-bikekit in 26" for the summer, then continue the road test in 20" wheel.
 
Curious: Why curve the rear rack stuff down before you get to the seattube, and not use the whole area you have available?

AFAIK the only reason this is done on normal types of bike frames is because the seat stays reach a convergence point at the seatube, and so the useful width of the rack would be too small at that point, I'd guess.

But your stays are the same distance apart at the rear and the seatpost (I think), so you can have the rack go all the way up there.

AFAICT this could strengthen your frame (vs twisting/side-to-side wiggle esp with cargo back there), and give you a bit more room for cargo as well (on the top rack, and more support for side-loaded cargo).

Below is a modified pic with the green lines being hte basic rack (plus some side extra triangulation you may not need, but which might help with heavy (top or side-loaded) cargo). In red is a top X that would help with "tail wag" prevention, by tying the opposing corners together front and rear.

 
Mostly, the curve back on the front of the rack happened because I had some bent steel on the floor, and I grabbed it and thought, hey that looks good. I never planned on a deck the full length of the rear, because there will be another open top battery tray right behind the seat. There will be another strut added continuing down that will be part of the battery tray. The bottom of the tray will be the third middle stay typical on mixte bikes.

The curve on the bottom rear of the rack is actually for strength. Bent steel won't snap, like my welds on a 90% could. So that cantilevered part will be stronger as a bent curve. And it looks good.

Originally I had thought something more like you just drew. And, honestly, I'm pretty shocked how stiff it is now! It's going to get even stiffer, because the battery trays are going to be adding additional bracing back to the seat post area.

I don't really expect to carry a ton of weight on top of the rack though, the bike will get the bob trailer mounts. But I do plan a triangle shaped gusset here and there. Or maybe some more curvy steel if I can bend some tighter radiuses. I have lots of that 1/2" square tube to play with, a neighbor gave me about 100 feet of it.

The battery tray crudely sketched in in yellow here.

Batteries in blue

Will add red bar, which will support a lower pannier mount, or support panniers in the center. Curvy red bits added strictly for appearance. But in fact, adding the battery tray will ruin the bikes appearance. Oh well.

Battery tray , pannier support.jpg
 
I like the design. :D

dogman dan said:
A jig would be nice next time.

Here's a cheap-o jig I finally got around to making. Perforated steel tube and 3/8" bolts. It's designed so one size will slide into the next one up, for adding more lengths later. This much of a set up cost me about $60 at the local hardware store, including a bunch of nuts/bolts/washers. I can add bits later as the budget allows, but it gets the important parts aligned and allows for various wheelbase lengths.

bSc8D2jfXuivs6JDxdUZhVFxN3TmvPgNB3YgnjyJJ52b8wpdxBkWGI8rfYw8XwuOQ58353Oed_INi5UzAkjWP3NcEH3pXAg-v-Hmjzs5qN20N8tb_qzaukXy78hTgM_vAy5XZhNoxhLDzn9Te9Xa1dsQ75zBkLPMlU35jFAiPlScX5h0cpgKbfQ1tuFVlSXhLdP1abcrUHMueEsPnvPUvgJoygMkEzbDOQwaEFj2hBldTR7SpiXZg7F1O4J0epEer75uvM5O3u_MfEpfbWEj0jIG6-m-l92KXJGSiF-k9CRfsUbTX9295WktbXQv0R-6mYTWpNbn-puxhnbFBC4dia-M-gNTL3PYr4Y3VIN7mNLdJND02Zp3gx0o0ruN96NZyjGNYnkZpIGe3XsDPdhOrD1LM8CyeFje-KijsLESFYHUxDyNSp5hL7HR49psBjcMJcLZxw-gljvHXyaJFeu8gcrLLZFy1fghnYU9xYxKEJvOLxZIo9XIvVywQiaq11iK6OmoAbOXRSYFNROmCl2SLZmJ3TcvYXSwk8ZSv2Hi_9w=w640-h480-no

7dT8Mx2_nzEbrb9hPGtq9jXWXJYzCrplZ5UsZoBdQno1eQJx2R6AxB9bIOvq84GOrk4nYw47t_a4IpFL6_IsfqC7aPyO0Ql9-0VVd_m6R5qF6ATBk85XJBArNo20WfhfBaxCvzjfkj5mf6zTDloBOh27UIga0CQWi4GaaOZ4ccI-YE5lh98npj7D7F3kj6ht5hWMHtBeInlO6oCEemL-ObVLLaA8GFpvPWkBkCSNBb1KoMWwIlE0RTxsjcwpQl65T6CBhTI1jxZbmV6e-BN-FK8fw9a0SrZufQyyn_X38qm_HqeHwNGPPUlxRsNPTZqAj46xCPdfSA5Ln9D2rangmopHfLokuLouMguyeefIvCxOx9kkuz5BxDVi7SvA-IME-HIcrAJ_pQ7UUcB0VKc6zLoigELQmq8wiCzQEIxTrGVhpSm4H79W41IP-3NWFf5m1Z3BznWD9gOT2QggNN7AxQcvU9h_kXHLSXaXHFs7OjJMdFBK40hnvek0zL0hz1LudXR6RuuYPJ5aMah7P3ve96nWIh_pAIE2bobtsT-GOVI=w1034-h775-no

FshfRH2fExa1FYtJkz4FsJwkL248-2KemY7j8RTfkzU6nCSnHbt3gp44c0xfaa0ufIpUunEVjIjQXMZTZPBLzfmbwHs-ZZn7dq5lGF447UBdVU7Tj-KlAalXzYK-g6T6kAjb2nRtZlmiSlRzPnyVDnSos4fQ6qUNk9kH_WG-lVQvYD7VXEAR1t936eUD1zaBfEGiynju7XJKllUfWQBssyeGyl7waEhEl5GbrNoro9fE07z67OuxAJe7HzZBBiAc3oE9h_Rum1wVEITx8qauRY7Aq2uC5F7_eDOjMVN5nSKCbdwBAgwCSDveW1nytlKezUv9txFA-ihlIAuazMVvGG1ZMLcxfRK1kVU5GGh7MphG2WukPbPqJn9Tq9WjTwzDqnQdMeQnoEhR58gO6WwsjGJHo-Mfrmd7wlMrBwanOoxGKDMDfE9Nad9SQKM3Q3kgrGcxoOQ8iWDEbH9324HvAYF1BGIxTQGY7LX5J5wXFc7u4ah2VIdOpVT4Gu67u12KTT6Jws1QwjWD0jlghM1u4A8amRtKOn3481xfCKVgFLI=w582-h775-no
 
That first ride was have been really satisfying! The no hands test is a big one for me too... I can't stand a bike that squirrels around the instant you take your hands off. You just made a better bike with some scribbles on a legal pad and some drawings on your garage floor than some actual bike designers do..

edit... but maybe consider some triangulation somewhere in the rear to offset the bending loads from heavy braking with the rack loaded?

yuba stay.jpg

Somewhere in this area?
 
dogman dan said:
But in fact, adding the battery tray will ruin the bikes appearance. Oh well.
Some of us consider function to be a beautiful attribute. 8)

Nice job on the head tube triangulation. I'm worried about the cantilevered seat post, however. Maybe use a quick release steel wire going from the top of the post to the bottom of the head tube to prevent that stress?
 
NICE jig. Exactly what I'll need, when I start actually welding head tubes and bottom brackets.

Current pic of it. Not exactly triangulated in the back, but I think enough steel there now to be stronger.

Not quite so ugly with a battery on board as I feared. But that seat post did turn out taller than I was expecting. The donor frame was very short. So I may have to ride it with a lower seat than I'd usually like. Jacked all the way up now, because I have to pedal it till I put the controller on.

 
Please comment freely. It's how I learn.

Still thinking about that seatpost. I do have enough tube cut from the original frame to make a new, further back, seat post. But for now, I'll drop that seat 3 inches from where it is in the picture.

These bikes, they are never really done. :roll:
 
Yeah, it's like it has 3 sets of seat stays. Original mixte designs have 2 seat stays, part of why they are so damn strong.

In this case though, the middle two don't go though to the axle all the way. So I might add some bracing there, or some steel plate gussets.

Still more steel to add in back too, those pannier crossbars. It was so light last night, becoming a lead pig now.
 
Cheap o harbor freight 110 AC flux wire feed welder. $100 for it.

One last picture for today, got it together enough for a powered test run. Ignore controller location, etc. Just wanted to see how it ran at 20 mph.

20 mph the top speed, this is the 6x9 direct drive motor. Perfect for the bikes MTB gearing anyway, and a good speed for towing a trailer full of groceries.

Wow, it really does ride nice. Crazy stiff, really responds great in a corner. You can really feel the effect of the battery being in the right place. Weighs 60 pounds without battery, but will get about 10 pounds heavier with saddle bags and wooden top deck added.

Powered test ride.jpg
 
Definitely the design is half copied from the edge runner. But the main difference is this bike will just barely fit on my swagman hitch bike rack. Full size longtails require a trailer to carry them anyplace. If you would do that. I like to leave the 100f desert on a summer weekend, and drive too cool mountains for a ride though the forest. So a rack carry matters a lot for me. The smaller rear wheel will run better on mountain roads with long hills.

But IMO, those big cargo bikes like the Edge runner and the Yuba need stiffer frames in front of the pedals. Like mixtes, or classic cruisers that have the extra two bars in the triangle. I rode those cargo bikes at interbike, and they do have some frame flex, just not much behind the seat. I don't mean to say they ride poor, just that you can still feel some flex in the front half of the frame. FWIW, the interbike test rides were done empty, so hard to say how they handle loaded with cargo.

Rode a longer test ride yesterday afternoon, Jesus this bike has a stiff ass frame! Cranked hard on it for several miles, no popped welds so far, and not a hint of tail wag or creaks. This might be a design flaw, with zero flex being actually harder on the welds and the rear wheel spokes. How it rides fully loaded will tell all. So far it handles great of course, with nothing on the back. One flaw has appeared, the frame is a bit short for the big handlebars. It looks so great with the cruiser bars, but they whack on your knees if you pedal through a turn. So it might end up with a bmx style handlebar after all. I really don't want to cut the bars shorter.

Next step, finish a few welds for the pannier bag supports, then lots and lots of time grinding shitty welds, re doing the fugliest ones. Then decision time, Make it pretty with shiny red paint, or leave it all raw and rusty. Ugly has it's virtues, when parked at the store.
 
Back
Top