Peterbylt
1 mW
I guess it’s time to start a build thread, looking for constructive suggestions.
If any of this looks familiar I posted on this a while ago when researching the hub motors.
Not sure if it belongs in Bicycles/Scooters/Motorcycles/Large EV? Doesn’t really fit in any category. It is made almost completely from Bicycle parts. All the answers I’ve found have been in the Bicycle section so that is where it will start.
This was basically my list of requirements.
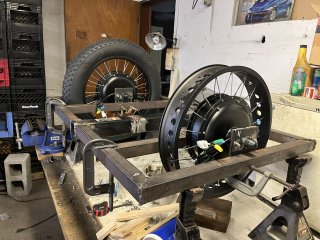
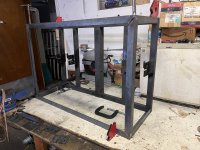
After several discussions with my local steel guy we finally decided the base of the frame would be made out of 1.5 inch, 14 gauge steel square tubing and the upper part of the frame would be 1.5 inch angle iron, mostly for strength, the steel would be stronger and more flexible for the size and price and I can weld it myself with the arc welder I already own.
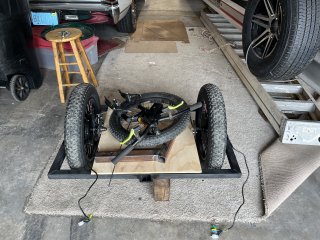
After much research I decided on 20 inch 48 volt 1500 watt hub drive motors, with included controllers, throttle and wiring. Based on cost, availability and being able to procure replacement parts, tires, tubes. 1500 watts is probably more than I need but with the weight I will be carrying and the difference in cost between 750 and 1500 watts was like $10, currently on AliExpress the 1500 watt is less than the 750.
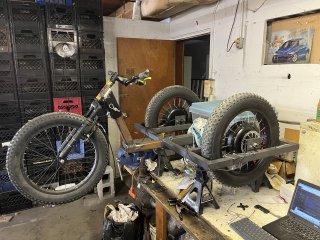
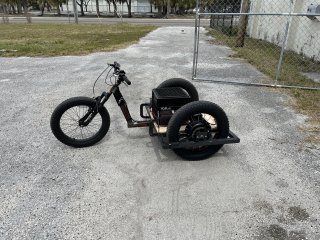
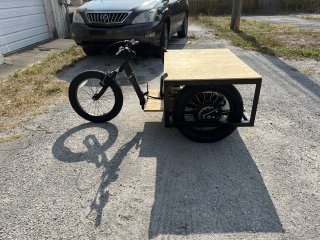
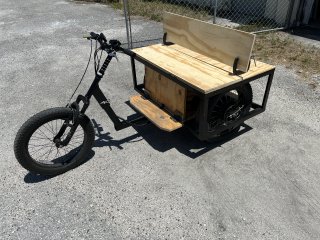
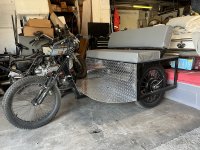
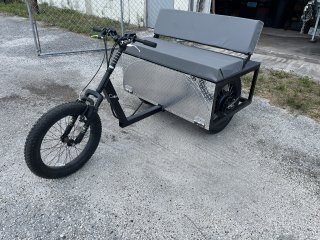
The hub motors would be mounted inside both sides of the frame to make it easier for storage and provide more seat area. Gooseneck and front fork would be detachable using a receiver hitch type system and store inside the box when in storage mode. I picked up a damaged BMX type 20 inch fat tire bicycle to scavenge the tires, front rim, fork, handle bars, steering tube and some of the brake parts.
The top of the box will be the seat.
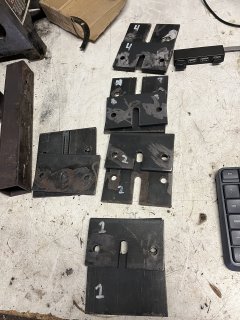
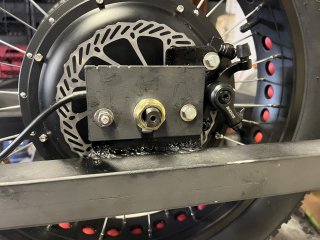
The rear axle dropouts are more of an axle drop-in. With slots cut into ¼ inch plates welded to and extending above the frame to keep the wheel mostly enclosed in the frame, providing a solid mounting place for the axles and maintaining the 24 inch overall height and providing a box large enough to store the front fork, gooseneck, front tire and battery, secondary plates slotted in the opposite direction are also bolted on. This provides a very stout axle mount that prevents axle rotation and is relatively easy to remove.
I tried having the Dropout plates cut on a plasma table, in the end it was easier to just drill and cut the slots with an angle grinder.
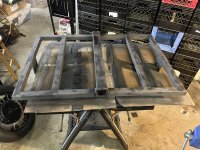
I am building the base of the frame first to provide proof of concept, if it doesn’t work I could still bail without much cost or effort.
If any of this looks familiar I posted on this a while ago when researching the hub motors.
Not sure if it belongs in Bicycles/Scooters/Motorcycles/Large EV? Doesn’t really fit in any category. It is made almost completely from Bicycle parts. All the answers I’ve found have been in the Bicycle section so that is where it will start.
This was basically my list of requirements.
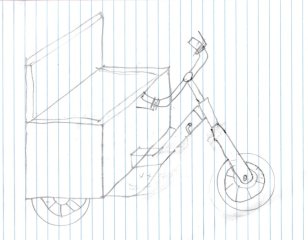
- The first constraint is that it must be easily disassembled and collapse down into a small enough package to fit in the storage bay underneath my RV and be light enough to be managed by me without assistance. I have determined the optimal storage size is a 24x24x42 inch box, basically the size of an extra-large storage bin.
- It must be able to carry two adults side by side giving them a Golf cart like experience, easy to get on and off, will mostly be used to run around campgrounds and resorts, an auxiliary vehicle for our RV.
- Will mostly be used on flat ground occasional hills, mostly paved, dirt or gravel roads found in resorts, campgrounds and state parks, possibly the occasional foray off road on fields, beaches or trails found in campgrounds and Parks, top speed 15 – 20 mph, faster would be nice on occasion.
- Driven by Two 48v 1500W 20 inch Fat Tire hub motors (already own them) on the rear of a trike type vehicle. Since it will be used on both paved and dirt roads I wanted the ability for the drive tires to work independently. With the size of the occupants (we are not small people) I wanted plenty of power, I also wanted the fat tires due to some of the conditions we find in a lot of the Florida campgrounds, two drive tires for traction issues in sand, mud, loose gravel or possibly snow. Using self-contained Hub motors will simplify construction and maintenance.
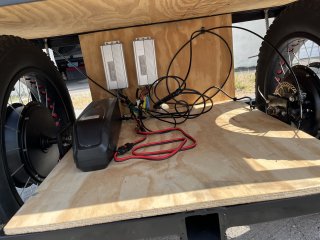
- Electrically speaking a 48 Volt, 100 AH Lifepo4 battery pack, I want to be able to charge from a plug in charger or in most cases I want a Solar panel roof that will not only charge the batteries but serve as a roof from the sun and rain. Four 100 watt Solar panels should provide enough charging wattage, and have a small enough footprint to be stored more easily than one large panel.
- I also want to include USB and 12volt charging ports and a 110 volt inverter so it can be used as a power/charging station for multiple uses, or even back home during a power outage. Most importantly, we are amateur astronomers and want to power all of our telescope and imaging needs in the field.
- Must be semi pleasing to look at, pass the wife’s cosmetic requirements.
After several discussions with my local steel guy we finally decided the base of the frame would be made out of 1.5 inch, 14 gauge steel square tubing and the upper part of the frame would be 1.5 inch angle iron, mostly for strength, the steel would be stronger and more flexible for the size and price and I can weld it myself with the arc welder I already own.
After much research I decided on 20 inch 48 volt 1500 watt hub drive motors, with included controllers, throttle and wiring. Based on cost, availability and being able to procure replacement parts, tires, tubes. 1500 watts is probably more than I need but with the weight I will be carrying and the difference in cost between 750 and 1500 watts was like $10, currently on AliExpress the 1500 watt is less than the 750.
The hub motors would be mounted inside both sides of the frame to make it easier for storage and provide more seat area. Gooseneck and front fork would be detachable using a receiver hitch type system and store inside the box when in storage mode. I picked up a damaged BMX type 20 inch fat tire bicycle to scavenge the tires, front rim, fork, handle bars, steering tube and some of the brake parts.
The top of the box will be the seat.
The rear axle dropouts are more of an axle drop-in. With slots cut into ¼ inch plates welded to and extending above the frame to keep the wheel mostly enclosed in the frame, providing a solid mounting place for the axles and maintaining the 24 inch overall height and providing a box large enough to store the front fork, gooseneck, front tire and battery, secondary plates slotted in the opposite direction are also bolted on. This provides a very stout axle mount that prevents axle rotation and is relatively easy to remove.
I tried having the Dropout plates cut on a plasma table, in the end it was easier to just drill and cut the slots with an angle grinder.
I am building the base of the frame first to provide proof of concept, if it doesn’t work I could still bail without much cost or effort.