20 inch full suspension street build (now with twin motors)

Timma2500 said:
John, I've just done frame hack number 8 :D
This time in carbon fibre - aluminium is so yesterday :p :p

Paul.

Paul you crack me up.

1. You haven't posted for more than half a year.
2. & post teasing comment as above with no link or pic to follow.

please show us some pics!! at least.

I did see some other guy here go for carbon too... forgot where it went.

On the topic of other materials, sure carbon and aluminium are lighter, but couldn't less steel do a similar job and allow for more modding without fear of heat problems... this comes from a newb in fab work.

Personally if I build another bike it would be similar to LMX's:

919417_10151752293464617_2121979879_o.jpg


if it could be pedalled for legaility it would be cooler.
 
It can be difficult to find a place that can solution heat treat the aluminum back to t6. That's what I found. Cheaper to overbuild and powdercoat heat for the appropriate amount of time. Wish I had a big enough oven. :(

Think I might copy your jig someday. If its ok. It's awesome.
 
Brake said:
It can be difficult to find a place that can solution heat treat the aluminum back to t6. That's what I found. Cheaper to overbuild and powdercoat heat for the appropriate amount of time. Wish I had a big enough oven. :(

Think I might copy your jig someday. If its ok. It's awesome.

Feel free top copy. Imitation is the sincerest form of flattery. :wink:

On the subject of carbon, be careful working with carbon. Nearly everyone uses aluminum head tubes and bottom bracket tubes in their carbon frames, but very few people know that carbon reacts with aluminum [electrolysis] and degrades. Titanium does not react with carbon. Another option is to wrap the aluminum parts in fiberglass first, then wrap the carbon around them. This eliminates the electrolysis issue.

I used to manufacture high-end RC helicopters and upgrade parts. My carbon frames had aluminum bearing blocks and motor mounts bottled to them and over time the carbon would haze at the aluminum to carbon joining point. That is what go me researching this. In those circumstances, it is best to use a titanium shim between the two. Again, in a bike frame, wrapping the aluminum parts in fiberglass before the carbon shields the parts from electrolysis.

Lastly, make sure you heavily roughen up the surface of any metal part before attaching carbon to it. Head tubes and bottom bracket tubes can come loose in carbon if not severely roughened up. Knurling works best.

Matt
 
Nearly everyone uses aluminum head tubes and bottom bracket tubes in their carbon frames, but very few people know that carbon reacts with aluminum [electrolysis] and degrades. Titanium does not react with carbon. Another option is to wrap the aluminum parts in fiberglass first, then wrap the carbon around them. This eliminates the electrolysis issue...My carbon frames had aluminum bearing blocks and motor mounts bottled to them and over time the carbon would haze at the aluminum to carbon joining point...it is best to use a titanium shim between the two...Head tubes and bottom bracket tubes can come loose in carbon if not severely roughened up. Knurling works best.

Expert advice, hard won over time and at great expense...freely given to help other experimenters save quite a lot of valuable time, effort, and financial resources...Matt, you are one of my personal top-dozen ES posters whose input make this forum the exceptional place that it is.
 
You can quickly bring back softened weld areas to reasonable tempers with propane plumbers torch and some heat crayons to keep you from over heating. Just a few minutes at 380- 400 degrees F works wonders. Tempil http://www.tempil.com/products/tempilstik-original/ Powder coat will do it if baking is above 325 degrees F for a while.
 
This is a really cool build to watch. Thanks. I'm really looking forward to seeing how you tackle the issue of chain tension to the rear. I have been stalled for a long time on my specialized big hit build trying to figure out the rear tensioner. The big hit has almost exactly the same rear suspension as your frame. The extra pivot point by the rear wheel makes it really hard to find the effective center of the arc the wheel travels through. I'm finding the chain needs to get way shorter as the suspension compresses. Its a significant amount like 3-5" shorter!

There does seem to be a magic placement of 2 idlers (in red) where the chain growth is almost none. Only problem with that is that it puts a bend in the top (power) segment of chain. Seems like a bad idea. Not trying to hijack you thread with my issues. Just seemed relevant since you are dealing with the same basic suspension design.

Full extension


Full compression
 
I plan on using a tensioned, moving idler wheel.

I would say running an idler on the power side is not a bad thing, per-se. Just make sure it is strong enough to handle the load. You will lose some efficiency, but not enough to master.

Matt
 
spinningmagnets said:
Nearly everyone uses aluminum head tubes and bottom bracket tubes in their carbon frames, but very few people know that carbon reacts with aluminum [electrolysis] and degrades.

Expert advice, hard won over time and at great expense...

This information came at great expense to unknown thousands of early adopters of commercial carbon-plastic frames, starting more than 25 years ago. And, of course, it was also at great expense to whichever manufacturers chose to honor a warranty on that basis.

Getting the latest and greatest might be a good idea for batteries, Cycle Analysts, or the like. Structural materials are somewhat more mature tech, though, where novelty is more likely to be for marketing purposes than for the end user's clear benefit.

Since I've been geeking out on bikes, I've seen gee-whiz frame materials come and go: carbon fiber/epoxy, metal matrix composite, maraging steel, cast magnesium, welded magnesium, scandium aluminum alloy, bamboo-carbon, bamboo-hemp, carbon-linen/epoxy, carbon thermoplastic, 3/2.5 titanium, 6/4 titanium, commercially pure titanium, along with who knows how many others I've forgotten. The only novel ones that have clearly redeemed their cost and manufacturability issues have been normal 6000- and 7000-series aluminums and air-hardening steels. The others either bring negligible benefits, add significant cost, or both. At worst, they do both these things while simultaneously turning a durable item into a disposable one. That's what carbon fiber composite does.

A used carbon frame is like a used battery: It might be OK, or not. You can't really trust it because it was never trustworthy to begin with. By extension, a homemade carbon frame is like a homemade battery. The only reason you'd ever want one is because you made it yourself.
 
Have you done any mockup on yours yet to see how much chain length change you have to deal with? I suspect yours will be easier than mine since the drive output is so far forward in the frame. In searching for my effective pivot point I noticed in front of the bottom bracket had less change than where I put my jackshaft.
 
Chalo said:
A used carbon frame is like a used battery: It might be OK, or not. You can't really trust it because it was never trustworthy to begin with. By extension, a homemade carbon frame is like a homemade battery. The only reason you'd ever want one is because you made it yourself.


Prices on carbon fiber has reached a level where it is acceptable even for frames. And durability and longevity is related to the build process. If if vacuum infusion is chosen you can pretty much be sure of strength and durability. Just add layers on the places where stress is the most. Also the weight savings for bb and head tube are not so big so that steel lining should not be considered.

That being said I would rather trust a carbon frame I made from scratch then buy one from a vendor unknown. I would have 100% faith in a self made carbon frame - a self made battery I would not even consider :)
 
DanGT86 said:
Have you done any mockup on yours yet to see how much chain length change you have to deal with? I suspect yours will be easier than mine since the drive output is so far forward in the frame. In searching for my effective pivot point I noticed in front of the bottom bracket had less change than where I put my jackshaft.

No I haven't. I am not too worried about out, though, because my bike is being converted for street use with only 4 inches of travel. Chain growth should not be a big deal. I do have a couple things I can do to reduce it should I find a problem with growth. One thing I like about this rear suspension is the anti-squat geometry it has. As the torque is applied to the rear wheel from the motor, torque is transferred to the rear suspension increasing the downward force on the rear wheel similar to increasing the rear spring rate. I hope to use this to my advantage.

Matt
 
I guess the idea was to use the torque of the human pedaling to keep the bike from bobbing up and down wasting rider energy. Your drive is a bit stronger than human legs! That bike might just take flight when you open the throttle. Should be fun!
 
Just as some added information about powder-coating aluminum frames and the tempering process---- If you try researching it, the only data available is regarding a LOSS of tempering strength after powder-coating. This is, however, dealing with aluminum that is already at a perfect T6 condition (I was unable to find any hard scientific numbers regarding what a T0 condition was brought up to after powder-coating). Depending on the powder-coating temperature and number of cycles at that temperature, the data shows with 6061-T6 aluminum, anything from a loss of 6% to as high as 20% loss from T6 condition after powder-coating. However, we are not dealing with a reduction in T6 condition. However, for our application of rewelding a frame in the manor I am doing, we are looking at an increase in a T0 or T1 condition. If powder-coating increases a T1 condition to T4 or T5, wonderful! Also, in certain circumstances, an INCREASE in strength was encountered beyond T6 condition after powder-coating. Most tests, however, showed a reduction of 6% to 8% in overall strength in a 6061-T6 sample after powder-coating. This is akin to T5 state.

Just wanted to throw that out there.

Matt
 
Hi Matt

Two different things going on here. One is work hardening and the other is solution of copper and other alloying compounds back into the matrix. The work hardening is done at the initial forming steps and gone once welded. The re crystallization, solution and aging treatments can be done after welding to bring those areas back to t3 - t5 tempers. Bake temperature of powder coat is important to know so you can figure what exactly is going on. Much Above 425 F or so and you will greatly soften / anneal the frame. If it is below 325 F it will not do too much on most alloys unless it is prolonged. Some links you may find useful.

https://www.youtube.com/watch?v=BBFBJ1zJlmA
http://www.thefabricator.com/article/aluminumwelding/achieving-t6-designation-for-6061
http://www.alcotec.com/us/en/educat...he-tensile-test-requirements-with-6061-T6.cfm
http://www.welding-advisers.com/Welding-aluminum.html
http://files.aws.org/wj/2007/06/wj200706/wj0607-20.pdf
 
Cool, thanks. I will check out those links.

The more I can learn, the better. I have been reading up on metallurgy, welding, proper fastening techniques, various materials and their properties, bearings, power transmission types (and benefits of each, as well as their drawbacks), etc.

I need to learn about converting motors to hall sensored operation, different battery chemistries, various controller types and their function, BMS systems, and numerous charging options.

I am trying to widen my field of knowledge. The problem is, it seems like the more I learn, the more aware I am of what I do not yet know. There is a limit as to how much one person can know. I am no-where near the saturation point, but I feel overwhelmed at times......

Matt
 
Those temp ranges are pretty close together. Thats a little scary. Depending on the quality of the powder coating oven the temp may swing high and low past the set temp trying to maintain a constant temp. Also wonder how uniform the temp inside would be. That would be bad if it annealed some spots and hardened others based on hot spots in the oven.

The industrial heat treatment company we use at my job has a $300 minimum. Maybe you should weld up a few more frames and make it worth heat treating the whole bunch. Im sure there would be customers.
 
Yes, powder coating is a bad idea if above 325 degrees F on hi temper alloys for any length of time. Good epoxy Paint would be my first choice if so. No telling what if any controls they will maintain unless you know the shop.

You can strain harden some joints/ areas but that may induce some micro cracks bringing weldments back to T6. Very difficult in something like a bike frame. Best to plan on local solution treating and artificial aging to get the heat effected areas back to a reasonable temper and over design those joint areas that require max strength. You can do this on a few test pieces to get a better feel of how much better they will get with just a few minutes at temp with the alloys you are using. Regular kitchen oven will work on small test weldments. The rest of the tubes and sheets I would keep in original temper to maximize structural integrity and minimize warp.

the more I learn, the more aware I am of what I do not yet know
Yes, "go gently into the night". An old man once said to me, be more humble kid, the world has done much, way before you got here.


:shock:
 
That's my Treat chart reminder for HT AlAlloys, note that T states doesn't simply mean progressive strength rates and are not states among which the material can go progressively from and to as could seem.

T0
untreated
T1
cooled from fusion and natural Aging
T2
cooled from fusion and annealed.
T3
Solution treat, cold worked and natural aging.
T4
Solution Treat, and natural aging.
T5
cooled from fusion and natural aging.
T6
Solution Treat and Artificial aging.
T7
Solution treat, artificial aging, stabilized.
T8
Solution Treat, cold worked, artificial aging.
T9
Solution Treat, artificial aging, cold worked.
T10
Fast cooled, artificial aged and cold worked.

Isn't that easy to get acceptable final restored performances in terms of Temper State, without Solution treat.....

Powder coating the piece without any other pretreat could add some or weak the actual temper state depends on many factors, and aging (soit natural or Artificial) should be performed after any heat....
It is often reported with 6xxx alloys that could be better to start with T4 If it's not on the plan to restore to T6 PWA.
For these and many other reasons, It should be better to project and prototype using AW (AS-Weld) rates instead of original or expected PWA, that's Matt's right approach.

Interesting Should be to deeply analyze the option You've chosen about to perform a double weld (int. ext.) on the front plate, I mean from the welding performance perspective, especially on the first 10mm from the weld on the material.

The typical thin tube material used for alloy frames (I mean quality pipes and quality resulting frames) is another question that makes any info from that world hard to be directly applied to this kind of welding projects (very thick material and non pipe shape) here the WPS is simple and lot easier to be respected, and what normally can degradate a sub 2mm wall thickness pipe around the weld shouldn't be that problem for a >5mm thick Flat....

Welding problems and errors like gas and solid inclusions, small interruptions, concave welds, incomplete penetration and fusion, cracklings due to self tension and more, are often the true limits on a weld, not the material or it's T state if the WPS is the right one, and material is rightly dimensioned....

Happy new incoming year to you Matt and to all ES!!!!
 
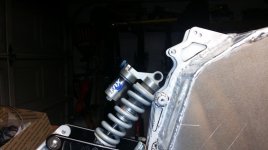
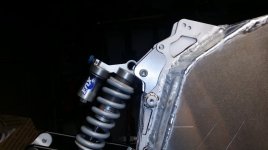
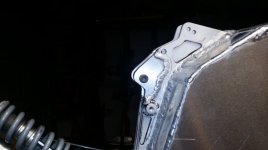
Another hour on the plasma cutter and TIG welder and the shock mounts are done (other than some cleanup with the Dremel).

Matt
 

Attachments

  • shock.jpg
    shock.jpg
    51.2 KB · Views: 1,345
  • shock3.jpg
    shock3.jpg
    46.9 KB · Views: 1,345
  • shock2.jpg
    shock2.jpg
    42.2 KB · Views: 1,345
Nice work. Happy to test ride it for you when its done. :lol: Bet there will be a long line for that. As panurge mentioned, most of the real troubles will be in the craftsmanship side of such a project. List of some current common temper designations with brief descriptions.
http://www.engineersedge.com/aluminum_tempers.htm
 
All those tempering issues of 6xxx issues made me choose a 7020 frame, as 7xxx alloy returns to full strength by aging alone.
If you want to hear treat your frame you can build a small oven with bricks. Just the size is the frame and heat it with a temp controlled heat gun.
People had good results doing this.
 
I've built a few ovens including tempering ovens for glasswork.. furnace for molten glass... and a lower temp oven for blowing sheet acrylic into a canopy. I dont know the temp required for tempering aluminum but would be much cheaper and easier to build out of sheet metal with insulation suitable for the temps required. A brick oven not necessary for these temps. Although a brick oven does come with the built in benefit of an extended cool down period if that is desirable. I think there would be a need to hold the frame in alignment while heat treating.

A bit off topic but in the realm of heat treating metals and there seem to be quite a few knowledgeable folks here about the subject. Many aircraft fuselages and other parts have been fabricated using chromo tubing and welded with mild steel rods and acetylene torch. Some time ago I read somewhere that tig welding chromo tubing was less than ideal. Wondering if anyone could shed light on that.
 
Back
Top