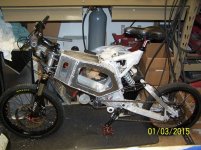
20 inch full suspension street build (now with twin motors)

I used to do a lot of fiberglassing work. 15 years ago I built a fiberglass curing booth. It was built from plywood and had a downdraft cooktop blower drawing air through the cabinet (I do appliance repair). The inlet air passed through a furnace filter and went through a thermostatically controlled 240 volt heating element from a dryer. I had a digital thermometer installed to monitor the inside temp. The outgoing fumes exited our house through a hole cut in the back wall of the house (garage). This cabinet worked phenomenally well. I could cure fiberglass 10X faster than room temperature curing alone and I could adjust the temp to achieve good curing without becoming brittle.

At some point I am sure I will attempt a similar setup for heat treating because I love being able to accomplish every aspect of any given process if at all feasible. I do have limited room in my shop, though, and I already have a lot of equipment.

I agree with the comment about holding the frame straight while treating. So, the oven would need to be large enough to hold the jig and I am not sure what affect (of any) it would have on the jig.

One cool thing about building a curing oven would be the possibility of curing carbon fiber using the same oven.

Matt
 
I don't think that having the frame in the jig is necessary or even wanted at all. It will relieve stress and as the frame is heated evenly all posts will expand the same amount. Never heard of heat treating in a jig.
And yes, bricks may not be necessary, it just depends on what material you have available. Cooling down of the treated parts is fairly fast so a metal box may do it as well.
 
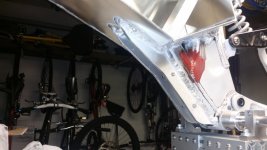
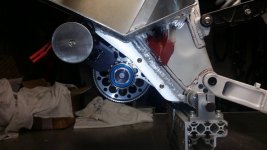
2 more hours and I got a bunch of welding done (nothing really to show, just lots of welds that were merely tacked before) and I cut and welded the drive unit mounts in place. They are 1/4 inch thick 6061.

Matt
 

Attachments

  • mount1.jpg
    mount1.jpg
    52.6 KB · Views: 2,918
  • mount3.jpg
    mount3.jpg
    51 KB · Views: 2,918
I can give some lengthy description of fabrication tools and techniques in this thread if you would like, or I can start a new thread. What do you think?

Here is a short description of my equipment and my experience;

I own the following equipment;

Bench top manual mill (Taig)
Bench top CNC mill (Taig)
Bench top lathe (Taig)
Drill press
Self lowering band saw
Chop saw
Miller Plasma cutter (using a Makita direct drive small footprint air compressor)
Miller Diversion 180 TIG welder
Lincoln 110 MIG welder
Bench top grinder
Bench top belt sander

Beyond that, I have a ton of bicycle specific tools like bottom bracket cup tools, freewheel tools, chain breaks, etc (You have seen the frame jig). I have a ton of small stuff that most people have too like various hand drills, saber saws, table saw, etc.

All of this equipment fits into a shop that measures 11 feet by 8 feet. I am not kidding. I have equipment stacked in steel racks to the ceiling. My compressor is at the ceiling in the corner of the shop because that was the only place to put it. If you look behind the bike, you can see much of my equipment in the rack to the right.


I taught myself how to TIG weld and MIG weld. I am obviously still a novice with the TIG. I am quite the expert MIG welding, though. I have a huge amount of experience over the last 15 years doing much MIG welding of steel.

Machining is all self taught as well. Basically, I used to compete in car audio competition and I did all my own fiberglassing, metal fab, wiring, box building, etc including installing 5 alternators and a 1.25 inch thick windshield on the car completely by myself. I also used to design and manufacture high end RC helicopter upgrades and complete helicopters. I manufactured tens of thousands of parts and shipped thousands of upgrades over a 8 year span.

Basically I say that if you have a drive to learn something, just dive into it and read as much as you possibly can. I am almost 100% self taught in nearly every area. I am actually a high school drop-out. There is a long story behind that. Basically, once I dropped out, I set myself to learning everything I could about what interested me. I am not gifted. I am experienced.

I like the saying "The harder I work, the luckier I get." That pretty much says it all. Anyone who works hard can learn a lot and accomplish more than they realize.

Matt
 
Hi Matt,

recumpence said:
I can give some lengthy description of fabrication tools and techniques in this thread if you would like, or I can start a new thread. What do you think?
I think a dedicated thread with the following list of tools, plus a rough range of prices for each piece of equipment plus how you use each of them would be wonderful!

It would be great to include what would you buy first, second... if you were starting from scratch, plus some guidance on how to make those decisions, plus what the learning curve is for each piece of equipment and any information or tips you have for coming up to speed on each.

recumpence said:
Here is a short description of my equipment and my experience;

I own the following equipment;

Bench top manual mill (Taig)
Bench top CNC mill (Taig)
Bench top lathe (Taig)
Drill press
Self lowering band saw
Chop saw
Miller Plasma cutter (using a Makita direct drive small footprint air compressor)
Miller Diversion 180 TIG welder
Lincoln 110 MIG welder
Bench top grinder
Bench top belt sander

Beyond that, I have a ton of bicycle specific tools like bottom bracket cup tools, freewheel tools, chain breaks, etc (You have seen the frame jig). I have a ton of small stuff that most people have too like various hand drills, saber saws, table saw, etc.

All of this equipment fits into a shop that measures 11 feet by 8 feet. I am not kidding. I have equipment stacked in steel racks to the ceiling. My compressor is at the ceiling in the corner of the shop because that was the only place to put it. If you look behind the bike, you can see much of my equipment in the rack to the right.

I taught myself how to TIG weld and MIG weld. I am obviously still a novice with the TIG. I am quite the expert MIG welding, though. I have a huge amount of experience over the last 15 years doing much MIG welding of steel.

Machining is all self taught as well. Basically, I used to compete in car audio competition and I did all my own fiberglassing, metal fab, wiring, box building, etc including installing 5 alternators and a 1.25 inch thick windshield on the car completely by myself. I also used to design and manufacture high end RC helicopter upgrades and complete helicopters. I manufactured tens of thousands of parts and shipped thousands of upgrades over a 8 year span.

Basically I say that if you have a drive to learn something, just dive into it and read as much as you possibly can. I am almost 100% self taught in nearly every area. I am actually a high school drop-out. There is a long story behind that. Basically, once I dropped out, I set myself to learning everything I could about what interested me. I am not gifted. I am experienced.
A common mistake that people who have a gift or talent in a specific area make is thinking that anyone can accomplish what they have (probably because it seems easy to them, which might be a good definition of gifted?).

recumpence said:
I like the saying "The harder I work, the luckier I get." That pretty much says it all. Anyone who works hard can learn a lot and accomplish more than they realize.
But I completely agree with that statement, which is not the same as anyone can do what you can do.
 
recumpence said:
All of this equipment fits into a shop that measures 11 feet by 8 feet.

Matt, I would love to see some pictures of your shop and how you have it laid out. My garage is a mess and twice that size. I really need to optimize.

Thanks!
 
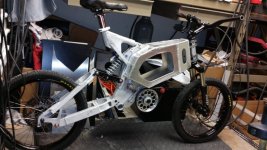
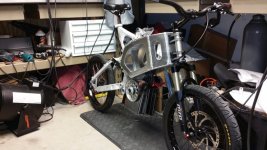
I welded the other side of the box. I also cut the side openings and removed the frame from the jig. I have begun test fitting components. As it sits the forks, wheels, handlebars, and seat are installed. It has a great stance to it. There is plenty of room under the frame. I have tons of room for twin motors, should I decide to move in that direction. Hmm, 60mph wheelie machine anyone? :twisted: :mrgreen:

I have some pictures to post when I have a chance.

Also, I will start a workshop thread soon.

Matt
 
Here are a couple pics. I will take a few more for you soon.

You can see there is plenty of room under the box for twin motors. I may be developing a "V"-twin drive unit. It is possible I may whip out a prototype of that drive soon and mount it to this bike for testing, we shall see. :wink:

So, I have two color options to consider;

First, I could do flat black. This would be good to minimize the look of the large box, but flat black is not that exciting.
Second, I could make the main frame structure red with all suspension bits and the box side covers black. This would break up the bike visually and be quite stunning. But, it would make the box look bigger.

What are your thoughts?

Matt
 

Attachments

  • test1.jpg
    test1.jpg
    71.8 KB · Views: 2,760
  • test2.jpg
    test2.jpg
    69.5 KB · Views: 2,760
Matt,

This is absolutely SICK !!!

Beginning with a Hooligan and hacking the frame and parts you've made what looks more like my sport bike without fairings (or better).

So your done now right, finished the build up? JK

Can't wait to see the final product!

One question... is that a v5 eDrive ?

-Mike
 
Hi Matt,

mwkeefer said:
This is absolutely SICK !!!
I completely agree!! One of the best builds I've seen.

I am not sure what color scheme I'd choose, but the only thing that could be improved IMO is that the box looks too wide.

With your talent for building awesome complete bikes I don't understand why you are partnering with phasor.

Equally as impressive as the results is the speed and ease with which you built it.
 
Nice work!
I think red might cheapen the look of it. Flat black always looks tough. Any chance a second drive would fit in that dead space between the 2 swing arms in front of the rear tire? Hang it from the upper swingarm so there is zero chain growth and put the tensioners between the two drives where there is less movement and more mounting points. Seems like that is just too much good real estate to not use for something. Oh, never mind, I don't want to suggest a solution that would deprive the ebike world of a v-twin prototype :D

As a related note, at what point do you plan on going to moto wheels and tires? Many people on here running half of your power levels are swearing moto wheels are the only way to go and I can't help but notice you are still running the old hookworms on most of your builds. Have you had any issues with reliability on all of these big power builds on bike components?
 
DanGT86 said:
Nice work!
I think red might cheapen the look of it. Flat black always looks tough. Any chance a second drive would fit in that dead space between the 2 swing arms in front of the rear tire? Hang it from the upper swingarm so there is zero chain growth and put the tensioners between the two drives where there is less movement and more mounting points. Seems like that is just too much good real estate to not use for something. Oh, never mind, I don't want to suggest a solution that would deprive the ebike world of a v-twin prototype :D

As a related note, at what point do you plan on going to moto wheels and tires? Many people on here running half of your power levels are swearing moto wheels are the only way to go and I can't help but notice you are still running the old hookworms on most of your builds. Have you had any issues with reliability on all of these big power builds on bike components?

I have not had any issues with the wheels and tires I have been using. Part of that is the proprietary rims I had made. These are 47mm wide, double wall aluminum rims I had Jetset in Taiwan make for me (I have a bunch in stock for anyone who wants a pair). They are really strong. Also, most freestyle tires work great. Bear in mind, moto rims and tires are primarily for very rough trails. This is a street bike. Also, at only 20 inches (17 inch rims), there is more strength than with larger 24 or 26 inch setups that most e-bikes run. Moto rims and tires are WAY heavier too. I am trying to keep the weight down. One other item is having some built in wheel flex. The frame and wheels need a tiny amount of flex. Moto rims do not flex hardly at all. That is fine on a dirt bike, but not on a street bike. I am totally open to using different wheels and tires, though. I have spoken with John Holmes about this at length. For now, I will remain with these. Oh, I do plan on having Industry Nine set me up with a pair of 20 inch wheels using my wide rims and their awesome hubs and aluminum spokes. My last couple builds used them and I am 100% sold on them. They are freaking expensive, though. But, they add an incredible finishing touch to any project bike like this.

It looks like the 3 suggestions on color so far have been to go with black. Cool. There are various red bits (small items) on the bike that I may leave red, or I may go with all black. Oh, there are a couple parts that must remain bare aluminum. That being said, I think I will make the chain tensioner bare aluminum and purposely leave a few other items bare for a bit of contrast with a tough machined look.

Matt
 
---Update---

I got up at 6:30 am and put 2 hours of work on the bike. I did a lot of work, but not much to show pictures of. Here is what I got accomplished;

-I completely stripped the Hooligan down to every last wire and bolt.
-3 steps of machining to the disc/sprocket adapter to provide rotor clearance at the suspension pivot.
-Grinding 2mm of aluminum from the one suspension pivot for rotor clearance.
-Additional machining of the rear caliper mount for frame clearance.
-Machining down caliper mount bolts to provide rotor clearance.
-Mount rear brake and test (all works well).
-Run a chain on the electric drive side to test clearance. The chain clears everything on the bike, but just BARELY clears the rear caliper. :mrgreen:
-Do rear brake line routing. This was a weird exercise. But, in the end, I have a great way to run the brake line that looks totally factory and is out of the way of everything.
-Do preliminary chain tensioner designing. There are three different ways I can go about this. I have not made up my mind as to the best method yet.

The remaining work before the frame can go off for some color basically falls in three categories;

#1 Box side panel fabrication and mounting (4 separate covers) along with start switch mounting.
#2 Chain tensioner fabrication and installation, along with all final clearancing and misc bits related to the chain such as guides and mounts.
#3 Minor welding. There are a couple small gussets to be made and a couple junction points I have to finish welding.

It looks like I have about 10 hours of fabrication left to finish the bike so I can disassemble it for powder-coating.

One thing about projects like this, it seems like the majority of time building is spent looking for parts, tools, and materials around the shop, fixing something that was tried and did not work, and head scratching wondering how the heck to accomplish each facet of the build.

I think that is where my skill seems to shine brightest. I rarely lose a tool. I have a large inventory of materials, bolts, shims, tubing, chains, cable, sprockets, specialized bolts and specialized bicycle tools at my disposal. I rarely try something that does not work because I have "Been there before" with so many other projects. And, lastly, I tend to know the best way to accomplish the majority of fabrication without too much thought.

That is what makes my builds shine and move forward quickly----- experience and LOTS of the right tools and equipment.

Matt
 
Matt ...

Where do the pedals go? JK.

That is one Phat frame job man, cant wait to see it and yes I agree with all the rest Flat Black although I'd go for Gloss Black and some Pearl additive to get the highlights or accents done and standing out.. or even better, mask them off and do a clear coat over the frame raw aluminum... that would look like brushed steel against the flat black.

I don't think BioLuminesent paint is on the market yet but that would also be trick and help visibility when desired.

One last thing, that v4 drive looks like your running the aluminum davinci torque limiter for weight and thermal advantages.. and is that a 3210 on the opposite side of the reduction?

-Mike
 
mwkeefer said:
Matt ...

Where do the pedals go? JK.

That is one Phat frame job man, cant wait to see it and yes I agree with all the rest Flat Black although I'd go for Gloss Black and some Pearl additive to get the highlights or accents done and standing out.. or even better, mask them off and do a clear coat over the frame raw aluminum... that would look like brushed steel against the flat black.

I don't think BioLuminesent paint is on the market yet but that would also be trick and help visibility when desired.

One last thing, that v4 drive looks like your running the aluminum davinci torque limiter for weight and thermal advantages.. and is that a 3210 on the opposite side of the reduction?

-Mike

This bike has a 5 turn 3220. It is, indeed, a V4 drive. Admittedly, I am pulling too much power through this drive. However, I am updating the drive to my new thicker motor plate unit with the idler wheel.

Matt
 
I put 6 hours of work into the bike today. Here is where I am at this point.

-The Hooligan is completely disassembled
-The idlers are fabricated
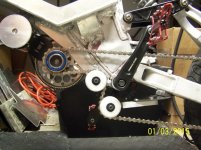
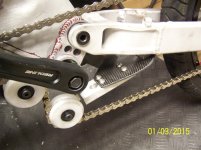
-The tensioner is fabricated and installed. This required machining an aluminum angle block and TIG welding it to the swing arm to mount the carbon leaf spring to.
-The electric drive chain is installed

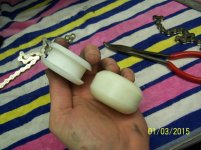
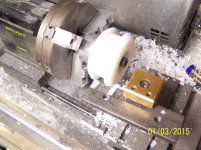
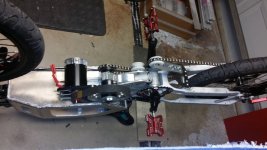
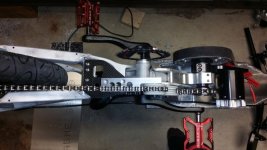
As you can see, the idlers are made from skateboard wheels. They are turned down on the lathe and installed using 5/16 shoulder bolts. Thankfully 5/16 is a couple thousandths smaller than the 8mm ID bearings in the wheels. This makes using these kind of wheels as idlers absolutely perfect.

The tensioner uses a carbon fiber leaf spring rather than a pivot and a coil spring. This was done for a number of reasons. A leaf spring holds the wheel in greater alignment than a pivot that can have some play in it. Also, a leaf spring is a bit easier to install. Lastly, it is very light weight. The only downside of using a leaf spring is limited travel of the tensioner wheel. However, I found there is almost zero chain growth with this arrangement. So, tensioner travel is a non-issue for me.

At this point, all mechanical work is done. All that is left to do is make the side panels and drill and tap the holes. That should take 2 to 3 hours to accomplish. At that point, I can begin wiring. I may send it off for powder-coating before wiring it. That way I can get the wiring harness done while it is at the powder-coater.

Matt
 

Attachments

  • 1-3-15.jpg
    1-3-15.jpg
    69.6 KB · Views: 2,578
  • 1-3-15 two.jpg
    1-3-15 two.jpg
    82.8 KB · Views: 2,578
  • 1-3-15 three.jpg
    1-3-15 three.jpg
    79.9 KB · Views: 2,578
  • 1-3-15 four.jpg
    1-3-15 four.jpg
    63 KB · Views: 2,578
  • 1-3-15 six.jpg
    1-3-15 six.jpg
    84.6 KB · Views: 2,578
Clever solution with the leaf spring. Where does somebody get carbon spring stock in small quantities? Is it supposesd to be springy or is carbon fiber sheet springy by nature? Did you have to do some engeneering calculation to select that size and thickness of did you just wing it by feel?
 
Carbon is naturally springy. I used 3mm thick carbon I had lying around the shop. I made two different springs. The first one did not work well, so I made another. I have a huge amount of experience working with carbon panels. So, I just used my existing knowledge and guessed at the thickness, length, and width for the correct spring rate.

Matt
 
Here are a couple pictures of the bottom of the bike. You can see the carbon leaf spring. It is tuned by orientation of holes in the plate.

Matt
 

Attachments

  • tensioner1.jpg
    tensioner1.jpg
    58.2 KB · Views: 2,471
  • tensioner2.jpg
    tensioner2.jpg
    57.3 KB · Views: 2,471
I'd paint it the brightest red you can find.....you don't want to hide away all your hard work 8)
 
Back
Top