A Poor Mans Chopper Build

Bobocop

100 W
Joined
Dec 9, 2008
Messages
120
Location
Toronto Canada
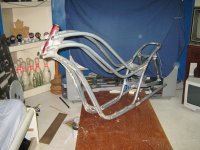
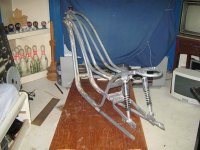
I’m attempting to build an electric chopper, I got laid off a few months ago and can’t really afford expensive motors, batteries etc. so I’m going to try and build one with as little money as possible.
If it goes well then I’ll save for a better motor and batteries on another project.

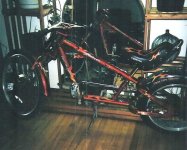
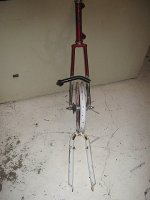
I was going to use a 24 volt motor (they were the cheapest) but after searching, I found this bike (photo below) on the Kijijii classifieds site here in Toronto.

The owner said that the ignition switch caught fire when he turned the key on, and sold it to me for $50

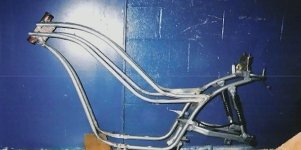
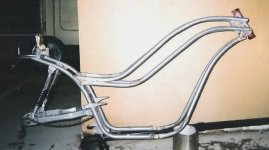
He had already sold the batteries and charger, but I figured I could use the front and rear suspensions, the front wheel, and the rear wheel as my motor for the chopper build.

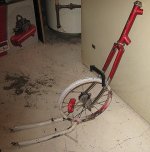
All I had to do now was figure out a way to mount the rear wheel on a 4” wide wheel that I wanted to get for the build.

Little did I know that just the back wheel alone weighed 2 1/2 tons,
I found this site (ES) after the purchase, oh well to late.
 
Next thing I wanted was a wide back wheel, I found (on the same Kijijii site) someone selling a Pacific Coast Chopper for $45 WOW (photo below)
(There are actually a few of these on there selling anywhere from $45 to $150)

I figured I would grab it and use that rear wheel since the rims alone sell for $50 US + del. on the net.
I could also use the forks and possibly other stuff.

The first thing was to see if I could somehow merge the motor rim onto the wide rim (well actually the first thing was going around trying to identify the motor, that’s when I came across this site, all I new was that it was 36 volts.
I did merge them, so on with the build, I’ll explain what I did later.
 

Attachments

  • Pacific Chopper.jpg
    Pacific Chopper.jpg
    74.3 KB · Views: 3,607
Now the build.
I cut the e-bikes frame up so I could use the rear suspension

Frame 01.jpg

For my frame I’m going to use some galvanized tube that was left over from when my parents made some kind of canopy to hang their grape vines.

You guys are probably going to laugh but here’s my tube bender that I rigged up out of scrap bike parts.
I removed some spokes so it wouldn’t dent the tube, works pretty well.
 

Attachments

  • bender01.jpg
    bender01.jpg
    49.1 KB · Views: 3,585
  • bender02.jpg
    bender02.jpg
    27.5 KB · Views: 3,583
Here’s how it’s coming out so far.
i used the fork neck off the pacific coast bike.
 

Attachments

  • Frame 02.jpg
    Frame 02.jpg
    56 KB · Views: 3,580
  • Frame 03.jpg
    Frame 03.jpg
    37 KB · Views: 3,565
  • Frame 04.jpg
    Frame 04.jpg
    36 KB · Views: 3,568
Alwayz good to see a ground up build and it is looking
great thus far good job.

Your prolly aware that welding galvanized metals is hazardous to
the health the fumes are toxic and mask should alwayz be worn,
thought i would mention it to those reading your worklog :)
Also, galv is a biatch to weld, my entire trike frame is galvanized
steel tubing, your best approach is to grind all areas that will be
welded to remove the galv, you will get less spatter and a neater weld...

Anywayz...i like the shape of the frame, are you intending to have
pedals on this build? I see there is a 'jackshaft' on the scooter you
purchased, will this be 'grafted' onto the chopper also? Have you
seen the Freakbike Nation forum? its a custom bicycle (non powered)
forum, good to peruse for ideas and info etc... might be of some
interest to you :) Lots of chopper bicycle builds to checkout.
Your familiar with rake and trail? Very important to get this
correct or close to it LoL for good steering, you get alot of 'flop'
on choppers with a large degree of head angle or 'rake'...this
mut be addressed with the trail of the forks :) Can fillz you
in more if needed?

Look forward to watching the build come together, best of luck..
your off to a solid start, with HEAP of room for batteries in the frame
will make some here jealous chopper bicycles with their larger
'diamond' in the frame are IDEAL for electric setups IMO, there's
a few memebers with chopper e-bikes on ES so your not alone hehehe

That 4in rim on the chopper bicycle are rare, can't buy them anymore from ChoppersUS
well...not entirely true, Alan tellz me they are only available when he gets
a damaged Scwhinn chopper in, he breaks the bike down and parts it out...
if you can get your hands on a pair PM me ill pay well for a two rims ;)

Kim

p.s clever bender setup...if you have trouble with the tubes kinking
you can fillz them with sand, must be VERY VERY compressed
and sealed well both ends so it doesnt 'push out' when bending
I found wood shaped like cones hammered in work a treat...old
broomstick ground down on the linisher FTW LoL
 
Hi AussieJester
Yeh, I know about the galvanize, I do grind it good, I only have a 2 setting flux mig so I have to take my time and be patient with it,
The low setting is not enough and the high wants to put holes in it :)

Anywayz...i like the shape of the frame, are you intending to have
pedals on this build? I see there is a 'jackshaft' on the scooter you
purchased, will this be 'grafted' onto the chopper also?

By "jackshaft", do you mean the center tube that holds the kick stand ?
If so, no I’m cutting that off, that tube weighs quite a bit and I have other ideas for the kick stand.

Have you seen the Freakbike Nation forum? its a custom bicycle (non powered)
forum, good to peruse for ideas and info etc... might be of some
interest to you Lots of chopper bicycle builds to checkout.

No I have not seen that forum, thanks for pointing it out, I will check it out.

Your familiar with rake and trail? Very important to get this
correct or close to it LoL for good steering, you get alot of 'flop'
on choppers with a large degree of head angle or 'rake'...this
mut be addressed with the trail of the forks Can fillz you
in more if needed?

Thanks , I have a good idea on the angle, but it’s good to know your there if I need you, I will be asking questions to help me along,

I never thought of using sand, that’s a good idea.

That 4in rim on the chopper bicycle are rare, can't buy them anymore from ChoppersUS
well...not entirely true, Alan tellz me they are only available when he gets
a damaged Scwhinn chopper in, he breaks the bike down and parts it out...
if you can get your hands on a pair PM me ill pay well for a two rims

as i mentioned above, a lot of people are sell the complete bike here (some very cheap)

heres one that i just looked up quick,

chopper.jpg

i don't know if it's still available, but it's only 15 miles from where i live.
as you can see they are asking $95 CA, you can't buy a back wheel that cheap.

i might buy a couple of those bikes, tomorrow i will search and see if i can find anymore and call the people to see if the're still available.
i will let you know.

i will have some more pics of my build up tomorrow
 
Wish thoise bikes were so freely available here, i remeber few years back they were for sale in Kmart or Target i forget which now, havent seen one in a long while now though, typical when you want something its never easy to find LoL..

Jackshaft = the small cog with the chain on it the bearings and shaft-->

file.php


Motor would drive the opposite side to the cog with the chain dangling off of it...keep
a hold of it if your not using it on this build could come in handy down the track if you like building choppers
the fellas often use them as a 'mid point' between the front crank/sprocket and rear sprocket on longer framed choppers
as a means to run two short chains instead of one long one. In motorbicyling circles they are also used
to hook the motor up two (as designed for originally) but with the chain (currently with chain on in pic) connected to the front
crank/sprocket (which would be a freewheel crank) then another chain running to rear freewheel, this allows the bikes gears to be utilized...prolley not explained that too well never the less keepz a hold of it ;)

Look forwardz to more pics :)

Kim
 
AussieJester said:
Jackshaft = the small cog with the chain on it the bearings and shaft-->

Motor would drive the opposite side to the cog with the chain dangling off of it...keep
a hold of it if your not using it on this build could come in handy down the track if you like building choppers
the fellas often use them as a 'mid point' between the front crank/sprocket and rear sprocket on longer framed choppers
as a means to run two short chains instead of one long one. In motorbicyling circles they are also used
to hook the motor up two (as designed for originally) but with the chain (currently with chain on in pic) connected to the front
crank/sprocket (which would be a freewheel crank) then another chain running to rear freewheel, this allows the bikes gears to be utilized...prolley not explained that too well never the less keepz a hold of it ;)

Look forwardz to more pics :)

Kim

hummm you gave me a few ideas for another build :)

I forgot to answer you about the peddles,
yes i'm going to have peddles on this build, but i was thinking of using the peddle assembly from the other chopper and have the chain running under the bike with some guides, not sure how efficient that will be, but i think the law here requires you to have peddles.

I will save (as you advised) the Jackshaft for something else.
 
Did a bit more today.
The forks,
I like, and did want to build the springer forks that AussieJester posted plans to and made them for his build.
but right now i don't have the tools to cut the steel plates and to drill the holes in it, maybe later i'll make some.

Ok, i'm combining the forks from the Pacific Chopper and the e-bike (the ones that i bought)
I left the Pacific forks length which is 28", then i cut the e-bike forks to 12", just enough to keep the suspension and to slide into the other fork as to make a stronger joint.

The diameters were off, so they didn't fit tight, i had to find a bushing, but that was ok because i wanted it a little longer anyway.
so i cut a piece of tube off a scrap bike that slid nicely into the Pacific forks and the e-bike fork slid nicely into that.

Then i cut the dropouts off the top piece of the forks (Pacific forks)

forks01.jpg

Those Pacific forks are some heavy duty forks, it took me awhile to cut and grid off the access of those dropouts.

I only have a drill to do most of my work, i use it also for grinding.
one thing i like to do is put 2 grinding pads back to back, this way i can get in to hard to get places (grind by pushing or pulling)

View attachment 1
Grind2.jpg
 
Here's how the forks came out.
after grinding, i applied primer and some automotive spot putty to get rid of the grinding marks.

forks03.jpg

I hated to put all that chrome to waist so i left the top half untouched, i'll figure something out to put where the chrome and primer meet in order to make it look better.

forks04.jpg
 
AussieJester said:
Themz some seriously long looking forks mate nice job :)

Maybe paint the primer area of the forks same colour as the bike frame and put
simple pin strip where the colour and chrome meet?

Kim

They are long :)
I first setup just the 2 pieces (held together with (vice grips) but decided to add another 6"
when i had it outside i pushed myself along and i like the way it feels :D

I like the idea of the forks being painted the same color as the frame.
pin strip sounds good too :D

I have to do my welding outside in the snow, and it's really cold here (minus 18 today)
so that slows things down a bit.

This was taken when i took it out to weld the forks and see how they fit.

 
I am jealous of everyone who is able to make their own frames like this!
It drives me crazy because I can visualize frames I want to make, but don't
have the equipment or skill to weld them. The project looks great!
Heck, any custom built frame looks great to me.
Keep showing us pics, please ...
 
nutsandvolts said:
I am jealous of everyone who is able to make their own frames like this!
It drives me crazy because I can visualize frames I want to make, but don't
have the equipment or skill to weld them. The project looks great!
Heck, any custom built frame looks great to me.
Keep showing us pics, please ...

:D I know what you mean nutsandvolts.
last summer i wanted to build a bike but had no welder, I wanted to buy one because for me it was a good investment :D
but because i wasn't working my wife said it was just like throwing money away :x
well, needless to say, she won that fight.

So i got myself a can of fibreglass resin and cloth, took a BMX and cut it up and made this

lowrider.jpg

I had an 18 volt motor that came off a wrecked pocket bike, so i put that on, cut the peddles off and added 24 volts (2 12v 7ah used bats)

It wasn't great, but it rode, bats only lasted about 15 min. before charge, and it was slow.

I just had to build a better bike, so over the next months i saved some money and bought a welder to do this build.

anyway my point was that i know how it feels to want to build something real bad but have no tools etc. to do it.
 
Inspirational stuff there bud... you didnt do the easy thing and simply say "too hard i have no gear or skillz" you did something about it EVEN with the wife against you VERY brave hehehe...Kudos to you...

Best of luck finding a job so you can add to the tool department...I would suggest adding 5in angle grinder with a handful of THIN cuttoff disks a couple of grinding disks and a bevel square ...I assume you have a tape measure and a set square? With these simple tools you can fabricate ALOT of custom gear ;)

Best of luck...and if you ever need any help (on the construction side anywayz electrical side i'm not much use) don't hesitate to give me a PM...

Kim
 
Did a bit more today.
The battery box,
Here i'm trying to make the box flow with the frame, i'm using very light wood, the kind they use for cottage wall paneling, for $5 you can buy 5 - 3" x 16 feet strips at home depot,
i also picked up some shorter strips for free at home depot, the ones they use to pile bundles on top of each other, their all over the place, if you ask they will let you have them.

Frame 05.jpg

Before i started bending the tube for my first welds i had measured the bottom to see how long i needed to fit 4 12ah batteries, so as AussieJester said i do have a lot of room down there.

I decided to do the seat at the same time as i waited for the glue to dry, the battery box bottom will be thicker as it's going to support the batteries from moving.

In order for the batteries to fit, the box had to be at least 6" wide.
that ment that the box had to stick out of the frame a bit (I don't like that)

Frame 06.jpg

Here's the battery box,

batbox 01.jpg batbox 02.jpg

Here it is primered, still needs some spot putty, and smoothing out.

batbox 03.jpg
 
Here's the seat,
I was surprised how cheap the vinyl was ($5 a square yard)

seat 01.jpgseat 02.jpg

I am going to make a smaller box right under the seat for a 12 volt pack (maybe nicad) to run the lights, horn etc.
so in order to get at it i added a hinge to the seat so it can open up to have access to the battery.

seat 03.jpg
 
Thanks Kim.

OK, as i said 2 posts ago, i didn't like the way the battery box stuck out of the frame.

And i needed to add some kind of support for the kickstand and trailer hitch at the back of the bike, (near the rear hub axle)
The kickstand and trailer hitch are going to be one unit (more on that later)

Anyway, what I decided to do is add another tube running from the front to back, not only does it make the bike look better (I think)
But it also makes the frame stronger, and it gives me the support at the back for the kickstand/trailer hitch.

Plus, if I’m not happy with the hub motor after the build, these extra tubes can also support a chain drive motor just in front of the rear wheel.

Heres pics.
 

Attachments

  • Frame 10.jpg
    Frame 10.jpg
    66.8 KB · Views: 2,405
  • Frame 11.jpg
    Frame 11.jpg
    64.6 KB · Views: 2,404
  • Frame 12.jpg
    Frame 12.jpg
    65.2 KB · Views: 2,399
Trailer hitch hey...so we will see even more custom fab when you build the trailer i'm guessing?

Definitely keep your eye out for a non-hub motor bud, hookz him up running through the gears and you will have some wicked performance cheap in comparison to what you would need to spend on a hub motor for same performance ;)

What sort of weight are we looking at for the frame thus far mate?

Looking good anywayz..

Kim

p.s your wife must be VERY understanding your not also welding inside in the lounge room are you? please say yes hahahaa will be one better than Methods 8) mig action in his kitchen the other day hehehe...
 
AussieJester said:
Trailer hitch hey...so we will see even more custom fab when you build the trailer i'm guessing?

Yes, my idea is to have a small trailer with a geared motor strong enough and geared right to push the chopper,
this way i have 2 motors and 2 power supplies for longer trips or just to go get stuff at the store.

I really don't want to spend money on another controller (for trailer), so i was thinking on a 24 volt geared system, this way i can just use a heavy duty car starter push switch with a relay to power the trailer.

I'm also going to try and figure out a way that the battery pack on the trailer will power the hub motor for when the chopper bike batteries go low. (trailer will carry 4 batteries but run on 24 volts)


AussieJester said:
Definitely keep your eye out for a non-hub motor bud, hookz him up running through the gears and you will have some wicked performance cheap in comparison to what you would need to spend on a hub motor for same performance ;)

Yeh, i don't know much about these motors (only what i read here on this forum) so i'm not sure how this hub motor is going to be.
it's a 36 volt motor and i'm going to run 48 volts.

I'm really not looking for high speed, i would rather have torque to go over a bridge without peddling
so i am going to keep my eyes open for a chain drive.

AussieJester said:
What sort of weight are we looking at for the frame thus far mate?

I don't have an electronic scale, so i just got my fishing scale out now and it said 20 pounds. (without the forks)

scale.jpg

later i'm going to drill a few holes along the inside and under the frame.


AussieJester said:
p.s your wife must be VERY understanding your not also welding inside in the lounge room are you? please say yes hahahaa will be one better than Methods 8) mig action in his kitchen the other day hehehe...

:D :D I read that post yesterday, I thought to myself, either he lives alone or he locked his wife in the basement to weld in the kitchen, :lol: :lol:

No, I have to weld outside, and do the other work in the basement,
 
AussieJester said:
Inspirational stuff there bud... you didnt do the easy thing and simply say "too hard i have no gear or skillz" you did something about it EVEN with the wife against you VERY brave hehehe...Kudos to you...

Best of luck finding a job so you can add to the tool department...I would suggest adding 5in angle grinder with a handful of THIN cuttoff disks a couple of grinding disks and a bevel square ...I assume you have a tape measure and a set square? With these simple tools you can fabricate ALOT of custom gear ;)

Best of luck...and if you ever need any help (on the construction side anywayz electrical side i'm not much use) don't hesitate to give me a PM...

Kim

I might need help on the chain drive and springer forks :D (if i do decide to throw the hub motor out)

i'm going to look into the tools to make those springer forks,
maybe a band saw and something to cut the holes in the plates.

I just bought a rotory tool, Canadian Tire had them on special this week for $9 :shock:
but it didn't have a cut off wheel.
so i'm going to buy one and see if i can cut the plate for the forks with it.

I could always use a hex saw, but that still leaves the holes.

What did you use to drill the holes on yours Kim ?
 
Bobocop said:
What did you use to drill the holes on yours Kim ?

I used a METAL hole saw on a big Makita hand drill...

To cut the steel plate angle grinder and ultra thin cuttoff disks ;)
 
AussieJester said:
Bobocop said:
What did you use to drill the holes on yours Kim ?

I used a METAL hole saw on a big Makita hand drill...

To cut the steel plate angle grinder and ultra thin cuttoff disks ;)

Well, I'm going out tomorrow and buying a cut off disk, I need it to get rid of some of the weight.
I'm going to remove part of that first inner tube from the bottom of the frame, I don't really need it there.

while i'm out i'll look into some of the meterials needed for the springer forks.
if i do decide to make them it will be later in the build.
 
Here's a pic of the bike before i finished the forks.
the tube i want to remove is this one (red arrow)
pls there's a couple of brackets on the rear that aren't needed.

Chopper 03.jpg

I am not going to use those handle bars, thats just to hold the forks on.
 
Back
Top