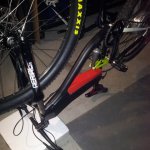
Aluminium "555" chopped DH frame: 555WattHrs

Very stealth. Nice work.
I like building stealth and silent, for it can ride anywhere no hassle.
 
After being laid up again for a month in total with a bad cough and another round of antibiotics in me, I can get back into spending most nights in the man-shed!

I got the bike out finished and for a quick ride but the BPM is just too punchy with it's torque levels at 2100W. I noticed the axles started to spin about 30 degrees after inspection. I only went a few blocks.
That was with two ~3.5mm chinese torque arms drilled, tapped and bolted to the frame.

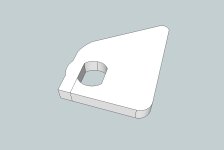
So I decided this needed to be done properly and have had a prototype set of dropout reinforcements lasercut to be a perfect snug fit, in 6.4mm plate. The end result will be approx 10mm of dropout thickness on both sides.

The first prototypes are done but need a lot of filing. I left them open just to get sizing.
IMG_20130819_140427.jpg

The final design is closed and should have approx 0.10mm of space around the sides. I'll still drill and tap to the original rear dropouts.
Dropout2.jpg

There should be enough room to refit the derailleur hanger if anyone needs one, even though I'm thinking single speed.

Another week for the final laser cutting and I will be ready to fly. :mrgreen:
 
A bit more work. Fitted a 6speed rear cogset, balanced the wheel, and ordered a new bottom bracket spindle as the stock one sounds like its full of rocks.
A few more days for the new torque arms and I'm set....

Here's a quick vid...
http://instagram.com/p/dRnCZCyYaP/#
 
Very happy with the new torque arm revisions. Fitted to both sides with M6 capscrews.
Took a ride down the street last night, hard not to lift the front a little without your feet up front on pedals, quite unnerving at 50kph. :mrgreen:
ce4b53440e4711e3984322000a1fcb7e_7.jpg

I ran the BPM sensorless at first and wouldn't recommend it at ~2kW. The sync shudders on takeoff made the clutch stick despite my throttle taming efforts, so I stopped and reconnected the halls. The clutch came unstuck and stayed smooth. Pretty silly in hindsight to shock the internals like that.

Couldn't resist a quick spinout on the garage floor.
http://instagram.com/p/dedH7uSYaa/#
Some interesting females seemed to like my instagram video above!

Just waiting for a BB tool to fit the new shimano BB that arrived, then I will fit pedals and maybe a singleator style tensioner. There seem to be plenty around given the current fixie fad.

I also need to splash proof the underside given the location of the 12fet and wires. That should be easy with the 3 dome heads on each side, maybe some ~1mm thin silicone sheet from an old placemat or the like. I felt the 12FET's main bar temp again after a few hard passes, and i was warm just to the start of my pain threshold commencing, which is generally about 65 to 70 degrees C according to my old espresso making days. :wink:
But if I add some ~3MM thick aluminium flat between it and the 3 capscrews on that side it should heatsink to the chassis really well.

The frame rode very well without pedals and I'll test some more in a thorough fashion, but I'm really pleased now and confident that getting the next frame underway with a fabricator is of little risk.

I plan to only sell the next frames when I have real units in stock, I think looking back on the bioplanet failure, and even some other frames in development, it's not a great policy to ask people to put money down and wait while you use their money to make a big batch. I'm going to try and flow the dozen I have in single or twin batches. TBA...
 
I ran the BPM sensorless at first and wouldn't recommend it at ~2kW. The sync shudders on takeoff made the clutch stick despite my throttle taming efforts, so I stopped and reconnected the halls. The clutch came unstuck and stayed smooth. Pretty silly in hindsight to shock the internals like that.

Interesting. I ran my BPM with a sensorless EB306, and didn't notice the stutter but definitely noticed the stuck clutch. I just assumed it was the shock load on the spinning internals catching up with a moving wheel that jammed things up. But then again I also have some other unwanted cyclic rubbing noise from in the motor.

BTW bike is looking a treat !
 
Stutter is really derived from the controllers back EMF reading

Heavy stuttering just means it's pumping out more power than it know what to do with. You can minimize this with ramping or tweaking the algorithm to match the motors design.
Hence the variation you both experienced in ride feel.

I'm a big believe in sensorless, especially when your exceeding spec. Its not like they are over engineering to meet increase heat demand when selecting glue mount hall sensors.

But if you intend on riding trails sensing is ideal, so controllers that switch when hall failure is detected into sensorless mode is ideal.

Also frame looks great, I'd like mine in a full raw aluminum with a clear coat :p
 
That makes good sense t3sla. I do worry about the high frequency backlash when the stutter hits the synthetic internal gears. Not a prob of course for DD hubs.

Clear coat would be rad. I think I will get another frame going, even on the runs I did sans-pedals the frame felt pretty good the other night. I am toying with taking the bike on the 80km ride from Castlemaine to Ballarat next week with the Gloworm guys if I can buy another 9 lipo bricks in time and make up a backpack. Some nice jumps roadside on the old goldfields. :twisted:
 
I'm sorry I missed this thread until I checked your sig just now.
Beautiful work. Was the welder reasonably priced rate? I love the chop and shut frame idea (like my monster).
So if you sell a bike or frame do you have an approximate selling price?
Sorry I admit I skipped through this thread, so if I'm way off with this post I apologize.
 
Gday Pendragon,
the fabbing isn't cheap. And several iterations to get the CAD to work in real space.
But I can probably make a return when I get the other 11 frames done.

At this stage I think about ~$950 plus freight - although with the Aussie dollar diving that makes it pretty cheap for overseas folks even with say $150 freight.
Cheers.
 
All rolling and ready for some fun in the carpark after work today.
So far - fantastic! In fact - hilarious!

IMG_20130830_122721.jpg
 
Very stealth. What thickness of plate did you use?
 
3mm plate only, non T6. Importantly its a compression section, and the base section prevents an extreme buckle.
Might go 4mm on the dozen sale frames.

Cheers wrench.
 
I'm more accepting of the top tube mod now that I've seen it more and thought about it.
Its s beautiful piece of work.
The compression factor is very interesting and I hadn't considered it. From my experience the wall thickness is less critical than structural integrity from gusseting and triangular reinforcement brackets.
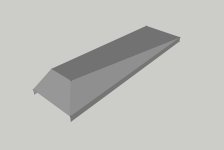
The weak points mechanically are where the box meets the frame. For piece of mind triangular brackets around there will increase the strength by many times its original breaking point. Also consider dimensions of vertical and horizontal plane. If you combine them you'll have a tough frame.
I only say this after having to fix a cracked frame in my monster bike. Now its solid as a rock.
I'll see if I can find a photo.
Before:
file.php

After:
file.php
 
jateureka said:
Looking good.
How did you protect the battery leads etc where they pass throught the metal tray?

Sorry jateureka I missed responding to this. I just drilled 8mm holes, ground them smooth with a quick dremel grinding bit, and used silicone coated wire.

No signs of wear yet.

This bike is a lot of fun to ride! I should be in the shed preparing the next frame most evenings, instead I've been hitting the town skate parks and library steps after dark! :mrgreen:
 
pendragon8000 said:
I'm more accepting of the top tube mod now that I've seen it more and thought about it.
Its s beautiful piece of work.
The compression factor is very interesting and I hadn't considered it. From my experience the wall thickness is less critical than structural integrity from gusseting and triangular reinforcement brackets.

Thanks for the commendations. I'm glad top tube mods do appeal to some. Hopefully I'll sell a few frames :)

If I am understanding the location of the pic above that is a different failure mode. What is the material of your current bike pendragon?

I often tuned out during my mech eng degree, but thankfully I can confirm that I listened enough at some point to advise that there is a point where thin plate buckling takes over. The gauge I chose and the bolted trapdoor feel like there won't a chance of initial buckling for compression. But more testing required. :twisted:
http://en.wikipedia.org/wiki/Buckling
 
Bike is getting close to complete - the Melbourne group ride this Sunday has kept me focused on finishing.
View attachment 2

I've shortened all elecrtical cables such as throttle, phases, halls - which has tidied up the extra wires on the underside immensely, and upgraded the phase wires and bullets. I've also coated the frame, and made a surly-singleator style chain idler on my 3d printer to keep the chainline sweet. Needs fitting tonight.

Unfortunately last night I removed the 12 fet from the aluminium under-tray while painting the frame, and managed to lose the black GND wire of the throttle fitting from the PCB. I have plenty of replacements in stock to copy from or replace outright, but in future I will make sure all small wires are secure against the chassis of the undertray to prevent the possibility of this happening again. You gain something removing the controller case but you lose the structural protection of the wires.

I've also designed up a nice undercover to keep the wires protected, and will add some vents and add some more aluminium to the existing heatsink.
I'll make a basic cover tonight from corflute, with some neodymium magnets to hold it fast underneath (they'll attach to the inner ends of the dome head cap screws). Once my dimensions are ok I plan to 3d print a proper cap with some ventilation for the 12 fet, and angle the vents to prevent rain and mud from getting in.
Underguts.jpg

I'm also planning to paint the blue suspension linkages tonight and the section of frame behind it if time permits. Black or red? :?:

The stock length of the rear hydro disc tube is very long, so I might try to get time to visit the LBS and have it shortened as it is a potential snag.

It's so hard to keep working on it in the shed now it's rideable - the temptation to head out the gate at night for an urban jaunt instead is rather strong! :twisted:

Here's how it should look all packed up:
bitmap.jpg
 
Under-door now complete and works well. I will add some vents but after 30 mins of hard riding the controller didn't seem to get warm. I was able to make up a large section of aluminium angle and drill it so the side screws retain the controller and the aluminium adds a lot of extra heat sink.

My prototype underdoor will make a nice pattern for measuring off the sizes and doing a decent job of 3d printing one. Nothing wrong with the duct tape covered corflute one though :)

IMG_20130919_214858.jpg
 
Bike looks good in black. Custom cut and shut full suspension aluminium mtbs in matt black are the new hotness :p
Did you paint it or have it powdercoated ?
Did the controller always hang out like that ? I I thought it was all internal for some reason. Or is it due to the wiring issues you just bolted the whole thing in there case and all ?
I'd probably paint the linkage black seeing as you have the big red door there now. Or ideally black on the outside with a red pinstripe around the inner holes :p
 
Hey fella,
I'll be powdercoating in future for sure.

But I finally found out about Plastikote that all the boy-racers use to matt coat their 2litre cars. Expensive but fun to experiment with.
It peels off like a thin coat of rubber/silicone paint. A light sand of the aluminium first to increase surface roughness before spraying, and now the bike has a sexy new rubber catsuit sticking to it. And if I don't like it a can peel it off and change. Any little bits of overspray was easy to manage, any fine spatters could be rubbed off as they have exposed edges. But the bulk stays on as it doesn't have the edges. Goes on like hammerfinish - needs loads of thin coats. It would still scratch if you dug your car keys at it - so powdercoat is the long term plan.
Check it out - they coat a whole car: https://www.dipyourcar.com/home.php

I've painted the old linkages in black enamel - removed them to do it - so you'll notice a different set of yellows got put on the bike while the new ones dry properly...

The controller tray underneath could be made at least 15mm lower. But I actually increased the depth of the new under tray at the front because it follows the line of the aluminium gusset that joins the tank to the downtube. It looked like it 'wanted' to go that way when I stood back and had a lookie. I like it - makes it looks faceted like stealth aircraft/bikes and other low-polygon shapes. The cover tapers back to the seat end, it doesn't reduce clearance of the shocker.

Actually there is enough room at the rear end to fit an additional 6 fet. I've been thinking of having a street legal controller, and an offroad one, with a 3 way switch to trigger. Of course I was riding in legal mode officer. The 6 fet could also be used for a small front hub, again for street legal mode, but the mid switch setting could power both controllers and motors. Or a GNG in tandem :twisted:
 
That's look real good. I'm impressed. :)
I agree with Hyena about s pin stripe on the arm. That's what I was thinking before.
With the street legal issue, I use the CA v3 to have street(legal)/economy/unlimited. A descreat switch can be used to change modes by putting a voltage divider on the aux input and choose 0v 2.5v or 5v . Sorry if you knew that already. CA v3 is the bizo.
 
Thanks Kep, I should put a spare Code10 in the van - first one to fry theirs on Sunday gets the a new one. 8)

Thanks also Pendragon. I 'm a bit of a minimalist, and I guess I have put off using CA's for no reason. For DD hubs I think the CA makes great sense.
The Ku 6fet/12fet controllers are so well matched to small/large geared hubs respectively that I've kind of had no reason.

Guess I better have a look.
 
Samd said:
But I finally found out about Plastikote that all the boy-racers use to matt coat their 2litre cars.
haha if you really want to be like the rice boys you need to make your bike fluro pink for saturday night and then return it to stock in time for mum to take it to work on monday :p

Let me know how it holds up though, my stealth fighter has been taking few hits of late and was thinking about hitting it with a few coats of this stuff.

pendragon8000 said:
A descreat switch can be used to change modes

So... not a blue LED carbon fibre missle switch like I was planning to use then ? :mrgreen: :p
 
Kepler said:
Looking forward to seeing the bike in the flesh.
Me too. :mrgreen:
 
Back
Top