Amberwolf's Bolt-Together Semi-Recumbent Cargo Bike

Yep, I like the extra frame. Is there a possibility of that suspension link being "Over centered", if you raise up the swing arm high enough ??

It looks to me like that is a definite possibility.

Maybe I'm not seeing everything ?? How much up-down movement is in that swingarm, especially when you hit a bump under load ??
 
I'll have to look up "over-centered" as I don't know most suspension terms (thought I did once but keep finding lots more :)).

Keep in mind that the swingframe doesn't actually sit down nearly that low now, as it does not have the yellow springs in there anymore, just the black one, which while shorter does not compress nearly as easily (850lbs/in). Because of the spring's limited compression range, I expect the full swingframe movement to be no more than it was on teh bike it came from, as it is the same size and type of spring used there. Only difference is that it is mounted on a much larger damper unit (mostly because the little MTB dampers I have are all junk, and would need serious rebuilding or modification to actually damp anything beyond gravel bumps. :roll: )

I don't know how much vertical travel the swingframe has at the axle, and don't remember what it was for sure on the original bike. . I am not strong or able enough ATM to compress the frame to see, or to hold it while I load it up with stuff that could compress it.

I guess I could just measure the gaps between the spring coils and then take the yet-to-be-welded front mount loose, and move it forward of the seatpost by that much. That would let me see the swingarm's fully-compressed position. Would that help?

Under normal laod of me and the bike/batteries/motor, I expect the bottom of the swingframe to be about level with the ground, maybe angled up a tad, kind of like the original bike it came from. (which is why the bottom of the red frame has to be higher in the rear than I show).
 
"Over centered" means, If you raise the swing arm too high, as you compress that suspension spring-shock, it COULD go past the point of no return, and actually, spring back out, raising the wheel higher, dropping the bike frame MUCH lower to the ground.

There is a point, where, that swing arm will be under maximum travel, before the spring -shock allows the swing arm to go past maximum, and, that will throw the wheel higher.

I'm not the best at 'splainin things. :roll: :roll:
 
I think I get it. I actually had that happen on one of the attempts to add a swingframe to CrazyBIke2; I think that was the one that crushed part of the rear triangle that I had to cut out and weld a new piece on.
 
Hmm....didn't see your reply there. :( That is an interesting vehicle; I wish I could emulate it's four wheels but 3 or less is the bicycle definition in this state. :(

Been doing more of the city-ordered cleanup, so still not back to this project yet. However, gathering parts still:
http://endless-sphere.com/forums/viewtopic.php?p=421439#p421439
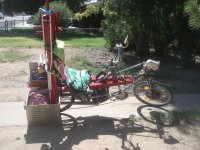
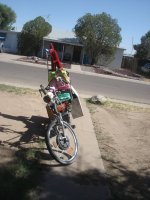
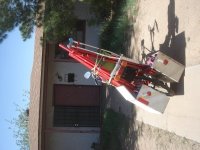
There were some old nearly 5-foot by 5-foot signage fixtures at work that were to be tossed out, made from 1" square tubing. Since they were going to be trash, I was allowed to take them for my projects, as long as I got them all out of there right then (at end of work shift). Fortunately, they each easily snap apart into two verticals and two crossbars, total of 10 of each of those, all of which I was able to tie down to the bike. About 50lbs of metal, there.
DSC04521.JPG
Was quite the challenge to find enough spots for it all, and ended up having to stack it two-deep under the seat, which basically meant I couldn't sit on the seat itslef, as there was no sling; had to take the Iams blanket I have rolled up under the pink and green dayglo stuff and put it on the seat bottom as a pad to ride home on. :)
DSC04518.JPG

View attachment 2

DSC04520.JPG

So now I have PLENTY of the square tubing I wanted for my new bike's cargo rails, and although it is thinner wall than I used on CrazyBike2, it is probably still more than strong enough for my needs, given that I'll be triangulating between the rails anyway.

Each of those tiles is about 12", so each rail is almost 5 feet long. Because the rails with the snap-on 90-degree parts are a bit shorter than the plain rails, they both weigh about the same, almost exactly 5lbs each. Those added parts are just barely welded on there, and so should be easy to remove. I may well adapt the snap-on system of those stubs into my cargo rails, to allow snap-on lower or upper "decks" for my rails, sorta like the Xtracycle system.


There are three more signs to be taken down at work; hopefully I'll get those, too, as that is another 12 pieces of square tubing to work with.
 
The bike looks really good AW. Reminds me of a line in the movie 'Machete' where he says "Machete Improvises". Looks like it would be very comfortable to ride.
 
(crossposted from the CB2 thread)

Today I picked up some stuff to help both with bike projects and with my cleanup:

Fred just finished investigating it; the wood has a few pieces that smell like cat pee, but its' all for outside so I don't care. It'll become the frames for some fence pieces to go at the edge of my sheds, to enclose the area behind them in a non-visible-from-off-the-property manner.

The tubing is mostly EMT electrical type tubing, much of it with 90-degree curved bends at one end, which may be very useful in making various bike and trailer parts, without me having to do any bending. I will probably use these bits instead of the aluminum cot parts, for the rear cargo rails on the new bike. (and for that reason, this post is crossposted to that thread as well).


Some of it is thinner water pipe, so it isn't super-heavy, but too much so for bike use. So it, plus those awning-supports (two white/rusty, and one brown/rusty) will end up welded together to make me a back porch awning, to replace the wooden one I'd built out of 4x4s when we got to this house about 11-12 years ago, and destroyed by one of my sisters about 5 or 6 years ago because she wouldn't listen to me.


I already moved the tubing into the house; in a couple of hours when the sun isn't directly baking the backyard (it's 108F out there right now, in the SHADE, with the wind), I'll move the wood inside so I can cut the pieces and build the fence bits to put up.


There's also some motors; the motor/grip end of a 3HP electric chainsaw (120VAC 11HP motor, dunno if brushed or induction yet), B&D brush trimmer, a vacuum, a desk fan, and a weedeater. None are working at the moment, but I don't yet know what's wrong to see if they're fixable or usable.

I don't get much stuff of Freecycle these days, but sometimes I find a "motherlode". :) In this case, it was just a post for some weathered lumber, but when i got there the guy had the tubing and motors as well; we'd both remembered a conversation about electric vehicles we had had more than two years ago that had stopped due to some sort of computer problem on his end, and I'd never gotten a reply back after that, so it never went anywhere.

Now he's got links to my blog and ES, and he has this project motorcycle that currently has an ICE but I wonder if it might be a good electric candidate. ;)
 
Hey AW;
You can make nice bends in EMT with a hickey; http://www.cefga.org/documents/BendingRaceways.pdf

Very cheap and easy to use. I've seen used ones in a ReCycle store for $5.

Nice score of freebee's.
 
All of my projects are now on indefinite hold until the hostile takeover of Endless Sphere is resolved in a satisfactory manner, or a satisfactory replacement forum is started and my data is moved to it.
 
Over in this thread:
http://www.endless-sphere.com/forums/viewtopic.php?f=28&t=30641
it was announced that the NuVinci N171 developers' kit, which I have wished to have for years, was going for cheap ($150+shipping!). I still have no budget for it, but a fellow ES member, GlennM, offered (unasked!) to get one for me to help my projects along, and hopefully to expand the ES knowledgebase as I figure out ways to use it that might be a bit different from how others do things. :lol:

So the order was placed last week, and today mine arrived, and passed incoming inspection:
View attachment 4
and appears to have all the parts (I only glanced thru the list vs what's there):
View attachment 3

That shifter motor looks almost exactly like one I saw in a Japanese car in a junkyard, used for a window rollup motor. I think it's even the same company, but it's been a couple years so I'm not sure. :)


It *is* heavy, feels about the same as a Fusin gearmotor, and is roughly the same size (but narrower).

There's been some good discussion in the above linked thread about ways to use these, but until I had it here I woudln't be sure how it all could integrate in...I kinda need to hold and see things in person to really grasp what I might do with them. :)


Holding it in my hands, I can visualize how I will probably use it: Output from the NV to the rear wheel on the *left* side, via sprockets on the brake rotor mounts.
Input to the NV via one of two methods:
--Dual freewheels on the right side, if I can figure out a way to do it (possibly using a BB cup, modified, to extend the threading, if there's space)
--Single FW from the jackshaft Thud made me for CrazyBike2's original drivetrain, and pedals and motor will be combined via dual freewheels on the JS's left side, output on it's right.

I'd already planned essentially the last one when pondering using the SA 3speed IGH as a jackshaft at the pivot point of the rear swingframe, or near it, so the only real difference is the huge weight and size difference.

I may decide not to use any freewheel on the motor side of things, and only put one on the pedal input to the NV, to prevent backdriving them, since this bike really would suck to pedal anyway, most likely, given it's projected weight. :lol:


The electric-powered autoshifter setup can be controlled either by analog input 0-5V, or shift maps using up to 64 shift points, which will shift up or down automatically as specified by the user-programmable maps when wheel speed reaches one of those points.

You can even put a switch on the handlebars to switch between two maps on the fly.

But you can't switch between manual and automatic on the fly--you have to reprogram the shifter via USB from a PC to do that. :( Seems like a feature anyone might want to test out, so it's odd that this isn't a core function. Oh, well. I'm used to that kind of thing.

I could in theory build an analog autoshifter mapper (with op-amps, and comparators and/or transistors) that would read wheel speed and shift at certain points (preset with pots rather than code), and still allow for manual override control of shifting. It would still use the normal autoshifter from the devkit, but in pure analog manual mode. Probably wouldn't even be that much work to design and build, but it's not something I have time for yet.


Another idea I had was to use the output to the shifter motor itself to disengage the traction motor's throttle momentarily, so that shifting can quickly happen without much load on the shifter motor. It'd be something like this:
file.php


If I decide to totally forgo the electronic autoshifting, I can also theoretically build a manual cable-operated shifter. It still works by turning the square rod, so as long as I can work out a manual control system that turns it, like a dual-cable (pull/pull) reel, with a 4:1 ratio or more at one end or the other, then it should be possible.
 
Gordo said:
You can make nice bends in EMT with a hickey; http://www.cefga.org/documents/BendingRaceways.pdf

Very cheap and easy to use. I've seen used ones in a ReCycle store for $5.

Nice score of freebee's.

Somehow I missed seeing your post...sorry about that! :oops:

I haven't ever seen those benders used around here, but I could probably make one easily enough, out of wood, sheet metal, and some pipe.
 
I had a few minutes today to dig out this bike, and take some quick pics of possible motor and NuVinci hub placements. Keep in mind that most likely each of these will hang below the frame on dropouts/mounts made specifically for each one, rather than sitting along the tubing like the pics show. I may yet add the bottom framing to enclose them, too, that is shown in a pic/drawing on a previous page.

First, one of the Fusin motors from Dogman's melt-off, just forward of the NuVinci. Note the NV is larger than the Fusin!
View attachment 6

Close up of same.
View attachment 5
Probably I would run a small sprocket bolted thru the rightside cover of the Fusin, into a freewheel on the NuVinci's input splines. I might instead put the freewheel on the Fusin, and use a thinner single sprocket on the NV splines, to save room for a pedal freewheel. The motor chain is shorter than the pedal one, so if I can only fit one freewheel on, I'd rather it be the one on the longer chainline.

If I have to I can run a jackshaft to combine motor and pedals, but if avoidable, it'd be nice.

View attachment 1

I am considering something like John in CR thought up, of running the Fusin core, minus planetary and shell, and putting a very small sprocket on the magnet bell's side, which would normally drive the sun gear of the Fusin's planetary, to a very large sprocket on the NV input. This would eliminate both the plastic gearing *and* the heat-retaining external shell, allowing the motor to be easily ventilated and cooled, and thus able to run harder and longer than it can be right now.

It's really only a 300-500W motor as-is, and pushing 500W into it constantly for long periods is not a happy thing, either, as I have shown myself on DayGlo Avenger with the trailer trips--it just gets so hot that the halls start intermittently not working, but fortunately they came back after cooldown. Probably won't always do that. ;)


Alternately I could use the GM/9C hybrid, which can be a 1000W motor, minimum, as-is:
View attachment 4

Closeup:
View attachment 3
Again, bolt small sprocket to rightside motor cover, large one on NV drive input.

View attachment 2


On both of these, the NV's brake rotor mounts would probably be used to drive the output sprocket, but I might use the spoke flange instead, depending on the size of drive ratios needed at the rear, and amount of chain engagement I want.


One more thing--since I don't want to deal with chain growth/etc. on the rear swingarm/frame, there will have to be a new custom swingarm built that will accomodate a jackshaft as part of it's mounting pivot point, so the NV output can go to the left side of that jackshaft, thru the js/pivot, then out the right side of that to drive the normal freewheeling input of the wheel (because I don't want to back drive all that chain up to the NuVinci's output side, including the NV housing).


That custom swingarm pivot is going to take some thinking.

Most likely I will need"
--core shaft (small electric scooter rear axle, from ScootNGo or the like) that will support the weight and stress of the pivot,
--bearings on that *just* inboard of the dropouts the shaft will mount into.
--Possibly a spacer tube between the bearings to keep them at the proper distance, riding just on the outer diameter of the axle.
--Large spacer tube to ride on the outer surface of those bearings. Tube will need to be etched on inside diameter a bit to make recesses for the bearings so it can't slide on them side to side. Might eliminate need for small spacer tube on axle. This tube will be the torque transfer from left to right at the pivot; keyed sprockets with spacer rings on either side will fit over it.
--bearings on outer diameter of above tube, just inboard of the sprockets, will support the pivoting of the swingarm.
--Tube on those bearings will be part of the swingarm.

Something like this:


Anyone see why that might not work? Or have somehting more practical and easier to make?


I also have the rear swingarm and belt drive/etc from a Honda Spree gas scooter from the mid-80s, but it's for a much smaller wheel than I want to use. I am sure I could lengthen it; I'd have to take it off teh scooter to see exactly how it's setup.
 
I am going to continue this build over in a new thread:
http://endless-sphere.com/forums/viewtopic.php?f=28&t=31255
and copy all of this build's stuff over there.


The original build in this thread will stay here, and I'll get back to it eventually. ;)
 
Back
Top