atoms cannondale Jekyll pics/progress

atom1025

100 W
Joined
Jun 1, 2011
Messages
173
Location
Sacramento California
Finally got my frame back from the painter. Cost me zero cause the boss' cousin owns the shop and does a lot of our work. Guess hes a perfectionist and took it upon himself to do some more bondo work. I was happy with how it looked when I was done but he made the transition from metal to fiberglass look invisible. I couldn't tell you where, it looks so good.

Bike: 2004 cannondale Jekyll
Motor: mac 10
Batts: 57v rc lipo (prolly cram 10ah easily and 12 ah with some determination.)
Esc: infinion 12fet

I used foam fiberglass and epoxy to make this. Its very easy to make a box like this but if you want it pretty it takes some skill and lots of hardwork. This is only my second composite project and it came out exactly how I invisioned it. If people give a damn I can post the build pics. But posting pics from my phone sucks.

More pics to come. Won't be ridable for another month as I need to pick my new battery as the 8ah nanos are old and tired.

Adam
 

Attachments

  • IMG_20130209_112455.jpg
    IMG_20130209_112455.jpg
    137.7 KB · Views: 3,667
  • IMG_20130209_112804.jpg
    IMG_20130209_112804.jpg
    90.7 KB · Views: 1,656
Impressive nice clean stealthy look.
I am voting for some build pics :wink:
Is the esc coming in this box?
 
Unfortunately the esc will be exposed to the breeze. They have to have airflow.

Got her pedalling, gears shift nicely, rear bb5 installed and working poorly just as before. Those bb5 suck to dial in. Maybe its just me.

White pedals really standout. Prolly just rattle them black since I'm cheap and like the pedals. I'm gonna have to sand the cover a little then have it touched up. It gained some size with the paint making for a just to tight fit. Also included a top shot to show width. Its 3"wide.
 

Attachments

  • IMG_20130209_160402.jpg
    IMG_20130209_160402.jpg
    162.4 KB · Views: 3,620
  • IMG_20130209_161202.jpg
    IMG_20130209_161202.jpg
    69.7 KB · Views: 1,654
Got the front brakes working. Those are always easier to dial as there's not a hub motor in the way.

So I love my simple thumb throttle but really want to use the half twist with 3speed switch. It seems the majority of shifters are clickers with the triggers. There all so bulky and make useing the half twist impossible. Really want to find a shifter that's tiny. I remember the 10speed road bikes in the 80s had nice skinny shifters.

The problem is the thumb throttle is so far away from the grip. Its comfy for my giant ape paws but average size hands can't reach comfortably and my wife really likes to get loose on this when shes feeling down, really lights up her face to ride mine once in a while.

Also I currently have the three speed switch with the batts and I really want it at thumbs reach.

Anyways it was a good day and I gotta stop for the night.

Here's the before.

Adam
 

Attachments

  • 5Kf5H35J93M43F93Hcc4ea076fe71c8751243.jpeg
    5Kf5H35J93M43F93Hcc4ea076fe71c8751243.jpeg
    38.5 KB · Views: 3,611
Since there is interest I will go into detail.

So first off I don't know what the hell I'm doing here so follow at your own risk. Youtube has lots of helpful videos. Here's the ticket to success. Don't be afraid of this stuff, its easier then it looks. If you can place fabric and roll out some epoxy your set. There is no need for fancy tools, pumps, ovens etc. I have a vacuum system but did not use it. The man who taught me this crude method called it a wet layup and he made incredible contraptions. He made composites from a pair of Levis and it was tough as snot. So don't take composites to seriously. Its not a science. Sure a pro could make the same thing stronger for a third of the weight but were talking less then 5lbs here.

Ok so there's two parts to a composite. Fabric and resin. There's tons of different kinds to pick from and it can get pricey. Bondo even has a line of glass and resin at home depot. I would not touch the stuff but I'm sure it would give results. Here in the states I would shop at TAPS Plastics. They will show you what you need and there's even free literature. I had leftover resin and only needed hardener as it only has a year shelf life and mine turned black. I bought west systems 308 hardener. I recommend the slow cure for beginners. The medium puts the pressure on ya with time crunch, fast is for the pros or quick fixes.

The glass I used S2 glass 4533 and two yds got me three layer s. Its tough but I would recommend 5 layers.

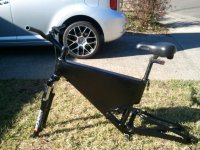
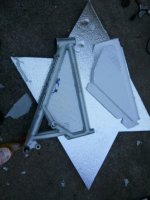
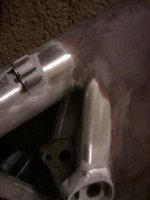
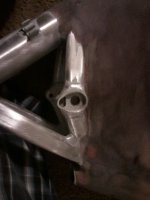
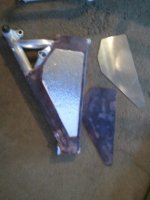
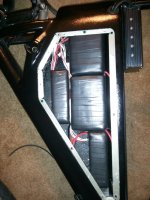
So I bought the eps foam insulation board from the home depot. It comes in a variety of thickness. I bought the 1.5". Cut the triangle out, well actually two identical triangles. Then using a router I cut the channels for the frame tubes. You can use a razor as well or even melt it with a solder iron.

Ok that took a whole 20mins. Then you must adhere the two halves. I used that tough stuff spray insulation as I had it and it filled the voids. It actually is sticky ass stuff so beware.

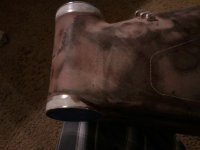
Allright had a smoke and some lunch and we are an hour in. Here's where you can spend 2 mins or two months of your life. Adding shape..... sure if I left it blocky it would look fine and function but sexy curves are much better. I would guess I spent 3hrs a weekday for two weeks tweeking off this frickin thing. Would of gone smoother had I known eps melts from bondo!!! Set me back some hours. So I used a palm sanding block and a router to shape. The hardest part is making that side look identical to this side. At some point I had to move forward else there would be nothing left.

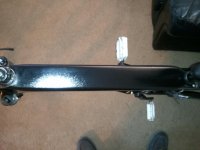
So shapes almost done but I was struggling with the "put bondo down then sand it all the way off" I needed structure. I had the glass mesh for roofing. I spray glued it to the frame. This acted as a chicken wire for the bondo, smoothed imperfections and also gave me a warning layer. So sanding the inside if I see yellow I know I'm close to the shell and to back off.

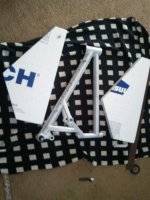
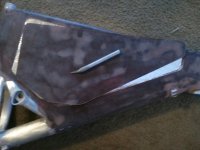
Allright bondo done, lets get dirty. Allright just remember that you can sand away ugly when its fiberglass so just have at it like a kid on a paper mache volcano. Its pointless to try and get crazy with the templates. Just slap the shtuff on and get it wet with epoxy. Here's why I me the medium cure. It gets tacky quicker so tough curves grab sooner. Just relieve stuff roughly don't start trimming the excess till later. So it takes me a panicked 20-25 mins a layer. The pot life is 30mins so that's perfect. As soon as the layer is on I have a smoke break......

Start the second layer right away. Its easier if its a little tacky but doesn't matter. Then just keep adding layers till your happy. If you let it cure you can't add more layers until you rough up the surface. Its best to get it all in one afternoon.

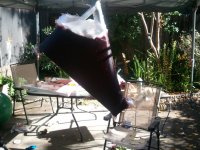
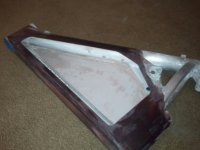
So after a number of hours the shell will lose its tack. Its soft like taffy. Perfect time to trim the excess. If you trim to soon then its messy, to late and you have to sand it off.

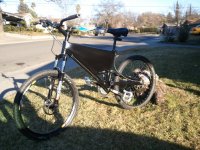
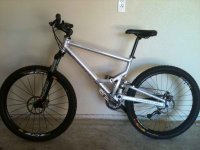
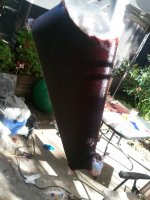
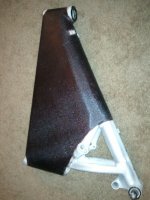
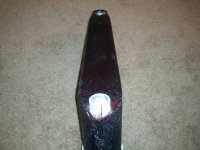
I then used the epoxy and micro balloon filler as a bondo/gelcoat to fill imperfections. Let it cure. Longer the better. At least a week. Then, again how smooth do you want it. Its really easy to spend hours of you life sanding, filling, sanding, rubbing, sanding.... my wife was worried id lost it and was worried I ruined a perfectly good bike! LOL whats up now wifey! !!

So then you paint it. Paint sucks even when a pro does it. You can't abuse it like powdercoat. Thinking bought getting it vinyl wrapped like the cars...

Adam
 

Attachments

  • IMG_20130209_184603.jpg
    IMG_20130209_184603.jpg
    89.3 KB · Views: 1,654
  • IMG_20130209_184646.jpg
    IMG_20130209_184646.jpg
    88.2 KB · Views: 1,654
  • IMG_20130209_184836.jpg
    IMG_20130209_184836.jpg
    135 KB · Views: 3,617
  • IMG_20130209_184933.jpg
    IMG_20130209_184933.jpg
    125.9 KB · Views: 3,617
  • IMG_20130209_185011.jpg
    IMG_20130209_185011.jpg
    139.1 KB · Views: 3,617
  • IMG_20130209_185106.jpg
    IMG_20130209_185106.jpg
    107.3 KB · Views: 3,617
  • IMG_20130209_185231.jpg
    IMG_20130209_185231.jpg
    102.2 KB · Views: 1,654
  • IMG_20130209_185401.jpg
    IMG_20130209_185401.jpg
    74.8 KB · Views: 3,617
  • IMG_20130209_185447.jpg
    IMG_20130209_185447.jpg
    70.8 KB · Views: 3,617
  • IMG_20130209_185624.jpg
    IMG_20130209_185624.jpg
    79.5 KB · Views: 3,617
  • IMG_20130209_185546.jpg
    IMG_20130209_185546.jpg
    67.2 KB · Views: 1,654
  • IMG_20130209_185709.jpg
    IMG_20130209_185709.jpg
    76.1 KB · Views: 1,654
  • IMG_20130209_185812.jpg
    IMG_20130209_185812.jpg
    70.7 KB · Views: 1,654
That looks great! I really like this, the Jekyll is a nice riding bike, should make a good ebike. How much does the addition weigh?
 
With a cheapo spring style postal scale the frame gained less then 4 pounds.
 
So I had the brilliant thought of hacking the 3speed switch from the twist throttle to the thumb. The surgery wad a beautiful success.

Taking the infinion case to be anodized black tomorrow.

Might have it wired by next weekend but I'm not rushing things.
 

Attachments

  • IMG_20130210_191119.jpg
    IMG_20130210_191119.jpg
    53 KB · Views: 3,537
  • IMG_20130210_191040.jpg
    IMG_20130210_191040.jpg
    32.2 KB · Views: 3,537
  • IMG_20130210_191820.jpg
    IMG_20130210_191820.jpg
    68.4 KB · Views: 3,537
wow, that's awesome. maybe you can wrap duct tape around the outside somewhere? :lol:

wicked skinny! (from your attachment at top..)
file.php
 
At 48v I can fit 15ah. At 57v I can get 10-12ah. Not much but my new commute is only 8 miles with no hills. I was torn between a 3" wide box or four.

I went with 3 for a less bulky look/feel. Four inches is much more user friendly and would of prolly held 20ah easy.
 
Thanks!

I went ahead and edited the post with the build pics. I gave a piss poor how to description.

Adam
 
good skills ! and nice work ...shaping/windsurfboards skills :

you could have use 1.2mm airex (hotblowing moldable) and 2 layers on each side , one directly on the eps foam, it make it lighter, stranger ...sandwich tech...
Airex.png
[/img]

I'll try that kind of work, adding metal insert or PVC insert to hold wires, plates...juste have to use microbaloon in the eps (use epoxy not polyester)
41orrHZZ%2BVL._SL500_SS500_.jpg


and I woul use protection wheels like on moto to protect th pack from crash
roulette-gsx-600f-88-97-gsg.jpg


cool to see some laminated work,well done
 
Thanks man. What's funny is I work at a sheetmetal/machine shop so I could make aluminum housings effortlessly. I still chose the composites as I want the frame to look like a solid piece, not just a box bolted to the tubes.

Guess the plater had a hell of a time getting the infinion case to take to the black. He finally got it after the third try. He had to etch the hell out of it. Its not perfect but its black and I'm happy with it.

Gonna order batts soon. Can't decide what I want yet. I'm kinda stuck at 15s cause my cell protection boards from methods are for 5s packs. Part of me wants to go to 16s cause I can fit 8s packs easily. But then ill need to get new cell protection and that can get pricey.

What to do what to do.....
 
So I made some foam mock ups of some batt choices. I found a 5s pack that's 32mm thick. I have 70mm available which allows me to stack two packs. I can fit 12 5s 3000 packs. So it will be a 15s4p 12ah.
 
So I took it upon myself to rearrange the mess of wire coming from the infineon. So I took the throttle wire from the half twist throttle pictured above. It has 8 wires inside a black sleeve. I hacked it into the inside of the controller. I don't use regen so I put the brake cutoff in its place.

Basically its a single black cord going from control case to throttle. Throttle has 3spd and brake cutoff all in one tiny package. This means the brake cutoff wires plug into the throttle eliminating the need to run the wires down the side of the bike.

Also they had the halls on one side and motor out the other. I arranged them so only the halls and phase wires exit the one side. The other side has the batt input, CA input, and throttle/brk/3sp combo.

I eliminated the cruise control plug, key plug, lvc jumper from the harness, tucking them inside the case.

Going to make for a really clean build but will be a nightmare to swap components. I tested all components for a year on this bike. I just used a triangle bag for batts. I feel confident in the components.

Adam
 

Attachments

  • IMG_20130217_120521.jpg
    IMG_20130217_120521.jpg
    68.2 KB · Views: 3,284
  • IMG_20130217_124106.jpg
    IMG_20130217_124106.jpg
    51.9 KB · Views: 3,282
Remember the game operation? Well for the past week I've been playing the lipo version.

Opened up every pack and desoldered all leads leaving just the circuit board.
I then made two blocks of 5s4p 12 amps. Wish I could fit three blocks but I had to split the last packs into two blocks of 5s2p 6 amps.

Now that its all said and done I would not hesitate to do it again. Kinda felt like a surgeon, one wrong move and KFF. The reward was dropping sixteen 5" lengths of 12g wires and eight jst balance leads. Trying to fight all those wires would be insanity! Cutting open 12 brand new lipo packs...... not insane at all...... right?

Now I just need to pop some powerpoles on, series them and the try to remember how to put the cell protection from methods back together, its really easy to use his protection but its not fool proof and to be honest with myself I can be a fool. Gotta pay attention to where your plugs are going.

After that I just have to resolder the halls and phase wires. Oh yeah I got one of those fancy Anderson powerpole panel mounts. Its very clean and will allow me a charge port and a fusible link or "key" as I like to call it.

For my balance leads I want a panel mount like a d-sub 15 pin. Wish they made a sixteen pin. I may be forced to used a 25 pin d-sub connector. Anybody have suggestions to make a clean way to access my balance leads from the outside?

Adam
 

Attachments

  • IMG_20130224_175011.jpg
    IMG_20130224_175011.jpg
    47.5 KB · Views: 3,286
  • IMG_20130227_173710.jpg
    IMG_20130227_173710.jpg
    126 KB · Views: 3,286
atom1025 said:
For my balance leads I want a panel mount like a d-sub 15 pin. Wish they made a sixteen pin. I may be forced to used a 25 pin d-sub connector. Anybody have suggestions to make a clean way to access my balance leads from the outside?

DB25s work great for me, you can get them with breakout boards to if you dont like soldering

http://www.winfordeng.com/products/brktd9.php

Best of luck, looks like you heading in the right direction!

KiM
 
Not much worth showing. Just really been taking my time roting wires. Really happy with the results. I did a power up and everything works. No test ride as the batts have not been installed.

I made a holder for the Anderson pp panel mount. It uses the water bottle cage mounts on the downtube. It puts the charge jack under the shock. Fits like a glove.

Then I traded in my old hvc breaker for this awesome potted unit methods made up. Outstanding look! The old one just looked weak and frail compared to this!

Adam
 

Attachments

  • IMG_20130308_155738.jpg
    IMG_20130308_155738.jpg
    23.7 KB · Views: 3,196
  • IMG_20130308_155847.jpg
    IMG_20130308_155847.jpg
    24 KB · Views: 3,196
  • IMG_20130308_155933.jpg
    IMG_20130308_155933.jpg
    37.5 KB · Views: 3,196
Here it is installed to give ya a better idea of it looks like. Virtually invisible from the outside.
 

Attachments

  • IMG_20130308_163549.jpg
    IMG_20130308_163549.jpg
    83.5 KB · Views: 3,192
  • IMG_20130308_163658.jpg
    IMG_20130308_163658.jpg
    68 KB · Views: 3,192
Did a test ride on the new commute. Its only 7.5 miles and much safer then the old commute which was 8.5 miles.

Bike felt great, no surprises. Its been 5 months without the ebike grin. It was good to feel that again.

Adam
 
Congratulations, I like the box very much. I believe the Cannondale Jekyll is uniquely designed to do what you have done.

Probably it is obvious, but let me ask you:

How do you take out the batteries from the box? Is there a hole in the base? If there is, in fact there is no burglar protection, right?

Another question is if you are able to fit a controller inside, or if you have designed it only for batteries.

Thanks.
 
Check out this pic it shows the access. There is no room for controller, its stuffed with 60 3000mah lipo cells. http://endless-sphere.com/forums/download/file.php?id=101805
 
Back
Top