bowlofsalad
100 kW
Hello,
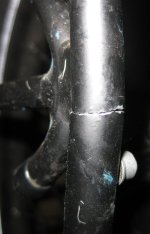
I purchased an axiom journey 2429 (I paid a bit over $45 with shipping) a while back with the intent of placing my first ever ebike battery (48v20ah) and various other riding essentials on it. The total weight of what I placed on the rack was likely around 30lbs, probably a little less. I spent some time looking, reading, and researching bike racks as I often do, I was looking for something that had an excessively high weight limit. This rack had a limit of 110lbs, with the weight of my load of around 30lbs, I thought the rack would more than handle what I had to place upon it. After 500 miles, most of which were ridden at or below 20mph (using things like a cycleanalyst and a 3 speed switch made certain of this), the rack broke, describing where it broke might be a bit difficult, but it broke right where the bottom post ended inside of the tube. By bottom post, I mean the post that attached to the bottom holes rather than the upper holes. You'd have to have the rack and remove the bottom posts to understand their length and how far into the tubes go, but basically the breaks in the tube were right beneath where the three tubes are welded together.
I was surprised and also disappointed that the rack broke, but honestly, when reflecting on idea that the rack broke after 500 miles with only 30lbs of it's 110lb rating is pretty atrocious. Sadly, after a few days of going back and forth, they denied their lifetime warranty on the rack as well. It's not the end of the world that the rack broke, in fact I am glad it did. All I can say for certain is, if you want a job done right, you'll probably have to do it yourself. I ended up making a rack myself and it turned out great, it weighs a whole lot more than the journey 2429, but my application isn't the weight weenie with just a spare tube on the rack. Perhaps they made the rack for occasional light duty and the 110lbs is purely marketing. All I know for sure is, when installing the rack, I had only one nut on for about 10 seconds, I had to let go of the rack for a few of those seconds and in those seconds, I watched the rack slowly wobble back and forth under it's own weight. That should have been a pretty clear indication as to how strong the rack was, it did last 500 miles, but that is pretty paltry and basically a waste of time making the purchase at all and installing it.
My advice is to make a rack yourself or have someone make it for you, out of steel. The rack you make yourself is something you can fix, and feel confident and happy about. The worst case scenario, you end up making something that is a piece of junk and need to make it again better, it sure beats paying 40-50+ dollars for another rack. In the time they'd answer your e-mail you could make a new rack.
Things that will hold a lot of excessive weight probably shouldn't be made out of aluminum. Aluminum has no fatigue limit, it will shatter like glass. Steel has a fatigue limit, it will bend or tear like cardboard. Steel and aluminum has basically the same strength to weight ratio. You may assume that aluminum is stronger, it simply is not, but it is more expensive.
A little more detail about the rack and my experiences with it.
The rack broke on one of the bottom vertical leg, I was about 15 miles away from home. Not only did the leg break, but it had popped apart so the rack was completely freely sitting on only one leg and two arms. I was a little stumped on what to do, there was no way I was riding home with that. I had pulled over and was holding the thing so it wasn't bending wildly begining to accept my fate that I needed to call someone for help somehow. At the moment I decided to try and do something about being basically stranded,to my tremendous luck, I looked down and found a nice blue coat hanger on the ground. I wrapped the hell out of the broken leg on that with this wire coat hanger and made sure the thing was good and tight. I set my three speed switch to low and took the least bumpy roads I could. Amazingly, I made it home without further incident with just the wire coat hanger keeping that leg together.
I didn't want to be out of an ebike while a secured a more permanent solution (DIY bike rack or get a replacement) so I wanted to try and repair the rack. My first try and was lots of jb weld (basically a strong glue). I cleaned the area with sand paper and acetone as best I could and gooped the stuff all over and inside the broken leg. I let the glue set for around 24 hours and then went for a short ride. It wasn't long that I could see cracks beginning to form After 5 miles, which was around my total trip, I could see a deeper crack, the glue didn't seem like it had totally failed yet, but it was sure to sooner or later. My next try was to take a coupe of long pieces of old 1/2" stock tubing I had, and using some spare round tubing clamps, create a sort of gusset to bridge the gap of the break and use some spare round electrical clamps suggested by a member of this forum (ykick) for use on torque arms. http://endless-sphere.com/forums/viewtopic.php?f=2&t=49474
I went for another ride, this gusset attempt seemed like a pretty decent solution. During this second ride, I could hear a sound that I am certain was cracking aluminum, I stopped and took a look at the rack on the cracked leg, dreading the thought that there was a crack in some place that was going to make the rack totally trash. For whatever reason, I decided to take a look at the other side and saw a crack almost parallel to the other break. I headed home, and decided to just gusset up the other side in the same way I did the other side. I think I ended up riding another 50 miles at most with both legs completely broken but being held up by gussets, after that I decided I was done riding like that, it wasn't worth the risk and so on. That was when I retired that rack, got the materials to fabricate a new rack, and went on riding.