bono said:
Hi,
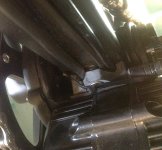
My Bafang bbs02 is in service now (was making funny noises), so I could take better photos. As you see, the motor damaged the frame.
Is it because of incorrect mounting? What should I do to stop this when I install the motor back? Should I install some kind of metal plate between the frame and the motor?
thanks!
It would be impossible for the BBSxx unit to do that sort of damage unless you had it quite incorrectly mounted, most likely with inadequate tension on the 2 large threaded BB nuts and/or on the left-side mounting plate screws. These two parts of the mounting system operate together to stop the drive rotating around the axis of the BB
and to prevent it twisting in line with the frame. The unilateral (left-biased) site of the damage to the lower surface of your down tube
and the forward edge of the BB tube suggests to me that:
- the drive has been quite loose in the BB tube, allowing it to rotate around the BB with considerable force
- the heavy mass of the motor has been able to actually
twist back and forth with respect to the longitudinal (fore-and-aft) axis of the bike - hence the damage to the down tube on the left side.
There are clear instructions available for mounting the motor, available in pdf form from most vendors. The motor should be snugged up tight against the lower surface of the down tube and should
not be moving around the BB axis
at all when under use. Use a proper BB
hook spanner for the first notched M33 lock ring and then (if you have one) a notched BB
ring spanner for the second lock ring (if you have the later version that has a hollow, 'wrap around' lock ring rather than a second notched ring, which just requires the hook spanner). Make sure that the 2 M6 screws that bolt the left-side mounting plate to the motor are tightened to the appropriate torque. I'd put some loctite on them given your past experiences. Also make sure that you have this mounting plate properly aligned - the small
protruding bumps around the BB hole on one surface of this plate should face and engage with the end of the BB tube, not the other way!
As others have pointed out, you have an aluminium frame. It's probably heat treated and this dent and crack should be regarded as severe damage to a vulnerable and high-stress part of the frame. Unless you are just pootling to the shops or school and back and never standing on the pedals, it's my own view that you should ditch the frame (metal recycling bin) and find yourself a replacement. My personal (and quite biased) advice would be to find a suitable cro-moly bike or frame - new or second hand, it doesn't matter - in the bike style you are after and with a 68mm BB width, which is what the BBSxx is really designed for. A good cro-mo frame will make a relatively light e-bike and most importantly, it won't let you down or add unnecessary complexity. I know we think of aluminium as 'lighter' but mostly, by the time you turn it into a bike frame, especially one with rear suspension, it ends up the same weight as steel (or heavier)! People have installed the BBSxx onto super-light weight alloy and carbon frames, but I'd leave this to the engineers (and artists) amongst us!
Make sure you follow the instructions when reassembling the drive and get some informed advice from someone with mechanical experience if you feel you are not up to it. I don't mean this to sound presumptuous or like a put down at all, but please remember, a bike is a highly-developed road-going vehicle and your welfare may well be at stake if something goes wrong at speed. What very often doesn't come across in these discussions at ES is the high degree of care and consideration for safety that more experienced DIY home bike mechanics and e-bike riders put into their bike maintenance and assembly. Bikes are not toys and have some complexities of their own that may not be obvious to the inexperienced user. Adding an electric drive can make things even more complex. It seems that most DIY e-bikers - those that don't have engineering training anyway - make plenty of mistakes when starting out. The trick is to make sure that we learn from them. The great value of this ES forum is that we can all learn from (and build on) eachother's mistakes and experiences!
Ride safe,
Savvas.