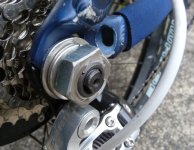
BMC Hub Motor - customer support - stripped threads

Wow - neat job - looking like a good recovery.That reduced torque arm is perfect for this appliction - it's actually too bad Doc doesn't sell a thinner version for the lower powered folks...

Joe Perez said:
Granted, there's no good way to put a torque wrench on a nut that has a bunch of wires poking through it...
22mm O2 sensor socket is perfect - I actually stripped mine using a torque wrench and a guesstimated torque. Bad guess, though....
 
Thanks. Hopefully it'll all come together as well as I'm envisioning.

As it turns out, the nut which comes with these motors also also contributing to the problem. I cut one apart to better illustrate the issue:

2MNVdtv.jpg


That area which I have highlighted could contain two more threads' worth of engagement, but instead it's chamfered out and does not contribute to retention. Merely changing to a different nut isn't going to help once you factor in the washer, so I am planning to take the threaded insert (thanks again, tkollen) and shave down the end of it so that the threads go all the way to the end. Thus, the insert can bottom out against the plate, reaching as far as possible onto the axle. With that done, it doesn't matter that I have a washer under the nut- it will still be grabbing onto the solid thread of the collar along its whole length.

Parts should be dribbling in early next week. Probably no more status updates until next weekend, as I'll be in Vegas at the NAB convention most of next week.
 
Ypedal said:
about using a torque wrench with socket on a nut with wires sticking out..
I've seen those crowsfoot sockets. I even own one (I think it's a 13 or 14mm, for one specific bolt on the air-cooled VW Beetle that's impossible to get to otherwise) but I've never trusted them for torquing- they're offset from centerline. teklektik's suggestion about the O2 sensor socket makes sense... if I had a known value to torque it to. :mrgreen:
 
So, back in town, got everything re-assembled and running.

To re-cap, here is what the axle looks like installed into the frame after I shaved down the torque plate and removed the un-needed second shim from the inside (having shaved the brake caliper mount). I have highlighted in green the area which the old nut used to engage, prior to having made these modifications:

f_12rv_ab7_u77ts.jpg


It's pretty obvious from this why I was having troubles.

I don't have any in-progress shots, but with the new threaded insert installed on the axle, and then the new 20mm nut installed over top of that, it feels *much* better. I was able to apply considerable torque using a big open-end wrench, and it didn't feel like the fastener wanted to yield at all- nice and solid.

Here's what it looks like all together:

f_p8c_16c_u77ts.jpg


Beefcake!
 
999zip999 said:
Customer service from BMC no chance as he is a DICK. I called him for a keyway as he said he has a hole bag.

He does, and in it he keeps his keyway's and spirit level bubbles.

Perhaps you wanted a woodruff key? Pity I got here so late.
 
Congratulations to your successful mod! I just made one additional change to my mod from last year. I did grind the insert down for the cable side of the axle in order not to block the cable opening. Then I cut the thick M20 nuts to about half the thickness so that neither inserts or nuts protrude outside the end of the axle. This mod is however only aestetical and doesn't improve the function of the fix.
 
nicely done JP. what i can say from beefy torque arms: you probably will not really need those nuts that much. i have 10mm thick hard steel clamping dropout where the axle is a such tight fit that i had to use force to install the wheel (axle in the dropouts). i did some modding, and once forgot to fasten the nuts properly. drove around pushing some kW into motor. no problem at all. the motor was held in place by the dropouts alone. :)

erster%20fortschritt.jpg
 
teklektik said:
JP-
Very tidy repair. Thanks for posting the tale with all the photos.

Thanks.

One thing I should point out is that I did things a bit differently from tkollen's original setup, and wanted to reinforce the reason why.

Here is a shot from the original set of images tkollen posted:

file.php


You can see that there is a flat washer and a split washer between the threaded insert and the dropout, thus reducing the available thread engagement of the insert on the axle.

While I don't have a picture of it, I used a 20mm split washer (and no flat washer), and installed the washer after I had already threaded the insert onto the axle all the way. In other words, the end of the insert is physically touching the torque plate, so it has as much engagement on the threads of the axle as possible. The split washer which I used is between the nut and the torque plate, but does not decrease the thread engagement of either the insert to the axle nor the nut to the insert.

This is critical, as the length of thread engagement was the very core of the problem which I was having.


tkollen said:
I did grind the insert down for the cable side of the axle in order not to block the cable opening. Then I cut the thick M20 nuts to about half the thickness so that neither inserts or nuts protrude outside the end of the axle. This mod is however only aestetical and doesn't improve the function of the fix.

In my case, the wire bundle is too thick to make the turn-out through the slot cut into the axle, so this was never a concern- it has no choice but to exit the end. I guess I could see doing something like this in a case where I had more axle protruding through the dropout/torque plate, but you can see that in my case the axle is so short that I'd have had to remove way too much material from both the insert and the nut in order to expose the cutout.

I have no qualms with the wire bundle poking out the end of the axle. The baskets which I have on the bike are wide enough that the wire passes the broomstick test. (This was a concern in the event of a laydown-type accident, to prevent the wire from becoming damaged by the road.)
 
JP, You are absolutely right about this. Soon after I posted the picture of my fix you are showing I did discard the M14 washer and lock washer and screwed the insert all the way on to the dropout. Since I had enough space I put both a M20 washer and M20 lock washer on top of the insert. The picture shows how it looks now with the thinner nut after grinding off about 6mm.
 

Attachments

  • P1000539.JPG
    P1000539.JPG
    72.3 KB · Views: 2,559
Granted, there's no good way to put a torque wrench on a nut that has a bunch of wires poking through it, but at least it would put me in the ball-park.
Actually you could use a crow's foot wrench on the torque wrench like I used to do for Mercedes valves, but it is probably not worth the effort. It looks like you may have solved the problem. That nutsert and large nut that Teklektek showed is quite the elegant method of fixing the problem, and now you may have enough room to do it.
otherDoc
Wow! I just got scooped by a bunch of folks with the Crow'sfoot wrench. Ya gotta be quick with all these engineers around. I'm a doctor not an................
otherDoc
Thanks Tkollen, that is one super solution!
 
Back
Top