Bosch Powerpack BMS Schottky diode repair

Batteryrepair

100 mW
Joined
Oct 7, 2022
Messages
36
I've noticed that about 50% of the time, the defect of a broken Bosch Powerpack BMS is related to a broken Schottky diode.
Found under the Blue cylinder:
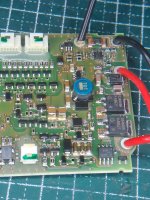
20230927_120312.jpg
These are relatively easy to swap. Use plenty of flux !
You can find a broken diode by measuring the Diode voltage drop: has to be somewhere around 0.2V.
Often they fail short, so 0 ohm both ways.
This is the bad component.
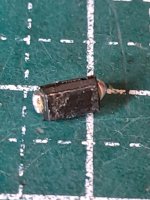
20230927_120418.jpg
Remove the broken diode and prepare the area for new solder (flux and wick)
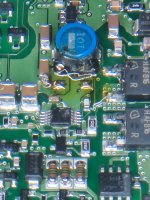
20230927_120343.jpg

Solder the new diode. On the side of the capacitors (left in pic) it's a bit tricky, but no worries if the solder bridges to the capacitor, they're connected anyways through the pcb.
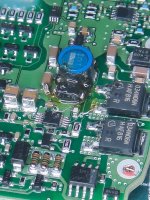
20230927_120829.jpg
Apply 30V to the terminals where the battery would normally be connected, the LED's should turn on.
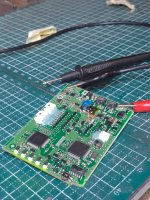
20230927_121140.jpg
Then the BMS can be used as replacement:

www.elektrischefietsgarage.be for repairs and parts
 
Last edited:
Broken is a poor choice of words when it comes to this problem. Faulty is much better. Faulty diode. As there is clearly no physical damage.

The big question is why it fails? Bad circuit design? It's highly unlikely that the diode is not living up to the specs.
 
I've noticed that about 50% of the time, the defect of a broken Bosch Powerpack BMS is related to a broken Schottky diode.
Found under the Blue cylinder:
View attachment 340142
These are relatively easy to swap. Use plenty of flux !
You can find a broken diode by measuring the Diode voltage drop: has to be somewhere around 0.2V.
Often they fail short, so 0 ohm both ways.
This is the bad component.
View attachment 340144
Remove the broken diode and prepare the area for new solder (flux and wick)
View attachment 340140

Solder the new diode. On the side of the capacitors (left in pic) it's a bit tricky, but no worries if the solder bridges to the capacitor, they're connected anyways through the pcb.
View attachment 340141
Apply 30V to the terminals where the battery would normally be connected, the LED's should turn on.

View attachment 340143
Then the BMS can be used as replacement:
This is a great set of pics and sure enough, my BMS schottky diode was shorted. I order replacements from DigiKey per another post diode = SKS36MA-3G but I could not tell from the pics above what the correct polarity of the diode was. I couldn't tell from the original part, even using a magnifier as the lettering/marking was too faint. Fortunately I found another post that very briefly showed the replacement diode and by pausing the video I was able to see the cathode marking. The cathode (bar marking on diode) end should be closest to the battery connection side of the board (on the right in the close-up pics above (pics 1,3 and 4). I had a 50/50 chance and fortunately, when I applied power, the lights came on as described. So far, so good. Before there was no lighting at all. All of the cells in the battery were at about 2.4 V. I used an existing 18650 charger and using clip leads was able to charge each of the 10, 4x18650 in parallel "cells" individually and they all came up to between 3.5 and 4.1 V. I'm going to "equalize them at 3.5 and then reconnect the BMS and see if it will charge. Eventually I'll have to replace the cells but this pack still has some miles left in it. It was the diode failure that killed the BMS. It failed while charging, BTW. I had both my wifes and my batteries on charge after a long ride and hers (bought the bikes together) is still going strong and we've only got about 1500 miles on the bikes. Usually go at least 20 miles between charges so that works out to about 75 charges, well below the 500 the batteries are warranted for (or sadly, two years which we had already passed.) I bought a new batter but had them give me my dead one to explore and it looks like my odds are pretty good for a repair at this point.
 
Last edited:
Ordered 10 from DigiKey for a few bucks. Replaced my shorted one on BMS and the lights came on. Thanks!
I haven't tried any repair yet or run out of bms's but yeah I'll get diods some when I feel to make such a repair and if measurements turns out to be that the diod is faulty.
 
This is a great set of pics and sure enough, my BMS schottky diode was shorted. I order replacements from DigiKey per another post diode = SKS36MA-3G but I could not tell from the pics above what the correct polarity of the diode was. I couldn't tell from the original part, even using a magnifier as the lettering/marking was too faint. Fortunately I found another post that very briefly showed the replacement diode and by pausing the video I was able to see the cathode marking. The cathode (bar marking on diode) end should be closest to the battery connection side of the board (on the right in the close-up pics above (pics 1,3 and 4). I had a 50/50 chance and fortunately, when I applied power, the lights came on as described. So far, so good. Before there was no lighting at all. All of the cells in the battery were at about 2.4 V. I used an existing 18650 charger and using clip leads was able to charge each of the 10, 4x18650 in parallel "cells" individually and they all came up to between 3.5 and 4.1 V. I'm going to "equalize them at 3.5 and then reconnect the BMS and see if it will charge. Eventually I'll have to replace the cells but this pack still has some miles left in it. It was the diode failure that killed the BMS. It failed while charging, BTW. I had both my wifes and my batteries on charge after a long ride and hers (bought the bikes together) is still going strong and we've only got about 1500 miles on the bikes. Usually go at least 20 miles between charges so that works out to about 75 charges, well below the 500 the batteries are warranted for (or sadly, two years which we had already passed.) I bought a new batter but had them give me my dead one to explore and it looks like my odds are pretty good for a repair at this point.
P.S. After balancing the cells to within .02 v of each other, I hooked the BMS back up to the battery pack, soldering the power wires FIRST and then connecting the balancing wire connectors. I temporarily connected it to the case so I could test it with the charger and it charges (as indicated by the blinking top LED)!!. Looks like I've resurrected my pack. I reassembled it an plugged it into my E-Bike and everything came up normally. I'll probably ride it around locally for a while to make sure it can go some distance and recharges as desired but it looks like I've now got a "spare" battery to go with the new one I had to buy to keep riding. I did NOT replace the cells since they all came up fine and I've probably only got about 70-80 charge cycles on them since new. My e-bike guy gave me a couple of other dead packs and I'm going use the connector parts to make up a test jig for future repairs. If I can "harvest" a few good BMS's or repair some with the diode fault (I've got nine more diodes) I should be able to re-cell them for about $200 worth of batteries. You have to watch be careful and buy batteries from a reputable source. It seems there are lots of 18650 scammers out there selling ones that are "fakes" and won't deliver full performance (or not for long.)
 
I swapped out a bms today as it was not litting up any leds at all and the button was broken as well.

Easy peasy.

I think I measured 0 ohms on the bad bms diod so I guess I'll get some diods to try a repair on that unit. This would be the smallest repair I've don't apart from braking an imac 21" rear CPU area of those yellow small capacitors. One came lose and I was trying to put it back :D
 
So I changed a diod on a bms and it lightens up. Allthough this one will have no button as it is broken. Maybe I can replace it but they are tiny. I will for sure make one try

Also I did a second one. When I measure it gives out 5k ohm something and the other side gives 1,5k ohm. When this second bms was broken and still is it had one side at 4,5k ohm, so the same as above on one line and 1,5million ohm on the other side which is alot. The bms was also draining the pack and the heat was mostly next to the button with near or on the rectangular chip. I don
t know but when I feel it also it may be possible the square chip was heating before I removed it from a pack.

I'm using a 60w soldering iron. I have a smaller one I can use which I guess will be a better option. One small battery powered one with (8W) and I guess it should be able to become hot enough... I will try soon.
The button is best removed and resoldered by heating from the bottom of the pcb. Put kapton tape to protect the plastic of the button from the donor board.
 
The button is best removed and resoldered by heating from the bottom of the pcb. Put kapton tape to protect the plastic of the button from the donor board.
I used it for another battery and put the leds on the bottom and drilled 5 holes. Also did see through epoxy and it will light up when charging but not otherwise.

I haven't tried replacing a button yet but removed two spares from boards that I cooked. I was installing it and tried to se if it would light up and another wire went into the board and 36v just rocketed into the inside of the chip making a smal crater and smoke one one piece on the the bms... that was it... maybe it was broken anyway.

Another bms that I had tried to repair before lost some resistors when I was trying to solder with my big iron and I just messed it up.

Tiny electronics is something else really.

I'll keep you updated
Try and invest $100 in a basic hot air station and some flux and tweezers. Start with a magnifying glass on a boom. It'll be so much easier and save you in the long run.
 
The fysical repair went smoothly but to no success.

I did try again to repair and I just guess my 5v rail thingy electronic unit is kaput. Is it that one that makes the leds blink? After my diod replacment the leds didn't light up (as it was before the repair as well . I couldn't se any damage on the electronic with my eyes.
Yes likely the 5V regulator is fried too.
 
The best remedy for characteristic/intentional problems with Bosch e-bike products is easy: Don't buy them. Don't own them. When someone is slinging booby-trapped garbage for your consideration, say "no, thanks." When they're trying to own and control things that you already bought and paid for, the best route away is to cut your losses and warn others not to fall for it. They chose failure, so let them fail.
 
The best remedy for characteristic/intentional problems with Bosch e-bike products is easy: Don't buy them. Don't own them. When someone is slinging booby-trapped garbage for your consideration, say "no, thanks." When they're trying to own and control things that you already bought and paid for, the best route away is to cut your losses and warn others not to fall for it. They chose failure, so let them fail.
If you get 10 for free and can repair 5 and maybe the rest later on it is like digging after gold.

I got a bms for 15$ private and I also did got some experience soldering small electronics but to my suprise I wasn't lucky today. Battery is worth 350$ after repair or need of a new bms, as that's the fault. Sometimes its the cells but mostly the bms.

I've also learned that the 5v unit turns on / off the leds. I got another battery to work on tomorrow and here the leds are lit. I keep my fingers crossed and wish for gold this time.

I got 3 bad bmss. They can be sent for shipping cost only. bad 5v unit and some mess around the diod I would guess on those.
 
If you get 10 for free and can repair 5 and maybe the rest later on it is like digging after gold.

Gold that has a rent payment due on every piece, maybe. Every part of a Bosch system is designed to bleed you for money until you give up, and those batteries only work for a Bosch system.
 
Back
Top