Bubba's 1st Bike Build

Joined
May 28, 2008
Messages
718
I have gone as fast as I want to go with a trailer pushing me, so it is time to build a bike. The bike, being a full suspension , needs a custom rack which I am fabing out of 1/2 inch tubing. It will be using left side drive. The hub, left hand freewheel and 56 tooth sprocket are for an ICE bike conversion. I am not sure if I will use the hub because it is steel. You can buy just the left hand freewheel and a sprocket if you want.

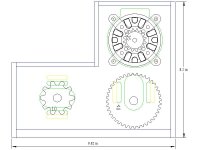
The last picture is how I plan to mount the motor and two jack shafts. I want to make this water proof by creating a custom cover. Wire cages will be around the chains to prevent the cover from getting snagged. The cages will also form a plenum for cooling air to the motor.

Steel Hub http://www.bicycle-engines.com/freewheel-sprocket-axle-wbrake-p-297.html
This one for $50 looks a little nicer http://www.evdeals.com/images/NewHub.JPG

Bubba
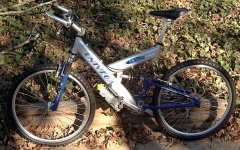
Bike.JPG

View attachment 3

View attachment 1

Motor.jpg
 
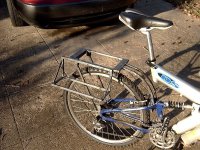
The rack is mostly complete. Brackets attaching the rack to the bike are large in case I decide to add another brace. It is not obivous in the picture, but the front brace made of two side by side pieces of 1/2" tubing.

Bubba

imag0002.JPG

View attachment 1
 
The top of the rack is a good distance from the pivot. When you hit a bump, the further the distance from the pivot, the larger the accelerations. Whatever you put on the rack should be secured very very well. :wink:
 
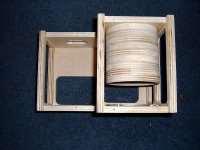
Some of the motor box has been completed. The rings are for a fan shroud that will be attached to the side of the box. The hub from evdeals is nicer being that it is aluminum and doesn't have the extra threads for a band brake.

Bubba

imag0002.JPG
 
Very cool! Great work!
 
Somebody got an "A" in woodshop class :wink: That's very cool, you should mount that on one of these:

CALFEEBambooMTB1196x1040white.jpg
 
Nice work.
You should see my woodworking skills. . . :roll:

Does the motor have a fan on it for cooling?

-methods
 
Guys,

Thanks for the complements, but I have no wood working skills. That is why I built a CNC machine. It does all of the hard work. There is a fan from a muffin fan on the motor and the tube is to channel air. I will post more pictures when I get the motor and gears mounted.

Bubba
 
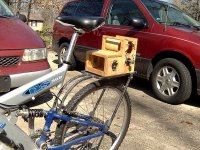
I found that I had incorrectly calculated the angle of the dangle and the seat post was going to hit the rack support. Splitting the front rack support solved that problem. The motor box is just sitting on the rack to give you an idea of the final look. I decided not to use the steel hub meant for an ICE bike. It uses 13 gauge spokes and my local bike shop said that a box of 13 gauge spokes would cost $100. The aluminum hub with the left and right hand threads should be finished being built up next week. The motor will be driving a 16 or 18 tooth lefty freewheel and I will be driving an 8 speed freewheel.

Bubba

IMAG0009.JPG
 
13G spokes
ebike.ca
 
I got one of the battery shelfs welded together and tacked to the rack. It needed to be offset to the rear for heal clearance.

Bubba

IMAG0011.JPG
 
hi Bubba,
how did you cut wood so beautifully? is that CNC? :D
i am building a motor test rack using the same kind of wood like you have and circular saw but mine looks just like garbage....could you shed me some light on this?

-george
 
georgeycc said:
hi Bubba,
how did you cut wood so beautifully? is that CNC? :D
i am building a motor test rack using the same kind of wood like you have and circular saw but mine looks just like garbage....could you shed me some light on this?

-george

It is CNC, he mentioned it in a post near the top :wink:
 
georgeycc said:
how did you cut wood so beautifully? is that CNC? :D

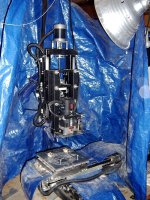
Here is a picture of one of the CNC machines I built. It is constructed mostly of stuff from Home Depot, window channel, pvc sheet, and delrin.

Bubba

n_a.jpg
 
I removed the heat shrink from the controller and am in the process of putting the cc esc in a box with a cpu heat sink on top. At temp probe will be added to the esc and if necessary I will hook up the fan. The Arduino is going in the same box as the esc. Progress has been made on the rack.

Does anybody know why the fan has three wires? Red Black and Yellow

Bubba

imag0009.JPG
rack.jpg
 
I dont know about that fan but the fans that come out of Dell computers have an extra RPM wire.
My favorite is to take Dell computer fans (12V 2A) and solder across the temperature sensor
Makes a fan that is 6 kinds of angry. Really blows like hell.

-Methods
 
Looking great Bubba!

I love that you made your own CNC! That's way cooler than any E-bike build! Awesome job! More pics of the CNC please! :)
 
As you can see, my big cnc machine doubles as a workbench. The big cnc can cut wood and plastic. I included a shot of my small cnc. It can cut soft metals. And last but not least, a shot of the electronics. There is the Arduino board, Eagle Tree data logger, and the CC esc with a 1000uF cap across he input leads.

Bubba

BigCNC.jpg
SmallCNC1.jpg
Electronics.jpg
 
All the parts and pieces are in hand. Now it just a matter of putting it together. Got the new wheel with an 8 sp freewheel and a 16 tooth left hand freewheel, timing pulleys, and #40 drive sprocket. The #40 sprocket has the same pitch and barrel as a 1/8" bike sprocket, but is about twice as wide. I sliced a little less then half off on the band saw. Chucked it into the drill press and used a file to bring it down to the final width.

Bubba

wheel.jpgpully.jpgsprocket.jpg
 
Everything has been squeezed into a couple of boxes. Signal and power wires are running together. This may cause a problem, but can be changed later if needed.

Bubba

outside.jpg
inside.jpg
 
This has been an aggravating weekend. A wiring error cooked my hall effect throttle and might have cooked the hall effect current sensor. Got pissed at the Arduino and went back to the Servo Tester. Things still didn't work. Turns out I had a bad cable between the handlebars and the electronics. Oh well, the Servo Tester will do for now. I will resolve the Arduino issues after I get it on the road.

Bubba
 
Back
Top