Chopper bike with 93% eff motor

Have you read the massive post in the for sale section, it goes though alot of the details about the motor, at work atm so i cant measure it for you sorry.

You can do exactly what you asked but if you read the for sale thread John from CR goes thru a rediculessly simple approach to mounting a sprocket to the motor as he has already got one running as a mid drive on one of his bikes does in exactly that way. I have done mine the hard way cause i am looking to push it as high as possible, there are some very easy methods for installing a sprocket on this motor now.

Hmm 36S20AH should get me 2500rpm and a top speed of 80km/h with a reasonable range....fun fun fun :) I can gear the bike to go even faster as i am using 22T drive and a 90T sprocket on the rear and go kart sprockets go down to ~50T.....150km/h is abit fast for a bike....specialy one i am building :oops: :mrgreen:
 
Snowy,
That was running only 55A on 20s geared for only about 70kph top speed. The cause was leaving it in high. Other than bogging down a motor on too much hill, the hardest condition our hubbies face is stop-n-go. I can easily melt any sealed hubbie with respectable power that is geared for a respectable speed. In low it would be geared for only 35ish top speed with only a slight change in torque (unlike a mechanical transmission), so it would get out of poor efficiency twice as quickly and dramatically reducing waste heat of repeated full stop conditions. It will be interesting running the same route with ventilation as the only difference. I did ride the route again with the low setting for the downtown segment, and the motor wasn't nearly as hot, but still warmer than I prefer, though it never got past where I couldn't keep my hand on it. I've also done the same destination riding much harder but via a route with a lot less starts and stops leaving the motor in high and no heat issues at all.
John
 
Sorry Bluefang. I f'd up and forgot that I need to make a little tool to get the cover off. I have to use a 3 jaw puller and need to make a little tool to fit over and protect the shifting rod. I'm doing the motor I shortened the axle on, so I can't just manhandle the steel bell housing off, because that wouldn't clear the magnets. I don't think I try anyway by hand, since I don't have the rim flange to push on. Going off daylight savings gives me an extra hour in the morning, so I think I can get to a drill press and make my cover removal tool tomorrow.

Somehow delays tend to work to my benefit, because I came up with an idea negating the need to ever use your fan. From your pics, I think you'll want to move your sprocket toward the motor anyway to narrow things up. I'm going to do the exhaust slots in pairs very close together, with the leading slot just a thin cut. Then later, if deemed necessary (very doubtful), I can slide a small blade into the thin slot, and bend a small tab over on the inside using epoxy to secure it. That will result in a true blade shape to create a low pressure region outside of the trailing hole and greatly increase the centrifugal fan pressure and flow using a reverse curve shape to keep the noise down and pressure greatest.

I also fined tuned how I will go at it. I'll first make incomplete cuts for all slots. I'll make a deep cut for each slot but not pierce through to the inside. That way I get most of the material removed for all the slots before I start to spray any sparks, bits of metal, or cooling water on the inside to get attracted to the magnets.

John
 
I am very interested in seeing how you cut those slots :), But i kinda like the idea of just drilling holes and mounting the fan, i have to keep the sprocket mounted like that as thats the way it has been welded on, my engineer did not quite listen to me. Next time i ll do it all my self :)

Hopefully you have something very simple and easy otherwise i will try my way and we both can see which seems to flow the most air, I will be putting little blades on the inside of the motor tho like you suggest, and i would actually like to have some noise on this bike so alittle fan noise would be good, its spinning at ~2krpm which is 1/5th of its normal speed so i thing it should be pretty quiet :).

Can not wait to have this puppy running, a few weeks off as waiting on batteries still. I have a 24S controller to run it on untill my 30+S contoller arrives so should be good. Plus i still have to assemble the thing :).

Ohh i just realized i could cut the start of the slot with a grinder, cuts thru ~20mm and then use a recipricating metal saw to finish the cut to a point. Would be significantly less heat then a grinder......hmmm hmmm. Some 1mm sheet alloy should be pretty cheap to make small blades from too.....DAMN U JOHN.
 
Bluefang said:
Have you read the massive post in the for sale section, it goes though alot of the details about the motor, at work atm so i cant measure it for you sorry.

You can do exactly what you asked but if you read the for sale thread John from CR goes thru a rediculessly simple approach to mounting a sprocket to the motor as he has already got one running as a mid drive on one of his bikes does in exactly that way. I have done mine the hard way cause i am looking to push it as high as possible, there are some very easy methods for installing a sprocket on this motor now.

Hmm 36S20AH should get me 2500rpm and a top speed of 80km/h with a reasonable range....fun fun fun :) I can gear the bike to go even faster as i am using 22T drive and a 90T sprocket on the rear and go kart sprockets go down to ~50T.....150km/h is abit fast for a bike....specialy one i am building :oops: :mrgreen:


yea i have... but I cant seem to find any reference to that particular measurement. Only asking as I'd like to order some parts for my own motor, which will hopefully be here before the end of the month!! :twisted: :twisted: Might ask john too since ure at work...
 
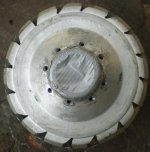
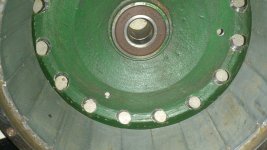
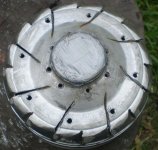
Here you go Bluefang. I finally figured out how to get that shortened axle motor apart. Did the slots and the intake to get fresh air on the switching contacts. AL cover side intake to go and interior blades....both tomorrow. That steel is some kind thick at the corner. I'm going to really taper that stuff before painting. It cuts like butter with the grinder.

The advantage with this route is that my slots get all the way into the magnet backing ring, so grit, water, whatever stuff that enters has a way out with the flow. This was about 90min of grinder and drill work, and I'm waiting till the end to get all the metal bits off of the magnets. Some smoothing and I want to take more material off of much of that corner before lap disc and paint, but it should look sweet and function just as well. No hole in a pizza pan for me that are so common, but so ineffective.

John

MiniMonster Ventilation 1.JPG
View attachment 2
View attachment 1
MiniMonster Ventilation 4.JPG
 
Harold in CR said:
That looks pretty good, right there. 8)

Thanks....still in rough form. I just noticed that bottom pic has an optical illusion due to the angle....That corner with the dark dot is not concave like the inside of a piece of angle iron. It bulges out....very thick material at that corner.
 
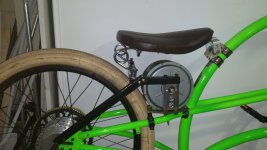
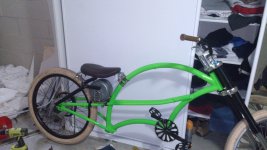
Played around abit more with the seat/motor mounting. Seems like it will stay in place once its all done :) Seems to be going together as easily as i was hoping, only problem is family is in town so not much time to work on it after work etc. The mount is a cut out 6mm steel plate with some dirt bike risers used to mount the motor. The seat mount is some random steel i had lying around with a secondary alloy seat stay :)

DSC_0059.jpg
DSC_0061.jpg


Once i am done with mounting the motor i ll have to play with the motor air flow. Atm i am kinda leaning to johns method but as he says it needs a tidy up so i would be keen to make the actual slots slightly wider too. But either way it shoulde be interesting. And yes john i ll leave the fan off until i decide its actually needed :)
 
That motor john in cr is selling looks awesome. I was going to get one for my project, but decided i wanted rediculous power and went with the golden 5000 watt motor. If i was doing a non-insane bike i would definatly use it.

And...johns a straight shooter, defiantly a good guy to deal with, he took the time to discuss the motor with me on the phone, very cool. (Plus he shares my name, so that makes him cool -)

--John
 
Pretty sure johns motor actually handles power better then the GM motor due to its efficiency etc. I think the only reason luke was ever able to put so much power through his GM motor he had at one stage was due to it been rewound and professionally programmed with a sevcon controller or whatever they are called. But it should still have some great power :)

But ohh well. I always thought 20-30kw I am aiming for was right up there with ridiculous but that's ok.
 
If we look at it in comparison to RC outrunners, it's closest relation, yeah it should, and I'm pretty sure it can hang with the 5kw GM motor, which is 11kg, with Bluefang's mods and higher voltage. I don't know about the 17kg 10kw motor Luke used though. Now my 6 phase 14kg HubmonsterHE is a different story, and when I send one to Luke we'll know for sure. I'm running 15kw peak input at only 74V nominal without any heat issues, and that's sealed up in bone stock form. I need a bit more bike before going higher and doing some cooling mods. The original Hubmonster at 30kw was just too much for me to handle. I don't want to end up on my back in front of traffic leaving a red light, or lose control in any way for that matter. :oops:

John
 
Hey Bluefang,

I was having issues deciding about bladelength and stuff for my interior blades, and came up with what I believe is a far better plan. I'm going to cut slots for the interior blades, drill and tap 2 holes per slot for bolts to secure each blade, and mount them from the outside. The idea is that I can get the size exactly right and mount them only with bolts and a bit of thread locker without worries of a piece coming loose. I can even try different things. I may even be something guys with their giant holes could add without even opening the motor, but increase flow and turbulence.

Here's what I'm planning on mine:
Ventilation blades attached from outside.JPG
 
Too bad theres no liquid cooling, i hope we see that in more motors. The golden has an option for liquid, i didnt go for it, but seems like a lot of motors would work a lot better with liquid cooling.

--John
 
Liquid cooling adds complexity tho. I'd be much happier with air cooling but my geared mac is no good for air.

Chopper is looking good- how do you feel about 8kg of steel whizzing around under your knackers, Bluefang??? :shock: :twisted:
 
johndjmix said:
Too bad theres no liquid cooling, i hope we see that in more motors. The golden has an option for liquid, i didnt go for it, but seems like a lot of motors would work a lot better with liquid cooling.

--John


liquid cooling is only of benefit if it transports the heat to an area with greater surface area than the motor, and even then, only if it does so quickly enough. basically, venting your motor means a liquid cooled motor would need to have a significantly larger surface area (by way of a radiator or something) to beat venting (contamination issues aside) while compensating for the inefficiencies associated with it. I'd be really interested though to see a stock liquid cooled design...

BF, how'd you remove the unwanted motor bits? on a lathe? just tossing up which way to go about doing it for mine... :twisted:
 
Removing the unwanted bits from the motor was done by a machinest on a lathe.....not doing that again. Cost too much and its not a much better job then i could have done with powering up the motor and useing it as its own lathe and just hacking at it with a grinder.

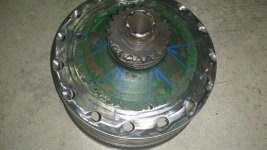
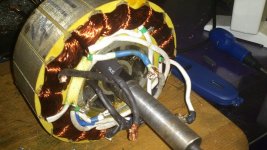
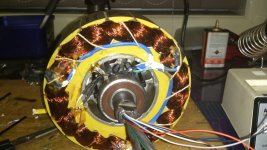
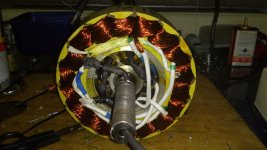
I have finaly had some time to work on it again, spent the afternoon rewiring the motor and moding the case.

DSC_0064.jpg
DSC_0067.jpg
DSC_0068.jpg
DSC_0069.jpg
DSC_0071.jpg
DSC_0070.jpg
 
Nice work! Cant wait to see how it powers up!! Im saving up for one of these motors, probably do the exact same thing you are. on a dh bike
 
Looking good Bluefang. I made some headway this weekend too. I've got my the slots cut for my interior fan blades and drilled and tapped the bolt holes on the steel side, along with intake holes on the AL cover. Hopefully I have enough air intake, since they're further from center than I normally do because of my sprocket on that side.

+1 on the self lathing and doing as much as possible before any holes are cut. The material at the steel corner is really thick, and of all places to lose some weight, that the ideal. It may only have 100's of grams potential, but that's at the spinning perimeter. I took some material off behind each blade shape at that corner, but I worry about sending the motor out of balance, so removing material up front during the lathing/cutting would have been better.

Here's where mine stands including at least an hour removing metal bits from the mags.
MiniMonster Ventilation 5.JPG
MiniMonster Ventilation 6.JPG
 
[youtube]sZG9VgalMZk[/youtube]

This is a quick vid of it running. Freaked my self out something bad 2x while assembling the motor. Dropped it and cut the insulation around the phase wires exiting the motor, able to easy fix with some more heat shrink and a tidy up but then after getting it all assembled and on the bike i realized one of the halls was not triggering......shit.

Pull the alloy cover off and traced the hall and lucky for me it was just a dry soldier joint on the pcb they use for the halls so its all good now. She now spins up well and its got a nice buzz to it :) I have the fan on it and asside from been a bit wonky its not making any noise and its doing a good job of pulling air thru the motor :mrgreen:
 
How light are you guys getting this motor with everything cut off like this? I wonder how heavy the shell itself is? Could someone make a whole new shell out of alloy??
 
I think the shell is as close to nothing in terms of the weight as possible. Its a heavy motor due to the copper fill and quality of parts used, to lighten the motor i think you might be able to shave another 500g off the mods i have already done but at the risk of weakening the motor and not really having much benefit.

I ll weigh my motor later as i dont have a scale at the moment but i think it will still come in at around 8kg, its a heavy powerful bugger
 
Oh that's not bad then, the Mac is about 9 lbs so its not that far off. Just about half again but with twice or maybe three times the power potential its a very good trade! I really want to try this motor in a purpose built frame MID mounted..
 
Nice work Bluefang, I really like it !

Keep it up!
 
Back to the Mini-monster, even with the last 4 weeks not working on it at all i might still be the first with a running bike. :) Atm the battery pack is build, the motor has been tested and i am wiring up the 32S controller that John from CR might tell you more about. Have to build some clamps to stop the rear wheel moving forward under power once adjusted or buy some axle restraints/adjusters for a pit bike or something.

Battery is a 32S20AH 20C lipo pack that is broken up into 2x12s and 1 8S for balance charging.
Drive is 219 racing go-kart chain that should be good for 30kw, 22T drive and 90T composite driven sprocket
Should do 70km/h........just get there very quick with alot of weight along way to the front it hopefully wont lift :) Rear tire MAY be changed to a 21"x 3.5" motorbike tire later if i burn thru rear wheels. :twisted:
Controller will probably only do 10kw to start with but i ll be modding the shunt as it should be able to handle alot more then that for short bursts. A plug in CA will give feed back on power usage.

I have a request for suggestions tho, I kinda want to leave the battery exposed but keep it water proof and immune to prying fingers. Anyone have any sugestions on how to wrap it in some form of a heat shrink or a clear stretchy tape, kinda like a glorified duct tape battery pack lol. The pack is not much wider then the frames below it and its held together with a metal frame around it along with the plastic hardcases so i am not worried about damage to the pack rather keeping things out that should not be in it.

DSC_0125.jpg
 
Back
Top