connections for? EcityP Smart S5-13 BMS

SoftwareFailure said:
Hello all.

Does anyboby here tried this software ?

I got a BMS wich uses the OZ890 chip and I'm trying to see its configuration by reading the EEPROM.
The software package is presented and supposed to work with an AardVark interface wich I have but unfortunately the options menu of the software doesn't allow me to choose the AardVark interface, only "Discnnected" or "O2 USB" options are available.

Does anybody have a "solution" ? Or maybe someone can post a log of the communication with the OZ890 sothat I can talk with it using other I2C softwares ?

I just downloaded the file, and I can't see the interface too. I have this version, wich is a bit older, but let you choose the parallel port adapter or the AardVark from the settings page.
Hope this helps! Let us know about your progress! :D
 

Attachments

  • O2CowBoySetupv0.75.exe.zip
    1.3 MB · Views: 404
Thanxs for the cowboy!

Cowboy works well with the Aardvark, although the connection/disconnection seems to have a mind of their own. Now that I can read the scan data and the eprom reg's, I would like to modify all that, unfortunately there are a couple of params whose description by cowboy is somehow a kinda private joke. Don't figure where to find that datasheet which would be of great help.

Anyway, thank you for that piece of SW.

There is still a point that makes me doubt. When connecting the power to the BMS, the OZ will not start @ power-on. It is necessary to reset it and it becomes OK! I thought on-board electronic stuff has to be 100% plug&play, doesn't it?
benty
 
Probably it's only the I2C part of the OZ that is "disabled" at power on. The OZ can work in I2C or in standalone mode, so maybe it starts with the latter by default. I have the DS but it's signed, if you know a way to remove text in bulk from the pdf pages I can upload it here, else just ask me for the commands/registers you need and I can post the edited jpg here.
 
Here's the datasheet. Password is wizardofoz
Have fun! 8)
 

Attachments

  • ds_uns.zip
    2.3 MB · Views: 613
thanxs alot gipmad for the ds, it's really cool!

Now the I2C works fine with cowboy and the oz. The only stupid thing remaining with my bms is the fact that at plugging the battery to the BMS, although the I2C comm is OK, all the measurements go crazy so that there is no real monitoring function enabled, unless one makes a very hard reset. This is not a "plug&play" workstyle as would be expected from an embarked piece of hardsoftware. I'm considering a H/W mod with cap&diode to mimick a reset each time the "power switch" is actuated.

cheers
 
I follow with interest this thread, however it's partly hard to follow for non native tech lingos...

It seems the OZ890 chip is not available for 'normals'. Thus hacking e.g. the smart bms is a feasible way if one could communicate via the i2c bus with the chip. I'd need this hack to know the status of 24 Lipo cells, thus 2 smart bms would be required and a uC to read out the values continuously. How could this be done? the operation of the OZ890 would have to be changed from hardware to software mode and to chips would have to talk to the same bus probably through optocouplers?

I see that some tests have been done with USB-I2C adaptors, is there a recommended one? I have a Devantech USB-I2C adaptor available...

any suggestions, r
 
Hi,

Am also preparing to buy few BMS with OZ890. Unfortunately I cannot download the attachments from this discussion.

Can someone kindly send me the datasheet and the software working with parallel port interface to lada21011 at yahoo.com

Thank you
 
pavlik1 said:
Unfortunately I cannot download the attachments from this discussion.

Just hold on a few days. I don't have access to the original files ATM. :D
http://endless-sphere.com/forums/viewtopic.php?f=1&t=25629
 
Hi,

First post here, I'm a French embedded software engineer, I have a scooter directly imported from china, updated to 72V and a Kelly controller.

I am looking for a BMS, I first considered the Signalab BMS but I found this one... verry interresting for 20$ !

For info here are pictures of the available settings in the windows SW (v0.87): https://picasaweb.google.com/romelec/BMSO2Micro

rolf_w, i have the same "problem": connect 2 boards.
I think I will replace the power FET by some optocouplers, controlling relays for the charger and the enable input of the controller.

But as you I would also prefer to put a microcontroller which communicates with the boards (in SW mode) through an isolated I2C bus, maybe in a second time.

Here is a link for a parallel to I2C converter: http://electronix.org.ru/datasheet/Philips/I2CPPP.PDF
And a paper for I2C isolation: http://www.eetimes.com/design/embedded/4025023/Opto-electrical-isolation-of-the-I2C-Bus

gip_mad, could you repost the SW and DS ? (or by PM), after the download problem they have CRC errors.

Is it possible to have an high resoution picture of the board ?

Thanks,
Romain.
 
romelec said:
... available settings in the windows SW (v0.87): https://picasaweb.google.com/romelec/BMSO2Micro
but you haven't connected it to the BMS yet?!

...I think I will replace the power FET by some optocouplers, controlling relays for the charger and the enable input of the controller.
But as you I would also prefer to put a microcontroller which communicates with the boards (in SW mode) through an isolated I2C bus, maybe in a second time.

I had similar ideas to control the main current, however my priority is to have all cell data available for recording to optimize my battery systems. I searched chinese websites as some designs use the OZ890 for packs with more than 13 cells (e.g. here use Google translate). They do i2c bus isolation with the ADUM1250:
20097262303347463.jpg


the serial interface is isolated by optocouplers:
20097262305754461.jpg


CANbus interface:
20097262312124822.jpg


I am interested to use CANopen in an EnergyBus configuration (see e.g. here p179ff)

In the OZ890 Datasheet a reference is made to The Application Note "OZ890 AN-11: Application circuits for 5~13 cells Li-ion battery pack" describes
the typical application circuits for 5S, 6S, 7S, 8S, 9S, 10S, 11S, 12S and 13S cells Li-Ion battery pack
(see p7). I wonder if this isn't the Smart BMS S5-13 ? Has anybody found this AN-11 somewhere? r
 
Very late answer: no, I can't pay 200$ for the adapter, that's why I asked to repost the the old SW ( and datasheet) to use a parallel adapter :wink:
 
Hi guys, sorry for the delay. Here is the software, but I can't find the "clean" DS anymore, so if someone can post it for me it would be great. I will look into it this weekend if needed, as I'm currently out of free time. :(
Bye
 
Hi gip_mad,

Thanks for the software :wink:
No problem for the delay, It took a lot of time (and repeated mails) to get technical answers from ecitypower :roll:
I ordered the boards today.

pavlik1, rolf_w, have you advanced in your projects ?

Romelec.
 
I received the boards a few days ago and quickly tested them with some resistors to simulate a battery:

The charge and discharge FETs are not commanded and the balancing is not active even with 4.2v per cell...

I have a 12 cells configuration, the 13th wire is supposed to be left opened or connected to the 12th cell ?

I will make the parallel interface to read what they have programmed.
 
romelec said:
..., rolf_w, have you advanced in your projects ? Romelec.

I have ordered and received 4 boards and the I2C to USB adapter a few weeks ago but I had never found the time to look at them... :(

Over a rainy Sunday afternoon I tried to figure out the circuit - it looks very similar to the one in the OZ890 datasheet - I am not understanding the current sensor setup (R20,R24 and N2,N3 etc. in the detail foto below...) and a few other things, though...

I first tried to install the adapter on my win7 notebook but i couldn't get the drivers working. Then I tried to install it on an xp notebook and it seemed to connect . It has to be supplied from the bms board to work properly and to be checked I presume.
P1020548s.jpg

Last week I finally prepared and connected one board (preconfigured to LiPo according to ecitypower) to a 2x6s setup.
P1020546s.jpg
I prepared the board according to ecitypower's description by removing CF13
IMG_0051 usage statement.jpg
P1020551s.jpg
When I connected the approx. 50V battery voltage to the bms there was this hardly audible 'tick' sound of something which electrically broke down - nothing visible, but the circuit remained dead. I checked the supply (VCC) to the OZ890 and it was 0V thus some component (D4-R17-C4, ...) in the supply line died I suppose.
P1020552s.jpg

This is where I am stuck right now - I need to find another free evening to try the next board - but I want to make sure I don't hear this 'tick' sound anymore...
rolf_w

(I also received the ADUM1250 which I will use for isolating the bms i2c connector from the joint i2c bus (which will be converted to a canopen / energybus format. I do hope I get this far...)
 
Today things looked a bit brighter - the SmartBMS finally works! and it is, as I imagined, quite comfortable to manage all the various setpoints/thresholds and to be able to log important data such as cell voltages...


To test the BMS I use 2x6s LiPo batteries. I prepared the battery by fully chargeing and accurately balanceing both packs to 4.2V. Then I discharged cell #4 to 4.115V to force the BMS to balance. The Foto shows that as expected all bleeding FETs are on except #4 and #13. Unexpectedly also #1 is off - something wrong with the bleeding circuit!? Actually 2 of the 4 BMS I received have one of the bleeding circuits (for 1 out of 13 cells) not working!

Cell#13 pin I did left open . I also did not remove CF13 as recommended by ecitypower. It seemed to work (see later)

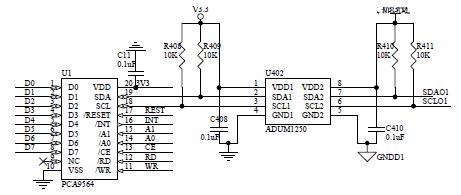
It took me a while to get the communication working. The 'cowboy' hangs from time to time (just restart) and the i2c to usb adapter also (I now always connect the usb last when powering up)

I was able to keep all settings to the initial ones (e.g. device No 0x60)

2 of the 4 BMS where damaged whilst testing. I don't know the reason - it happened when connecting the main battery power to the board i.e. connecting the ground pins (=B-) and VCC (=B+) pin. I tried to interpret the datasheet: "There is one essential requirement of assembly sequence while connecting the battery cells to the protection board using OZ890. In general, the ground pins and VCC pin of OZ890 should get power before any other pins. Please refer to the Application Note "OZ890 AN-1: Battery Pack Assembly Sequence and Connections Technique" for details." And use the following connection sequence:
  1. connect i2c
  2. connect B-
  3. connect B+
  4. connect balance wires of lower pack (cell#1-6)
  5. connect balance wires of higher pack (cell#7-12)
  6. start application
  7. connect usb

disconnecting is more or less the revers procedure.

I damaged the first board when connecting the B+. As explained above it seems that something damaged the OZ890 as the VCC input is now low impedance (ca. 20Ohm)
I damaged the second board doing the same, connecting B+ after testing the bms for a good while. The last thing I tried before it happened was to balance a single pack. I wanted to know if not removing the CFs also works with only 6 cells. I removed the higher pack and adjusted the eeprom settings to '6 cells' . When connecting the bms, the balancing did not start and the data readings in 'cowboy' were arbitrary. I stopped the test, reconnected the 2nd pack , when connecting the B+ there was a tiny spark and the OZ went silent.

I have ordered 4 bms - 2 have now damaged OZs and 2 had already damaged bleeding circuits on arrival, all kaputt in one evening! I do need some input e.g. access to the Application Note "OZ890 AN-1: Battery Pack Assembly Sequence and Connections Technique" and others...

has anyone been more successfull and has more info? r
 
I was able to fix the 2 bms which had 1 bleeder damaged. checking the components I figured out that the FETs are dead. when I desoldered them they came off in 2 pieces - obviously they were broken during the fabrication. As I have enough spare components with the 2 fried units I was able to change the FETs. Now both work like a charm! next step is combining them for a 20s and 24s setup, r

Has anybody a clue why ecitypower insists to desolder the CF capacitors (see DS) for the unused bleeders?
 
Hi, thank you for the updates, it's very interesting. It's a bit sad that one fet was defective on each board... Btw, I guess that they tell you to remove the cap because it could couple some AC voltage to the unused cell pin, making it sense a cell and go crazy.
 
Hi,

My boards are a little bit different from you: the LEDs are not soldered (I added them) and the CF0 and CF13 capacitors have been replaced by 0ohm resistors :shock:
Could you send me the datasheet, I don't understand this difference.

Also I don't think there is any current sensor, R20 and R24 are 3.3k. The current only goes through the MOS

I still didn't had the time to build the I2C interface...
 
romelec said:
...the LEDs are not soldered ... CF0 and CF13 capacitors ...there is any current sensor, R20 and R24 are 3.3k ...I still didn't had the time to build the I2C interface...

the 'bleeder' LEDs are very helpful. did you solder them manually? tricky job...
ecitypower told me to remove CF13 to CF0 if cells are not connected and they did send me 0Ohm resistors as a replacement in case I would want to reuse these inputs again. i did ask for the reason but did not get an anwer yet. According to me this excercise could only make sense if the unused CFs are replaced with 0Ohm resistors in order to shorten/bridge the voltage sensing inputs of the unused cell positions...
I also tried to figure out the current sensing circuit ; the 2 resistors are definitely not the shunt resistors ; i guess the circuit uses the Rdson of the power FET as a shunt to measure the current...
what approach you have to build the i2c to usb interface? I will isolate the i2c bus of each board with an ADUM 1250 , link them all (currently only 2) to the same i2c bus connected to a PIC with integrated CANbus adapter...

The following circuit diagram is extracted from the DS. It does not reflect the SmartBMS but is a good help to better
understand the circuit oz890_HW-Mode.png

rolf
 
rolf_w said:
romelec said:
ecitypower told me to remove CF13 to CF0 if cells are not connected and they did send me 0Ohm resistors as a replacement in case I would want to reuse these inputs again... According to me this excercise could only make sense if the unused CFs are replaced with 0Ohm resistors in order to shorten/bridge the voltage sensing inputs of the unused cell positions...

Exactly. But we need AN-11 to check this....
 
Back
Top