Cordless conversion for Black & Decker MM850 Mower

amberwolf

Administrator
Staff member
Joined
Aug 17, 2009
Messages
42,697
Location
Phoenix, AZ, USA, Earth, Sol, Local Bubble, Orion
This one was relatively easy, though Jelly is a bit critical:
20210415_184255 - Copy.jpg

It's a brushed permanent magnet motor, so it works just as well on DC as AC. (it even uses a large full-wave bridge rectifier between the switch and the motor...I didn't bypass that solely because I left this whole thing setup so it can still easily be used with an AC cord as well, just in case).

I checked the pictures I could find of exploded views and such, and it looked like there would be plenty of room inside for a battery...even for a 28s1p EIG NMC pack, the same size as I use in the SB Cruiser trike (but a different configuration, as that is 14s2p). Unfortunately I don't have 1p busbars or enough ring terminals to make a 28s1p, only 2p busbars, so my only easy option was to use two 14s2p packs in series, for 116vDC full, 104V nominal, to run this nominally 115VAC-powered mower.

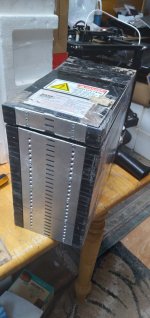
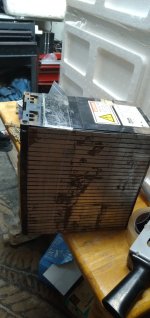
I considered unscrewing the top cover to put the packs inside, but there didn't seem to be enough room for two, though probably would be for one. It wouldn't run well enough on one (tested easily enough with an extension cord connected to the anderson SB50 on one pack) so two it would have to be. The whole deck is one big shell made of two halves, and taking that apart is not quite as easy as just unscrewing a cover, so I opted for cutting the top open instead, from just behind the motor to the very back wall above the bag cover. If I ever have to reclose that, it's not too difficult to make a new cover (I messed it up cutting it off, so it's not easy to simply reattach).

This leaves a space more than large enough for a single 28 cell pack laying with it's largest dimension down, or two stacked on top of each other that way...but it's difficult to get my hands in there to lift it back out, without putting handles on the pack, so I opted for putting one inside vertically instead, and then laying the other horizontally on top of it, and then cargo-strapping it down from the wheel wells on either side, for the initial test. I used the plastic cover piece between the strap and the pack to reduce stress on the pack itself.
20210415_184521.jpg
20210415_184611.jpg
It's a temporary arrangement for this test, but it worked fine and would probably work to do this each time I need to use it, and may not be worth any extra work to improve the mounting. (I'd guess a few hours to box in the area or otherwise modify it so I can get packs stacked horizontally out of there).


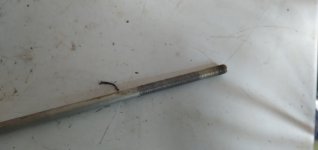
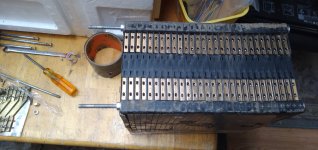
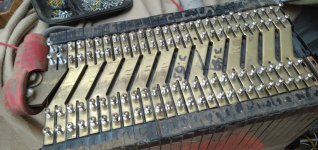
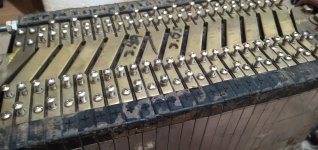
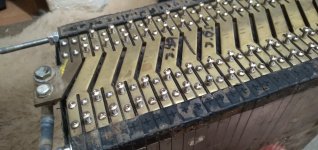
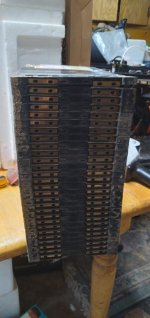
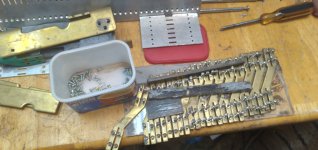
I only had one pack built up as a spare for SB Cruiser, so I used most of my remaining spare cells and 2p busbars to make a second one. I built it like the others, so it will also be a drop-in replacement for SB Cruiser in case it should be needed, as it won't be used on the mower very often (few times a year, typically--there's only enough grass to use a string trimmer on patches around trees most of the time, except after our few "rainy seasons" when we get a lot all at once, then nothing...rest of the time the dogs trample what grass does try to grow). Building this took about 3 or 4 hours, I'd guess, mostly trying to get my hands to not drop the screws and washers for the busbars down onto busbars or between them (which is generally bad :bolt: :flame: :kff: ). I picked cells that were all within a few hundredths of a volt of each other, and paralleled pairs that were different in opposite ways, to even it out where necessary. I forgot to take pics of the building process, but it's just stacking the cells and screwing down busbars to them. Easy peasy, which is why I like these cells so much. :)


After that, it was just charging the packs up, also easy using a Meanwell HLG600H-54A just like I use on SB Cruiser. I'd charged up the already built pack (left at storage voltage) while building the new one, and then topped off the new one once completed while figuring out the seriesing and connection to the AC plug on the mower.


That was simple enough, but complicated slightly by needing to leave the packs as ready-to-use drop-ins for SBC, so I couldn't simply directly wire them in series, bolted together, which would be the most efficient way to do it. That would also require putting one pack in, then the other, then bolting the wiring together, because I can't lift more than one at a time safely. So I used a jumper SB50 between the + of one pack's SB50 and the - of the other, and then wired just one wire from each of two other SB50 shells (+ on one, - on the other) to a round female AC plug that would fit into the hole / jack on the mower's AC inlet. Then each of those shells was plugged into the open contact of each of the packs' SB50s.
20210415_184528.jpg
20210415_184651.jpg
20210415_184655.jpg

An old Turnigy Watt Meter was used on just one pack to monitor current draw, etc., since it can't handle the series voltage of both. So all the volts and watts on it's readings are half of what were really seen. The idle current of just blade spinning is around 2A, and average mowing regular grass is about 4-6A. High spots and thick spots went way up.

20210415_184547.jpg20210415_184550.jpg20210415_184552.jpg20210415_184554.jpg20210415_184556.jpg


One thing to note is that since I wasn't using at least 50-100 feet (sometimes more for the street side outside the yard, nearing the alley) of extension cords on AC power, the mower didn't bog down like it would on those, and the wiring didnt' heat up at all. The bogging down usually slows me down quite a bit, sometimes adding an hour or more to the mowing, as I have to back off and go back in, etc. Not having to do that saved at least that much time. But the best part was not having the cord to tie me down and make me have to backtrack around all the trees, etc., or wind up the cords and move them and redeploy for front vs back vs sides vs sidewalk, etc.--all of which can take me at least another hour or two just to do, not coutning the mowing. So instead of taking half to an entire day to do, I think it only took about two hours to mow everything once I got started. :thumb:

If it just didnt' weigh so much, and stick up so high out of the casing, it would be much better.


Now I just have to do something for the string trimmer, which is a big Ryobi 137r (IIRC), that also runs on mains AC. I think a large-wheeled battery cart with a few feet of cord is probably the answer there. Has to be large wheels (like BMX 20" or so) so it easily rolls around on the uneven yard, etc., but the cart itself will need to be small and easy to pull (maybe something that hooks to a belt around me, so I have hands free to hold the trimmer). I'd rather have a more portable solution, but even just a 28s1p pack would still weigh 35lbs+, and I can't carry that around even in a backpack, and still do the trimming. Maybe if I can use a 14s1p pack, I could do *that* in a backpack. The trimmer has a switch on it that I almost always have in "turtle mode", which places a large diode in series with the power to the motor from the AC plug. That means it is running on half voltage anyway, so 14s may work well enough. I'll have to try it the next day off I have when it is still cool enough to do yard work. (these days, in summer I have to do it at night, or before dawn).
 
While I was finishing the front yard, I accidentally mowed over one of the drip-watering tips because i was (as usual) too tired to keep good control over my movements. Since the water was on at the time (for the first time since winter started) there was sufficient pressure to fountain up and over quite a ways...it was far past the mower, so I hobbled away to go turn off the water which took a few minutes, and by the time I came back i found that the fountain must have lost enough pressure (probably right after I turned away) to drown the mower...which is powered by my two spare EIG packs, that are just the cells in their trays and no cases, and no cover on the mower, since it lives in a shed and doesn't get used in the rain, etc. and thus doesn't need one.

So the next few hours were spent disassembling both packs down to the bare cells, to be sure no water got into any of the trays (this will cause galvanic corrosion as happened with one cell some years back when I was riding home thru flashflood waters well over the base of the battery area in the trike, and I did not get it dried out quickly enough).

It takes a long time to work on these, because there are four clamping screws on each cell, two on each tab, and there's two parallel cells in each of the 14 series groups, so that's 4 x 2 x 14 = 112 screws per pack, which are tiny allen-head types and are over an inch long each, with a minimum of half an inch of engaged thread fed thru the captive nuts in the trays. That doesn't count the two short screws at the bottom of each cell tray securing it to the metal plate across the bottom of the pack.
20240304_164817.jpg 20240304_164822.jpg 20240304_165249.jpg


I was lucky in that it was only in the very end cell of one pack, and just at the edges, and a few end cells (all the same end) of the other pack, again only at the edges.
20240304_170932.jpg20240304_170938.jpg20240304_172235.jpg20240304_172243.jpg


So i wiped them off and set them up to dry out in the stiff breezes still going on at sunset.
20240304_180138.jpg


By the time I was sure they'd all be dry, I was way too tired to trust myself to reassembled them, so I set them in stacks in their original order in a safe place, with all the interconnects and screws and cabling for each next to the cell stack for that pack.

Even this was too much, as I dropped one cell onto another while stacking them, and destroyed it by ripping the outer jacket wide open, a triangle about an inch long and nearly that wide. :( I have spare cells in a few different voltage levels (I left them at the voltages they came to me at, however many years ago that was, and they're still at those voltages), so I picked the closest voltage 3.62v to the 3.65v the cells of that pack were at. (the cells of the other pack were at 3.62v, so of course it wasn't one of those that was damaged, and I'll have to manually charge the new one up to 3.65v before I bulk charge the packs again). To be sure i know which one was changed, for tracking over time, I put some tape "tabs" on either side of it, making it obvious in the stack which one it is.
20240304_182314.jpg20240304_182625.jpg
This pack is the one I had swapped out of the trike to try one of the spares over winter to see if it worked better in the cold (it didn't; they're all just old)...I think when I get these reassembled, I'll put the other spare in the trike to test it out.


I taped the torn pouch and put it away in the "cell safe" (steel cabinet in one of the sheds) for later testing / tracking / etc., I won't be using it on the trike but perhaps it could see some outdoor-only usage if it remains operational and doesn't exhibit progressive failure / etc from the pouch tear.
20240304_182349.jpg


The repalcement cell is from a different batch; even the printing method is a bit different. (the damaged cell can be distinguished by the tape on it's surface, though you can't see the tear in the image).
20240304_182529.jpg


As a note, all the connections / tabs / etc were nice and shiny at their contact areas, *except* for one cell (of the pair) on the end of that pack (the one out of the trike), where there's obvious discoloration of the cell tab contact surface from some form of oxidation (black), as well as some obvious copper corrosion (green) on an edge. The tabs appear to be copper or a copper alloy, and the busbars are brass. There is matching corrosion on one of the two clamping nuts of that corroded contact.
20240304_165002.jpg 20240304_165019.jpg

Note there's a difference between the cell trays in the two packs--one of them has blue plastic separators between the cell pouches adn the tray aluminum covers. The other one has cells with a little insulation on the edges of the cells themselves, but nothing across the faces and no plastic separators.

Most of the cells in each pack are either consecutive or nearly consecutive serial numbers, which probably helps explain why they are so closely matched (still identical performance with no BMS/balancing/etc after years of usage).
20240304_165409.jpg


When disassembling the first (driest) pack, I found a LOT of dust and dirt in the trays for each cell, that had gotten into the "blocked off" pouch area, because this pack wasn't built with the bottom plate, just strapped together with gorilla tape, and that wasn't apparently done tightly enough to keep stuff flung up by the mower out from between the cell trays. (the other pack with the plate at the base, and gorilla tape and busbars securing the other end of the cells, did not have dust or dirt between them, but it had also not been used on the mower nearly as long or as much; I'll have to open up the pack presently on the trike once swapped out for the third pack to see how much dirt is inside it and clean it out. I don't remember if it has the base plate or not).

Some of the tray covers have signs of corrosion on them on the outside, but not on the inside, and not on the pouches themselves. So humidity or water has intruded on some previous occasion between the plastic of one tray and hte cover of the next in these cases, but didn't get into the actual cell area.

20240304_164832.jpg20240304_164858.jpg20240304_165348.jpg20240304_165244.jpg


One cell has a damaged tab; appears to be arc damage at the screw hole, but there's no corresponding damage to the busbar or the screw that was in that spot, so it probably happened before it was assembled into this pack.
20240304_170755.jpg
 
You use that battery pack to mow the grass?

What bloody kind of alien hell grass do you have?

Do you not worry about marketing people except for the grass burping all night from a heavy meal?

So many questions.
 
I keep forgetting to get pics of the updated battery configuration, but they're now both stacked horizontally, busbars at the front, tall sides of the packs parallel to the ground. Makes the mower less tall and the packs more stably secured with the cargo strap.
 
Last edited:
Ok, I have to file a complaint.

It was all good til i got to the picture of the battery wearing it's little hat.

You need to warn people, my wife works at 4am tomorrow and she gave me dirty looks for giggling.

Then I went out and showed my cancer buddy, he was all "it has a wee hat"

Much fun was had, thank you for keeping my life weird
 
This is a nice idea/hack to run a brushed AC motor on DC, worth knowing.
But not very practical for battery build, especially 230V version
Regarding the trimmer, some time ago i bought a no-name 36V cordless trimmer with a brushed motor, for like 25$ new (no battery). Cheap, simple construction, DC motor directly driving the cutting head without shaft. After adding a DIY battery i was surprised how vigorous and actually usable it is (more usable than old two-stroke gasoline trimmer).
These can be found sometimes, much cheaper than brushless motor models but still getting the job done (and some of the brushless also have some electronic locks to prevent use of DIY batteries, so not recommended for DIYers)
 
I bought an electric lawnmower in a fit of being green.. then I realised we had tree's to maintain.. and a hedge... I looked at the shiny new lawnmower... and hired a lawn guy because in the long run the tools cost was gonna kill me.

Now i have an electric lawnmower that no one wants...
 
This is a nice idea/hack to run a brushed AC motor on DC, worth knowing.
Also called "universal" motors, because they'll run on either one...but this mower is actually a DC system with an AC cord--it has a fullwave rectifier built in, which I removed (don't know why it's not in the thread, I know I got pics and whatnot of that, and other stuff... Hm...have to find them and post them in there).


But not very practical for battery build, especially 230V version
Thankfully it's only 110-115VAC here, so a 28s battery was easy enough.

The battery would actually only be half the size and weight it is if I had enough 1P busbars for the cells, but I don't, and am too lazy to crimp ring terminals on 26 short wires to do it.

Also, these batteries are the spare ones for the SB Cruiser trike, so leaving them in this configuration I can simply unstrap them from the mower and plop them in the trike to use them (either as replacements or range extenders), so I am very unlikely to do such a reconfiguration. ;)

Oh, and I found an orange duplicate of this mower at goodwill for a few bucks about a year ago; it's plastics are in worse shape than this one (UV sunrot; mine's always kept in a shed so that doesn't happen) but everything else is good, so I've been using it for spare parts (like the blade and fan so far).


Regarding the trimmer, some time ago i bought a no-name 36V cordless trimmer with a brushed motor, for like 25$ new (no battery). Cheap, simple construction, DC motor directly driving the cutting head without shaft. After adding a DIY battery i was surprised how vigorous and actually usable it is (more usable than old two-stroke gasoline trimmer).
These can be found sometimes, much cheaper than brushless motor models but still getting the job done (and some of the brushless also have some electronic locks to prevent use of DIY batteries, so not recommended for DIYers)

I have (and have had) plenty of crappy trimmers (most with direct head drive) that would be (and have been) easily powered by smaller DC packs... but all those motors are low power, and overheat rapidly in summer here...and can't cut thru some of the stuff I need them for. I've deformed/melted the casing around the motor on three of them from motor overheating (one ryobi, one B&D, one craftsman).

So I need the big AC-powered Ryobi trimmer, and at present that means a tether either to the pack on the mower (using the mower as a battery cart, basically, moving it to different areas that need trimming), or a much much longer tether to a wall outlet. Which one I do depends on whether I have time and energy to do the trimming and mowing together, or have to do them on different days / weeks / etc (almost always the latter, thus almost always just a very very long extension cord from the wall outlet).

(I even overheated the first big Ryobi I had; the one I use now I found at goodwill with siezed up bearings in the transfer gearcase at the head...parts swapping between the two gave me a good working one that's been reliable).


I also overheated the battery powered B&D hedgetrimmer (using it's own battery, no modifications), and the motor always smells funny now, but I don't need to worry about that anymore, since rent went up a couple hundred bucks this year I have just been cutting down all the lantana at the ground as I have time and energy and removing it, since I can't afford to water it anymore after that.
 
::sniffs:: ahh, the smell of my childhood. I was the only person in the house that had interest in electronic things.. Tv for football was my families gig.. I like seeing what made them go.. hence.. nostalgia over cooked circuit board dopant.
 
Well, it has taken me until the last several days to be able to reassemble them and recharge them; other than rebalancing the replacement cell to the rest of them, they're all still identical voltages (the replacement will probably act differently than the ohters, as it has been unused all these years while they have all been cycled, but I don't expect it will be much different).,

Some pics of the reassembly (didn't take as many as I'd intended to by far, kept forgetting to take them as I went.), also showing some parts I'm not using (like the bars intended to parallel two of these 2p packs), and adding threads to some long bolts to provide support and compression of the top end of the pack where the busbars are (teh bottom is secured with plates screwed to the bottom of each cell holder). Previously I had used gorilla tape and clear packing tape to secure the packs together, but I did not have enough to do them that way this time, and since that was only meant to be a temporary experiment at the time while I actually worked out the bolts/plates to do the securing properly, I just went ahead and did that.... (only took me several years to get around to it :oops: )

And yes, the metal plate on the bottom of the one pack is not continuous, I am saving the one full-length one I have for a higher voltage pack I would like to try out with the Phaserunners on the SB Cruiser trike. So i used one shorter one i had, and a piece from cutting one long plate down for the other pack. I have another short plate that will bolt over the two of these to connect them together, so the plate will secure teh whole pack at the base..

Last night I recharged them, and need to test them (by mowing the yards) tomorrow and/or monday. (only thing tested so far was balance at the mid-charge level, and at "full", which for my purposes is about 90% of their full voltage on their SoC curve, about 4v/cell IIRC).


Oh, and the little RC wattmeter i thought was toast because it got soaked while powered up turns out to be fine, after it dried out all this time. 😅
 

Attachments

  • 20240412_184053.jpg
    20240412_184053.jpg
    2 MB · Views: 4
  • 20240412_184328.jpg
    20240412_184328.jpg
    4 MB · Views: 5
  • 20240412_185351.jpg
    20240412_185351.jpg
    4 MB · Views: 5
  • 20240412_191040.jpg
    20240412_191040.jpg
    4 MB · Views: 4
  • 20240412_192113.jpg
    20240412_192113.jpg
    4 MB · Views: 3
  • 20240412_181715.jpg
    20240412_181715.jpg
    1,012.5 KB · Views: 38
  • 20240412_181707.jpg
    20240412_181707.jpg
    926.1 KB · Views: 4
  • 20240412_181702.jpg
    20240412_181702.jpg
    2 MB · Views: 4
  • 20240412_181659.jpg
    20240412_181659.jpg
    4 MB · Views: 4
  • 20240412_181647.jpg
    20240412_181647.jpg
    1,021.1 KB · Views: 5
  • 20240412_181640.jpg
    20240412_181640.jpg
    686.3 KB · Views: 5
  • 20240412_181632.jpg
    20240412_181632.jpg
    956.9 KB · Views: 3
Last edited:
The way I had to do the bottom plate on this one above
20240412_181715-jpg.351084

meant that there was less compression on the cells at that split (even with it strapped up tight with clear packing tape all around), so one of them puffed up, the one facing up in that pic just "under" the split. Not much puff, but a little, enough to force the pack to spread open and stretch the packing tape's plastic.
20250224_094058.jpg20250224_094107.jpg

I checked cell votlages and every cell in both packs was at 3.60v, 3.58v with the mower running just sitting there. An imbalance might show up at empty or full or under a heavier load.


Once I cut the tape it really bowed out (forgot to take a pic), so I removed the busbars on that end to get that cell out, and I ended up just taking four cells out so that the plate length I do have on there is able to secure all of the cells properly, and ther'es no split plate (which cant' really do the job). That makes it a 12s2p instead of 14s2p, so I adjusted one of the meanwells down to 48v (from 56) to charge this one, and left the other at 56v to charge the second pack (since the mower has to have them in series to operate).

I noticed it after having mowed the backyard and wawsa bout to go do the front and side/street. I was already nearly wiped out so after fixing the pack I just put it on the chargers and had to go lay down (and now type this up while I rest after my short forced nap). I'll check balance when I get back up; everythiung should be at 4.00v the way I have the chargers set. (they're probably done now, since I have the meanwells set for max current, about 11-12A, and 3.6v means about half full, so for a 40Ah pack that's about 2.5-3 hours to "full" at this level. )
 
Went to mow the lawn the other day and the mower's little vibration was suddenly a huge one. I first checked things like the plastic fan disc, blade mounting, etc, and found that the fan disc had actually heated up so much (presumably from the thing a bit later in the post) that where it contacts the motor shaft and mounting hardware it had melted and resolidified, probably in the previous round of mowing, or perhaps on several occasions. I managed to break off some of the blades trying to get it off. :/ doesn't matter cuz it's no longer centered anyway, the hole resolidified offcenter, so have to replace it (or rebuild it, don't have time for that).

So I just left it off and stacked washers on there in it's place so the blade mounting hardware would still work, just to get the job done while it's still cool out and I'm off work, but the vibration didn't change. Closer examination found the top bearing of hte motor isnt' actually a bearing, jsut a bushing, and had worn so badly that there was more than a mm of gap between it and the shaft. :shock: The motor vibration and friction probably heated up the shaft so much it was able to melt the fan disc core plastics....


Well, that's ok, I have a whole spare mower i found at goodwill a while back that's a slightly different model but uses all the same parts. I had fired it up to make sure it worked but didn't do more than make sure ht motor spun, so I didn't know that it's top bushing is *also* worn enough to wiggle the shaft in, though not nearly as badly. Just to make sure it was ok, before finding this out, I hooked up the battery from the old mower to this one, still mounted on the old one, and found the vibration, and then the wiggle. :( So much for the easy plan of just moving the battery over....


Hmpf.


So...the shaft diameter looks familiar, so i took a peek in my hubmotor parts bin and whaddya know--the top shaft is exactly the same size as the typical hubmotor axle, so a hubmotor bearing fits on it. The plastic top of the motor cage the bushing sits in is *almost* the right size but has a tiny lip intended to retain the bushing "fins" that keep it in place without melting hte cage, but once I scraped that off teh hubmotor bearing popped right in. Whew! Saved by the junk drawer again. ;)

While i had the motor apart, however, it became obvious that the bottom bearing (whcih is actually a bearing) is also worn out, but thankfully the spare mower's is still fine. I'd already gotten the top bearing installed on my old motor, and the bottom bearing off of it, so I swapped bottom plates from the spare one to the old one with the bearing still in the plaate, rather than trying to get the bearting out of the plate and then into the old plate.

I also managed to chip one of the old motor's brushes somewhere in there, so had to move a brush over from the spare one.

So a couple hours later, I finally had a working motor, but my chance to spend the time moving the batteries over to the new one and make a proper mounting and strapdown for them, inside it's cover, instead of with the cover cut away, was all used up in the fixing process...so i had to just put the fixed motor in the old mower and go get the mowing done, cuz that was going to take a long while by itself (mow a bit, sit down next to the mower and rest, mow some more, rest some more, and do this a few minutes at a time until it's all done front, side, and back. Can take two ro three hours this way, and tha's when its cooler outside like now, only like 85F or so...and when I'm done, I'm *done*, not gonna get anything else done the day I ahve to do this).

Still have to order a new fan disc; had to do today's job without it but he motor didn't get hot (because it's out in the open on the old mower, probably).

Bleh.

PIcs below showing the spare motor (minus the top frame, which is still attached to the wiring of the spare mower, the bearings are bottom on the left, original failed bushing and holder, and another hubmotor bearing just like the one I used in the old mower motor. Also one of the chipped brush.
 

Attachments

  • 20250428_172045.jpg
    20250428_172045.jpg
    4 MB · Views: 1
  • 20250428_172041.jpg
    20250428_172041.jpg
    4 MB · Views: 1
  • 20250428_172033.jpg
    20250428_172033.jpg
    2 MB · Views: 1
  • 20250428_172025.jpg
    20250428_172025.jpg
    2 MB · Views: 1
  • 20250428_171827.jpg
    20250428_171827.jpg
    2.4 MB · Views: 1
  • 20250428_171820.jpg
    20250428_171820.jpg
    2.4 MB · Views: 1
  • 20250428_171812.jpg
    20250428_171812.jpg
    2 MB · Views: 1
  • 20250428_171758.jpg
    20250428_171758.jpg
    2 MB · Views: 1
figured i'd check before ordering...whenever i get around to taht....or mabye i won't need to and the grass will all die off this summer since i can't water it anymore...


apparently there are 3d printable versions, but they don't look the same, not sure if it'll work or not
Fan (part #241125-00) and blade insulator (part #241381-01) for Black & Decker electric lawn mowers
1745888941830.png 1745888978276.png
 
Those B&D electric mowers have a few longstanding achilles heels that should have been addressed over multi decades long production runs for various models. The switches fail too early. The worst issue is that fan. When mounted, if you look closely at the clearance between the fan impeller blades and the heads of the motor mounting screws that extend down beyond the mower deck you will notice it will not take much of a wobble or shock (spinning blade hits a rock, a high spot, dirt clod, chunk of wood, etc.) to deflect the spinning blade which in turn deflects the spinning impeller to smash against one of the protruding screws, cracking off one or more impeller fins.

Happened too often. Several times per season for me. Before online parts ordering days the only place to get replacements was at a B&D service location. Often there were several of us customers waiting in line for the same part. They sold 100's of those fans each week! B&D obviously knew about this design flaw but never addressed the problem with a design revision for Years (preferring an easy influx of cashflow from selling the fans)(they were spendy). Across many different models! Decades!

Finally I realized I could snip off the outer corners of the impeller fins off a new one before installing (30-40 deg. angle). No more fin/screw interference. Haven't had to replace one since!

P1050016.JPG

The photo of the printables version shows it may avoid this interference problem altogether as it appears to be smaller diameter. You have a suitable 3d printer, no?
 
Those B&D electric mowers have a few longstanding achilles heels that should have been addressed over multi decades long production runs for various models. The switches fail too early.
I dealt with the switch problem on this mower at some point after changing to the battery, since it made the arc-at-disconnect problem worse, no zero crossing for it to work with, and it stuck on or off; probably on. I don't remember what I did, though, as I apparently didn't document it here. (I *think* I replaced it with a heftier switch from something else, but I don't know).


The worst issue is that fan. When mounted, if you look closely at the clearance between the fan impeller blades and the heads of the motor mounting screws that extend down beyond the mower deck you will notice it will not take much of a wobble or shock (spinning blade hits a rock, a high spot, dirt clod, chunk of wood, etc.) to deflect the spinning blade which in turn deflects the spinning impeller to smash against one of the protruding screws, cracking off one or more impeller fins.

Happened too often. Several times per season for me. Before online parts ordering days the only place to get replacements was at a B&D service location. Often there were several of us customers waiting in line for the same part. They sold 100's of those fans each week! B&D obviously knew about this design flaw but never addressed the problem with a design revision for Years (preferring an easy influx of cashflow from selling the fans)(they were spendy). Across many different models! Decades!

Finally I realized I could snip off the outer corners of the impeller fins off a new one before installing (30-40 deg. angle). No more fin/screw interference. Haven't had to replace one since!
Thanks--that's useful info. I never looked at the clearance, would never have realized that this is almost certainly why it breaks off.


The photo of the printables version shows it may avoid this interference problem altogether as it appears to be smaller diameter. You have a suitable 3d printer, no?
Yeah, which is why I looked around to see if there was a model I could print. ;)

Given how little I expect to have to use the mower, I haven't ordered a fan yet, and just for practice I may attempt a print of it though I'm not going to waste a bunch of time and plastic on it if it doesn't just work the first time, since they only cost about $15 and I could modify one as you have. :)

But I may also just take the unmelted fan that's missing pretty much all the blades, and use a plastic-repair heating iron I've got to melt new ones onto it made from other scrap plastics I have around here. (maybe even the already-melted-core fan disc, since it'd require a fair bit of work to turn that back into something useful.

I'll probably only worry about it if I get the spare mower that's still got a top cover converted to hold the battery from this one, or get to build the 1p version of the 28s pack that would work to run the 110vac brushed motor in here, instead of the 2p version I'm using now (which is because they're the spare packs for SB Cruiser), which of coruse are twice as large and won't fit under that cover.
 
Back
Top