CroBorg Super Commuter

Interesting Ride

I had a dental appointment yesterday afternoon so I ebiked from work to there, about 4 miles through town. I did this once before but this was the first time I had the ebrake working, and I used it a lot going down the big hills and stopping at lots of lights. Worked out really well.

I found I could filter up on the right by the traffic stopped at a light, and then accelerate out ahead of them and have very little traffic to contend with most of the time. Efficiency was unusually high, consuming 2 amp hours for 4 miles.

At the dental office I brought the bike inside and plugged it in (they are very pro bicycle and I had arranged this before). I was concerned about the now extra long home commute from there, about 17 miles, and with more climbing than usual. The charger I brought was one of the 4 amp hour aluminum cased units and by the time I was leaving the voltage was very near cutoff so it replaced most of the charge I had used to get there.

So now I had to go back by work and up, up, up. Four miles to get back to work, and 13 miles to home. I didn't plan to stop at work, but chose to go that way because it is a good route and very familiar and has very few stops and little cross traffic. I could choose another route, but it would save less than 10% of the distance and would add many stops and significant traffic areas (though it could cut way down on the vertical component of the ride).

The trip was uneventful (the way we like it), and a bit longer than the usual commute, but the weather was beautiful and the bike performed perfectly. It climbed up the full height of the long grade next to work that I usually start out halfway up on, and easily made it home on the charge. In fact I didn't need to charge at the dental office at all, the total consumption was 15.5 amp hours from work to dentist to home, and the total distance was 21.6 miles. So even if I had not charged the 20 amp hour pack would have been adequate.

On this trip home I was making good time down the windy part of the ride in the hills, doing just under 30 because of the gradient, and a motorcycle came up behind me. He followed me down the hill, I was following two cars so there was no reasonable way to go any faster, and that is a 25mph road so 30 is very comfortable and a little faster than some folks want to go on that curvy road. We talked at the light at the bottom and he was very impressed with the hubmotor, he had figured that out from following me, he could probably see it pretty well on the tight corners. The Borg works very well on that road, it really goes about as fast as you want to go, fast enough to have fun, not quite fast enough to race the really agressive drivers, it is about the right speed for safety as not too many folks need to pass me.

This morning going up that part of the road two motorcycles were vying to get past me. They had to work a bit to do it, and they were able to, but you could see they were pushing pretty hard on the corners and their real speed advantage was peaking the speed way up in the straight sections. My speed up that hill is fairly constant, I don't slow much for the corners but keep a nice steady pace up the hill. Quite frequently cars are content to follow me up and not even try to pass.

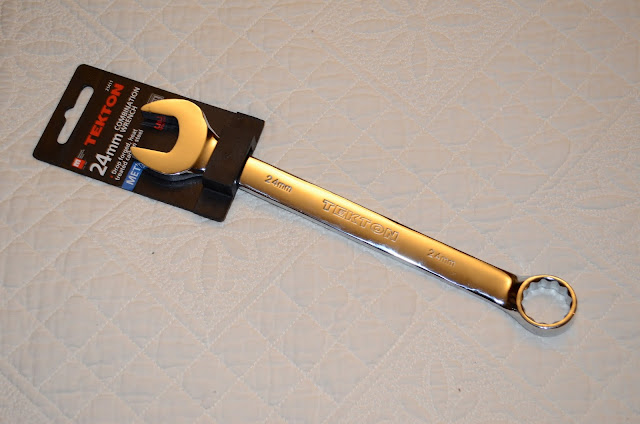
I got a 24mm combination wrench for the rear axle nuts recently, and that sure works better than even the big crescent wrench that I usually use. It is a little heavy to carry on the bike, but again it is much lighter than the adjustable wrench. I find if I can get the nuts just a little bit tighter the NordLocks seem to work and even with lots of regen they don't loosen. Still I want to check them every day so a good wrench is necessary. Regen is hard on the axle tightness, but this combination seems to work.
 
I love reading your reviews Alan. I should be receiving my own frame in a few weeks, then that build begins... and the $pending. I'm going to need to downsize the ebike invintory for this. I currently have 3 fully functional ebikes and 2 more builds planned. I'm thinking my Greyborg will make a nice replacement for my Diamondback Comp Recoil wich runs a 9C 2808 and I currently use as my pedal along bike. I rarely find myself riding it faster than 20MPH because I ride with my wife. Last time I rode a Greyborg it was much more comfortable.
 
Thanks for your kind comments, Jeremy.

Great on your new frame. I have a lot of stainless bolts for the 'Borg, so let me know if you want some. Had to buy lots more than I needed.

I'm looking forward to the new color covers. Hope you get some of those. Let me know what's available.

Here's the axle nut wrench I got from Amazon recently:

DSC_0396.JPG


I've been working on the new bike rack today:

DSC_0407.JPG


This steel rack claims to be good for 500-600 pounds, which I question, but at least it is more than adequate for a GreyBorg! It is part number TMS T-NS-MRC001. I also looked at aluminum racks but they seemed to have some problems and cost more so I went with the higher rated steel one.

It is pretty easy to load and unload by myself, I can lean the bike against the back window temporarily while strapping it down.

I did have to get some threaded links to make it easier to connect the hooks to the rack as the holes were a bit tight for the big hooks on the strap kit.
 
I am a big fan i just bought my crowmottor and am about to buy my greyborg frame as soon as i can find one for sale can you let me know where i can get one at a good price. I am very new to all this but i am really determined to get a great bike like yours going. I want one that i can put atleast a 100volt pack on can you recomend what batteries to use. I know you are prob. busy but i could use all the help i can get.
 
Welcome to the forum. Contact Zombiess if you are in USA, or Accountant if you are outside USA for Greyborg frames. It is not an inexpensive project but still a lot less than a Bomber or other high end ebike.
If you have read through this thread you know I'm using Turnigy Lipo. Those require some skill and effort to use but they are working well for me. my pack is 18S so 75V full charge at 20 amp hours.
Start a planning and build thread for your project and ask questions there to get input from the experts here on ES. Good luck with your project!
 
Thanks alot i am in Nashville Tn. .I will im am so excited about building the bike how much do you think you have in your bike if you don't mind my asking. And what controller do you recomend.
 
I have a Lyen 24 FET 100 volt, and it barely fits (I had to trim it a bit). I think I would go with an 18 FET or maybe even a heavily modded 12 FET to make more room for other stuff in the bike, but it depends on how much current you plan to run. The 24 FET was intended to be super reliable and not get hot, and after some initial problems mine has been excellent. At 18S I'm seeing 75 volts at full charge and about 70 amps peak current. If you push the voltage up to 100 volts you will be stressing the controller more, really should go with a 150 volt controller to have some margin. I think Zombiess has run a 150 volt 18 FET controller with 130 volts of battery for testing, speed runs and racing, so he will have more advice for your plan.

You can PM Zombiess (send him a private message here on ES).
 
Tire Changing Trick

I saw this in another ES thread and I want to try it as these tires are difficult to get on/off, so I quote it here:

Ch00paKabrA said:
... I don't understand what the issue was with getting the tires on the rims though. ... there is a trick to getting them on (and off for that matter).

Here is the trick, for future reference.

Most people will pick a side and put one bead on and then the tube, and then spoon the other bead onto the tire. With street tires, this is very difficult and you will almost always lose some skin off of your knuckles trying to get the tube in after the wheel is half on.

Do not do this.

Step 1: Put the tube on FIRST.

Step 2: Put the rim with the tube inside the tire. It actually pops in easily - so now you have your rim with tube inside the tire and you have a bead on the outside of both sides of the rim.

Step 3: Spoon one bead onto the tire making sure that you END the spooning at the tire valve.

Step 4: Repeat Step 3 on the other side.

Step 5: Inflate the tire.

...

Ch00p
 
One of these protects your knuckles. Use Dawn dishwashing detergent as the lube. Makes tire changing easy.


http://www.amazon.com/Crankbrothers-Crank-Brothers-Speedier-Lever/dp/B00CQTW8G2/ref=pd_sim_sg_3

otherDoc
 
This was written a few days ago but not posted.

Thanks for your comments Jeremy,

Glad to hear you are getting your frame. I am quite interested in the new colored covers when they are available. I have lots of stainless steel screws for the Borg, I had to buy quantity when I needed a few, so if you want some let me know. It would be really excellent if the frame kits came with a screw set, would save a lot of time and money for the buyers.

I also built a tool to press the swingarms onto the frame, it fits them closely and has a large threaded bolt through the middle to pull everything together. You are welcome to borrow it, there would be only shipping costs.

This morning I came up behind a road biker and paced him for a bit, and he was doing about 25. 20 mph is slower than a lot of road bikers go on the level.
 
docnjoj said:
One of these protects your knuckles. Use Dawn dishwashing detergent as the lube. Makes tire changing easy.

http://www.amazon.com/Crankbrothers-Crank-Brothers-Speedier-Lever/dp/B00CQTW8G2/ref=pd_sim_sg_3

otherDoc

Looks great, Doc. Nice bike tire tools! If they'll do half the job, I'll take two!! :)

These Moped tires are extra tough. I did get some motorcycle tire tools and rim protectors and have done it three times thus far. I should use detergent though, that would help a bit. Thanks for the tip!
 
Alan B said:
docnjoj said:
One of these protects your knuckles. Use Dawn dishwashing detergent as the lube. Makes tire changing easy.

http://www.amazon.com/Crankbrothers-Crank-Brothers-Speedier-Lever/dp/B00CQTW8G2/ref=pd_sim_sg_3

otherDoc

Looks great, Doc. Nice bike tire tools! If they'll do half the job, I'll take two!! :)

These Moped tires are extra tough. I did get some motorcycle tire tools and rim protectors and have done it three times thus far. I should use detergent though, that would help a bit. Thanks for the tip!
Luckily my wife decided to be the tire changing guru when I got that tool. I got her mechanix gloves and she is a demon! Only Hookworms though. She hasn't done M/C tires.
otherDoc
 
I dunno M/C tubes but tubes are still cheep enough I do not repair them. I got a pile of ones with holes if the price of rubber gets up to gold. :D My poor understanding is that M/C tubes are even cheeper than bike tubes.
otherDoc
 
These tubes are about $10-15 each and there is no repair involved, just will be changing out a worn out tire. Scrubbed off the rear tire tread in under 3k miles. Who says ebikes aren't fun. :)

I'm inclined to use a new tube with a new tire. This tube isn't as old as the tire since I had a flat awhile back.
 
Changing a Moped Tire on my Greyborg Warp

  • Take off side panels to access motor wiring plugs
  • Remove rack from seatpost
  • Loosen seatpost and readjust up to make room for bike workstand
  • Mount on bike workstand
  • Cut tie wraps
  • Unplug phase and hall sensor wires
  • Derail chain and restrain it out of the way
  • Loosen wheel nuts, using rubber mallet on wrench (sounds much easier than it is to do)
  • Slide wheel back and off (optional - jam thumb and partially tear off thumbnail even with protection from mechanics gloves)
  • Remove old tire and tube
  • Install new tube and tire
  • Setup spreader to pull dropouts apart to make adequate clearance
  • Slide wheel home
  • Reinstall NordLock washers and nuts and tighten, insuring the wheel is fully seated in the dropouts (do not use dropouts for chain tension adjustment, the torque reaction requires the axle to be fully at the forward end of the slots to avoid problems.
  • Reinstall motor cabling
  • Install new tie wraps
  • Check tire concentricity on rim, readjust as needed
  • Readjust tire pressure
  • Remove from bike workstand
  • Readjust seat to proper height
  • Reinstall rear rack
  • Reinstall side covers
I tried the rim inside the tire beads, didn't work for me at all. These tires are stiff enough I could not get the rim in there, even on a warm afternoon.

My dropouts have never had quite enough clearance between them to allow the Cromotor to fit easily, I bent them slightly outward but they are still a few millimeters too close. So I used a 3" PVC pipe and a couple of ratchet straps to pull the swingarm apart to get the wheel back in. Here's a photo just after the wheel went in, I've released the tension on the straps but you can see how it was rigged:

2013-06-01%252021.06.22.jpg


This was all done without a second person. I did not finish the job this afternoon, I will have to go back and reseat the bead tomorrow and complete the reassembly.

I don't think it is practical to change this tire alongside the road. :shock:

So I have the motorcycle rack available in case I need a pickup alongside the road. So far the one time I had a flat is was a few blocks from home and I just walked it home.
 
Yeah, I would probably just roll with it, too. Who knows? It might last longer!

2500+ trouble-free miles without flats from thorns, glass or snakebite is totally worth it ..and they stick so well..

I LOVE Gazelles :p
 
I'll run with it for awhile at least, no time to change it now, and I need to let my thumb heal. I guess I should add to the list above, ... and then discover it is mounted backwards (after all that careful planning). :(

I've got another tire and tube, so I suppose I could just hacksaw it off and start over. :roll:

I did have one flat from a 1" long sharp nail, early on, but patched the tire inside and new tube and no further problems. :)

Nice to hear from you Stevil, we'll have to get together for a ride again sometime. At least I have a rack that will carry this beast easily now.

This month is pretty busy until near the end. I think the last weekend is the electrics at Laguna Seca. Not sure I'm gong to that, might be fun though to get a few pics.
 
Back
Top