
Concept illustration from earlier Justin post is here.justin_le said:It's really just a single comparator IC...
You are using an out of date browser. It may not display this or other websites correctly.
You should upgrade or use an alternative browser.
You should upgrade or use an alternative browser.
Cycle Analyst V3 preview and first beta release
- Thread starter justin_le
- Start date
pendragon8000
100 kW
I searched for answeres on this one but no luck, so...
getting no joy after setting up the throttle in/out.

Im getting a reading of 25k ohm from the CA direct plug green wire to the circled diode.
its a lyen 18x4115fet , anyone have experiance with this?
should i swap the diode for a 10k R (i have 7K5 r here would that be ok)
no reply from Lyen atm.
any help much appriciated
Edit
Lyen DID reply. Must have missed it somehow.
getting no joy after setting up the throttle in/out.
Im getting a reading of 25k ohm from the CA direct plug green wire to the circled diode.
its a lyen 18x4115fet , anyone have experiance with this?
should i swap the diode for a 10k R (i have 7K5 r here would that be ok)
no reply from Lyen atm.
any help much appriciated
Edit
Lyen DID reply. Must have missed it somehow.
Kepler
10 MW
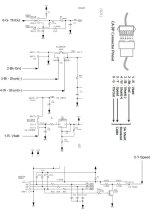
If you are going to use the CA3 to take care of throttle, you need to connect ThrOut directly to SP on the controller. The standard CA connection is a throttle override which is why it goes though a diode.
Your CA plug needs to be connected as per the attached drawing. At the moment your ThrOut would be going to the D4 diode in the top left hand corner of the drawing rather then to the SP pad.
Your CA plug needs to be connected as per the attached drawing. At the moment your ThrOut would be going to the D4 diode in the top left hand corner of the drawing rather then to the SP pad.
Attachments
Kepler
10 MW
Got a chance to run a full set of LiPo batteries through the CA today and test how accurate the battery gauge is now. The pack is a 2 x 6S 5ah 20C Turnigy LiPo with about 400 cycles on them. Pack was connected 12S 1P. LVC on the CA is set at 42V.
Packs were fully charged with a LiPo RC charger so the full 4.2V per cell was reached.
Here are the results.
View attachment 2
View attachment 1
Settings seem to be spot on now will the battery gauge completely full at the start of the ride and 1 or 2 pixels left on the gauge as the bike started to hit the LVC.
Still optimising the setting on the torque sensor but managed to get some solid data out of the ride. The ride was 26km in total. I used just under 210W/hrs and contributed 118 human W/hrs to ride.
Kepler
10 MW
justin_le said:Kepler said:Thanks for that Justin.
So just to be perfectly clear with using a resistor and the Vex input to get around the HV issue, I presume the drawing below is what you mean. Basically I am turning it into a HV setup but using a dropdown resistor rather then a DC-DC converter, correct?
Yes, that is it exactly. If the resistor is going inside the casing, I would try to locate off to the far side of the enclosure just to spread out the location of hot spots in the device and better help with the heat dissipation. I'd use 5K for R2, and 100K for R1, and your calibrated V/V setting will be around 21.
-Justin
Worked on converting the CA to handle HV this afternoon. Mixed results. Firstly I mounted both the power resistors and voltage divider resistors on to Veroboard to keep thing neat. Used 2 x 2.2K resistors in parallel for the power resistors and a 5.1K for R2 and 100K for R1. Moved the bridge as per instructions together with removing the SMD cap connected between the lower bridge pad and C11.


Next I plugged in all loads and measured the +V. Found it to be reading 53V. A little higher then expected.
Re scaled V/V and found I needed 15 for the CA to read the correct pack voltage. Voltage on the Vex pad is 37V.
Tested the bike and found that the displayed voltage would not change even after running the bike for a while.
Not quite sure what to do at this point however I did notice that your instruction is slightly different to the Unofficial user guide. Your instruction is for R1 to 100K however the user guide states that R1 is limited to no more then 10K. So perhaps I have these around the wrong way?

Kepler said:Re scaled V/V and found I needed 15 for the CA to read the correct pack voltage. Voltage on the Vex pad is 37V.
Yikes! Sorry Kepler, I totally typo'd in referencing your schematic sketch, it should indeed be R1 that is 5.1K, and R2 which is 100K. I'm used to putting the label R1 on the top resistor. Anyways Vex needs to be in the 0-5V range, fortunately there is a series resistor that should have protected the chip from damage due to the 37V being there, so all should be good once you swap these two resistors around.
-Justin
Kepler
10 MW
No worries Justin. Thanks for getting back to me. I will change it around tomorrow and see hoe it goes. Hopefully all good. ")
Diamondback
10 kW
i can also confirm that the RC lipo is now almost perfect too.
at 43.5V LVC on the CA, i had the last little segment showing only.
i rode today to LVC on the CA with my 12s2p pack.
actually, did 186km in 2 days on 19.1ah. that will be in another thread shortly.
Jason.
at 43.5V LVC on the CA, i had the last little segment showing only.
i rode today to LVC on the CA with my 12s2p pack.
actually, did 186km in 2 days on 19.1ah. that will be in another thread shortly.
Jason.
Kepler
10 MW
Kepler said:If you are going to use the CA3 to take care of throttle, you need to connect ThrOut directly to SP on the controller. The standard CA connection is a throttle override which is why it goes though a diode.
Your CA plug needs to be connected as per the attached drawing. At the moment your ThrOut would be going to the D4 diode in the top left hand corner of the drawing rather then to the SP pad.
Sorry slight correction on that. The +5V is power to your hall throttle.
Instructions are still the same though. You need to connect ThoOut to SP of the controller. Also be careful to make sure there is not a diode under heat shrink on the feed wire.
Have a look at this thread on fitting an original CA direct plug in setup. Might make things a little clearer.
http://endless-sphere.com/forums/viewtopic.php?f=16&t=17125
Jumping in here for my first post. Several weeks ago I puchased the following components to put together my first e-bike.
eZEE V2 700c rear drive motor kit, upgrade to the V3 CA with THUN torque sensor and 36V 14.5 amp battery.
Had been looking on line sporadically for years in search of a true proportional assist setup which would still ride like a bike.
Let me begin by saying it all went together relatively easily and works amazingly well. I went into this project with some hesitation as the V3 CA and Thun torque sensor setup are still in beta phase but it is performing better than my expectations. These components went onto a 10 year old Specialized Sequoia aluminum frame bike weighing ~ 22lbs. Have now added an 8lb motor, 8lb battery and a few other bits for a total weight of ~40lbs. I am using a 32mm rear tire (the 38mm which came with the kit would not even fit in the frame and I never intended to use it) and a 28mm front tire on 700c road rims.
I have about 200miles/300km on the bike now. Much experimentation with the various V3 CA settings to settle down some surging effects which was coming along nicely and then saw the post by Kepler (hope I have the name right) which brought up the possibility of adjusting the number of poles from 8 to 16 for the Thun. This probably had a more positive effect than all the other mods I had tried! Very smooth now.
I highly recommend anyone test this option using the Thun sensor. I find that my power use for most any riding averages about 10 watts/mile or about 6 watts/kilometer regardless of whether I am using an assist of 150 or 250 (watts per ??) We have a local hill called the Torrey Pines Hill Challenge which is 1.4miles with an average grade of 6%. On my first ride out of the neighborhood, my placement moved up from #3000 of 4000 riders to #52 so I am now able to ride at the speed of the local Pro riders! And to wrap it up, the bike handles well with the battery placed forward in the frame under the top tube and I have no throttle.
Plan on adding a 3 way switch soon to enable on the fly changes in assist if desired. Many thanks to Justin and the crew for walking me through the decision making process of components for this project!
Cheers
Steve
Kepler
10 MW
Welcome to the forum bajajoe. Good work on getting your first ebike up and running. Extra nice work jumping in the deep end with the CA3 and Thun. Sound like you have done very well.
Setting to 16 polls is good for getting the thun a bit smoother but unfortunately it throws out your stats like cadence and human W input. If the stats dont worry you though, then it seems like its a good adjustment to use. I have gone back to 8 poles as I like the stats and are working to smooth out any surge with other adjustable parameters. I have found fine tuning the start and stop delays help with overall smoothness but if you have any other suggestions, I would love to hear about it.
The 3 way switch is a must do. Now I have the Thun, I user the 3 way to adjust the level of PAS. Works a treat.
Just to be clear with others thinking about using the Thun, the surge I am talking about is very minor. I am just attempting to get it the best i possibly can.
Kepler
10 MW
justin_le said:Kepler said:Re scaled V/V and found I needed 15 for the CA to read the correct pack voltage. Voltage on the Vex pad is 37V.
Yikes! Sorry Kepler, I totally typo'd in referencing your schematic sketch, it should indeed be R1 that is 5.1K, and R2 which is 100K. I'm used to putting the label R1 on the top resistor. Anyways Vex needs to be in the 0-5V range, fortunately there is a series resistor that should have protected the chip from damage due to the 37V being there, so all should be good once you swap these two resistors around.
-Justin
Swapped them around this morning. All fixed.
V/V calibrated in at 21.75.bajajoe said:Much experimentation with the various V3 CA settings to settle down some surging effects which was coming along nicely and then saw the post by Kepler (hope I have the name right) which brought up the possibility of adjusting the number of poles from 8 to 16 for the Thun. This probably had a more positive effect than all the other mods I had tried! Very smooth now.
Hey Steve/Bajajoe, congrats on the build success here too! Unfortunately the final tweaking of the official CA3 release got totally derailed by the motor temperature experiments here.
But based on yours and Keplers feedback once I get back to it, I'm going to be adding a option to choose the PAS filter length to be 0.5, 1, 1.5, or 2 pedal rotations. The fractional ones will only work with a dual left and right pedal torque meters, but with the THUN setting it to 2 rotations would be equivalent to the 16 pole trick without messing up any of the stats.
The setup interface is also being changed so that you dial in a 0-999% boost rather than the technically precise but more obscure Watts/N-m. So if you set it to 200%, then each watt of human power would produce 2 watts of electrical power.
We also had another first timer post:
2handy said:So who am I & what am I up to?
I'm just embarking on the ebike world, having recently received my simple (compared to some of the amazing bikes that lots of you guys here have!) 1kw rear wheel mp3 hub kit & a 48v 10a battery. I'll get it sorted over the coming week or so, before I too look at becoming a proud CA3 owner.
I'll post a picture when I do.
Just caught your build thread now and will look forwards to helping out with CA3 integration if you decide to go that route. We've also got a sample MP controller from Gary that we've modified for direct plug in CA compatibility, and will be posting a small document on how to modify the internal controller for a CA plug directly on it so no need for the additional shunt.
-Justin
Diamondback
10 kW
Justin, I would like to ask for a feature in the final code.
Would it be possible to have the assist level displayed briefly on the main screen when the knob is adjusted ?
Then revert back to the previous display ?
This would allow a precise assist level to be set for the PAS, for those that are using the aux pot as the assist level.
Similar to how you said it works for those using the pot as the mode selector.
Jason.
Thanks for that Justin.
As you may have read in the other thread, today I've finally started doing the multiple short low throttle battery conditioning runs, each followed by a full charge, for the benefit of the LiFePo4 battery back. (At last I'm on the road!)
I've still got plenty more tidying up to do & then I'll get to the polishing stage - adding a CA3 & such, which I'm certainly looking forward to.
Thanks for your interest & offer of help.
As you may have read in the other thread, today I've finally started doing the multiple short low throttle battery conditioning runs, each followed by a full charge, for the benefit of the LiFePo4 battery back. (At last I'm on the road!
)I've still got plenty more tidying up to do & then I'll get to the polishing stage - adding a CA3 & such, which I'm certainly looking forward to.
Thanks for your interest & offer of help.
Kepler
10 MW
But based on yours and Keplers feedback once I get back to it, I'm going to be adding a option to choose the PAS filter length to be 0.5, 1, 1.5, or 2 pedal rotations. The fractional ones will only work with a dual left and right pedal torque meters, but with the THUN setting it to 2 rotations would be equivalent to the 16 pole trick without messing up any of the stats.
The setup interface is also being changed so that you dial in a 0-999% boost rather than the technically precise but more obscure Watts/N-m. So if you set it to 200%, then each watt of human power would produce 2 watts of electrical power.
Excellent. I have run out tuning options with the 16 pole adjustment being the only option left. I like the proposed boost setup change too. Makes the adjustment more logical.
One other problem I am experiencing with the torque sensing setup is that the bike tends to surge when pedalling from a dead stop. It then settles down after a few surge cycles.
Diamondback
10 kW
Kepler said:One other problem I am experiencing with the torque sensing setup is that the bike tends to surge when pedalling from a dead stop. It then settles down after a few surge cycles.
Mine does this also. It can be quite disconcerting.
Especially if you only want to move a little.
Jason.
Architectonic
10 kW
When will those stem brackets be available?
Best to email the Grin Tech sales guys (sales@ebikes.ca) for purchase questions. The sales folks are always on the job and can get you a response the quickest. I'm thinking the parts will be available by email request before the web site actually gets updated...Architectonic said:When will those stem brackets be available?
Justin is certainly the man with the proper answer on this one, but meanwhile, I would hazard a guess that this might be addressed by reducing PLim->WGain in the same manner as tuning out overshoot for a Power Throttle configuration (i.e. ThrI->CntrlMode=Power). If you examine the Limit Flags on the diagnostic screen, the 'W' flag is always asserted which indicates that that WGain is in play. Under the covers the Watts-based PAS torque parameters are operating by power limiting so reducing the gain a bit should reduce the overshoot at the cost of a slightly slower response.Kepler said:One other problem I am experiencing with the torque sensing setup is that the bike tends to surge when pedalling from a dead stop. It then settles down after a few surge cycles.
I don't have the means to verify this strategy so this is just winging it, but it might be worth a try....
hjns
100 kW
teklektik said:Justin is certainly the man with the proper answer on this one, but meanwhile, I would hazard a guess that this might be addressed by reducing PLim->WGain in the same manner as tuning out overshoot for a Power Throttle configuration (i.e. ThrI->CntrlMode=Power). If you examine the Limit Flags on the diagnostic screen, the 'W' flag is always asserted which indicates that that WGain is in play. Under the covers the Watts-based PAS torque parameters are operating by power limiting so reducing the gain a bit should reduce the overshoot at the cost of a slightly slower response.Kepler said:One other problem I am experiencing with the torque sensing setup is that the bike tends to surge when pedalling from a dead stop. It then settles down after a few surge cycles.
I don't have the means to verify this strategy so this is just winging it, but it might be worth a try....
I had a lot of surging when in power limiting mode (CAv3B22 cromotor 20S Lipo 13.5Ah). Power is "limited" to 12kW, even though I only see peaks of 8kW. I turned WGain down to 40 and the surging disappeared. I am not saying WGain of 40 will work for you as well. Just that you need to be prepared to go really low.
There seems to be enough interest in the CA3 settings that I'm just going to list what I'm currently running and perhaps a few notes (and questions) on what I've tried to smooth the output from the Thun torque sensor.
My goal is too have a very smooth power delivery as I frequently am out of the saddle and contributing all the power I have to climb hills etc. (ride it like you stole it!) Also as others have noted this unit works well right out of the box but there is room for improvement given the variety of adjustments that have been programmed into the CA3.
Unless otherwise noted my settings are at the default.
Setup Throt out - outpt Mode - Voltage (the option would be R/C pulse but I have yet to figure out what this is?)
ThrO - Up Ramp - 100 (have varied from 20 to 500)
ThrO - Down Ramp - 300
Setup speed lims
SLim - Strt Speed - 4.5 mph I find this to be a useful setting as no motor power comes into play until I'm moving at 4.5mph thus low speed navigation is unaffected by the motor.
Setup power lims
Plim-Max Current - currently at default 99amps, however I tried 25amp setting thinking this was the controller amp limit anyway. Had a negative effect and was lit up on screen 11 "A" as a limiting factor so
went back to 99amps.
PLim- Max Power - 900 watts
Plim - W Gain - 70
Setup Pas Sensor
PAS - PAS Poles - new but important change, now using 16 rather than the default of 8, this significantly smoothed the power delivery.
PAS - Quadrtr - Enabled (note this was disabled when delivered which also disables the Thun torque sensor so I had no power until discovering this item in the setup notes.)
PAS -PAS Mode Trq Cntrl
Setup TRQ Sensor -Trq sensor type - Thun BB
Trq asst level - 150 W/Nm for general riding, 250 if I'm lazy riding to work in the morning.
TRq asst offset - +1
Hope something here is of use to other new users.
If anyone can lead me to enlightenment regarding how to set up an external 3 way switch which would allow instant change to Trq Asst level thanks ahead of time.
It seems I have seen something about using the aux. pot on the CA3 for this but I am hoping for a plug and play option.
Cheers
Steve
Please see page 21 of the present Unofficial User Guide for Aux Pot options. Unfortunately, there is no complete off-the-shelf solution - more or less fabrication will be required depending on the switching technique that you select.bajajoe said:If anyone can lead me to enlightenment regarding how to set up an external 3 way switch which would allow instant change to Trq Asst level thanks ahead of time.
It seems I have seen something about using the aux. pot on the CA3 for this but I am hoping for a plug and play option.
It sounds like you may be looking for a 'no-fabrication' solution in which case the simplest strategy might be to modify a thumb throttle (as an Aux Pot input device) by removing the spring and modifying it to have some drag to hold position. Here's a mod to a cheapie eBay thumb throttle that uses three o-rings from a Harbor Freight o-ring kit (not very good o-rings but fine for this). You can also get o-rings in hardware stores, etc. Grin Tech has a nicer Wuxing throttle and also has 3-position switches if you choose to go with that type of switch approach instead.


Just hook this second throttle up to the V3 Aux Pot connector. You can put the throttle on the left and diddle it with thumb and forefinger to get 0-100% assist.
None of the control schemes outlined in the Guide are difficult to fab. I'm just putting this out there because of the simplicity - your call on desirability...
Diamondback
10 kW
Actually there IS an off the shelf plug and play option.
I bought the ezee pas dial from Justin.
This will plug straight Into the CA, and will allow adjustment of pas level.
It works very well. Just have to remember to calibrate the knob as its not a full 0-5v sweep.
Jason.
I bought the ezee pas dial from Justin.
This will plug straight Into the CA, and will allow adjustment of pas level.
It works very well. Just have to remember to calibrate the knob as its not a full 0-5v sweep.
Jason.
Aha! Buying unlisted parts is cheating!
Seriously - great choice - I would personally prefer a regular knob to the thumb throttle - it's a more natural hand/finger motion with better fine control.
Great tip - Thanks! (Another addition to the Guide )
Seriously - great choice - I would personally prefer a regular knob to the thumb throttle - it's a more natural hand/finger motion with better fine control.
Great tip - Thanks! (Another addition to the Guide
)Similar threads
- Replies
- 3
- Views
- 414
- Replies
- 0
- Views
- 287
- Question
- Replies
- 5
- Views
- 274
- Replies
- 2
- Views
- 588
- Replies
- 9
- Views
- 2,157