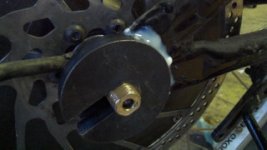
DoctorBass Torque Arm Installation

RVD

1 kW
Joined
Apr 26, 2011
Messages
418
Location
Seoul, Korea
Hi Everyone,

I thought I would create a thread for those of us who are installing DoctorBass torque arms.

I am finally ready to install my set. I have my epoxy (3M DP-420) ready to go, etc.

Looks like from watching videos, etc. that the proper sequence is:

1) clean the surface of your dropouts...with alcohol, acetone, etc...something that will clean them up.
2) roughen up the surface of the dropout and torque arms so that the epoxy will have some surface to bond to
3) mix up the epoxy with a wooden chopstick or something like that
4) use the wooden chopstick to apply epoxy to the dropout
5) press torque arm to the epoxy. use a clamp or something to hold it exactly in place. clean off any residue epoxy that may find it's way into the dropout.
6) build a hair dryer oven with a box and hair dryer up to about 70 degrees celsius
7) let it cook for about 2 hours
8) let it cool down at room temperature for some more hours
9) once epoxy is hardened...done.

Does that sound about right?

A few questions / options:

1) install torque arms on the outside or inside of dropouts? i think i'm going to install on the outside since there isn't much space inside anyway because of my freewheel, etc.
2) for the derailleur side, do you remove the derailleur and screw the derailleur into the torque arm hole? if so, the screw isn't long enough to go through the torque arm and the frame of the bike so it will only be in the torque arm. is that safe?

These torque arms are really nice...
 
Aren't you guys doing anything to rough up the surfaces being joined? Epoxy doesn't bond well to smooth surfaces no matter how well they are cleaned.
 
Hey RVD,

Are you installing the DBTAs on your S-750? I'm about to do the same, although I've got lots of other projects going on right now...

Please take lots of photos when you do this!

Thanks,
Ambrose
 
Ambrose, yes to my tidalforce s750 like yours.

Yes, plan to use sandpaper to roughen the surface a bit for bonding. Will add to steps...
 
Great!

I took a quick look at my TF S-750 and see that there is a "bump" near the dropout which might interfere with mounting DB's TAs on the outside of the frame...


Ambrose
 
I am still planning this. I took a closer look at my bike today.

6147469797_b1fc31c256.jpg


It looks like my dropouts are kind of scratched up anyway so I think it's good enough to hold the epoxy. Otherwise I was going to use some sandpaper to roughen up the area. As Ambrose showed in his picture, there is unfortunately a groove so the surface area for the epoxy to bond isn't so big.

I also checked with my wheel and there is no space for me to put the torque arms on the inside because of the hub motor + 7 speed freewheel. So my torque arms will go on the outside.

On an aside, the green plastic car is my son's electric car. It runs on SLA batteries though.

6148019818_454ccdeb66.jpg


I lined up the torque arm to the dropout to see what it would look like. I did not apply any epoxy yet. This is just to hold it up there to see what it would be like. As you can sort of see here, the torque arm is bigger than the drop out so this further reduces the actual surface area for bonding.

6147469907_d2725821a2.jpg


Although this picture is blurry, you can see that the torque arm is bigger than the surface area on the bike.

I plan to apply epoxy on the bike and torque arms but the actual area of bonding is probably going to be roughly half (or maybe even less) of the size of the torque arm due to the size of the dropout being smaller than the torque arm + groove on the frame.

I suppose one idea is to add a lot of epoxy into the groove so that the torque arm will still bond to the inner part of the groove. My logic is that although the bond will be weaker, it's still better than no bond so I'll probably do that.

i also plan to do one side at a time.
 
Hey RVD,

As an alignment guide, I would put something in the dropout like a wooden dowel wrapped in perhaps waxed paper or plastic wrap that could help to align the DBTA. That way, if the epoxy were stick to the plastic wrap, it would be easy to remove. Just a thought.

Ambrose
 
you need to remove the paint where you are going to apply the epoxy.

not sure if you are already planning this, but just wanted to make sure you are removing the paint.

if you don't remove the paint the epoxy bond will be between the dropout and the paint. the paint will chip away and the dropout will break lose
 
Here are 5 answers from the questions here:

-Remove paint where the T-A will make contact AND where the epoxy will fill the empty surface too

-Rough the surface with sand paper or grinder or a file of BOTH T-A and bike frame(actual dropout)

-Apply epoxy to bond both parts and YOU CAN USE IT TO FILL THE GAP AND SURROUNDING THE SMALLER THAN T-A ACTUAL DROPOUT.


As well if you wish and jhave the tool, you can cut some part of the T-A.. I have made them BIGGER to accomodate these possible needs :wink:


Pay attention to PROPERLY align paralelism of Both T-A slit !!!! IMPORTANT !! otherwise you might be not able to enter or exit the axle !!!

Some person also installed them by puting the hub motor with his axle in place and than to bond the T-A...
BUT ! the must add some oil or libricant to the axel and to wipe it a little bit.. just enough to leave a thin film of lubricant to not allow the excessive epoxy leak to bond the axle in place !! :shock: and not to contamine the rest of the epoxy.


-Yes you can install torque arms on the outside or inside of actual dropouts.. use the best option depending of your frame

-Yes you can install the derailleur ONLY on the Torque arm threaded hole and no longer use the old dropout hole.
The T-A is stronger than the actual dropout so no worrie.
Also you will observe that it add an offset distance from the casette.. you can readjust the liomit screw of the derailleur to compensate and also play with the derailleur cable.

Doc
 
6150982541_dc35438929.jpg


I started the sanding and scraping off of paint off the dropouts. I have to do the same on the torque arms. I'm being careful not to remove too much of the actual metal on the bike...I want to get the paint off and that's it.

I won't cut through the torque arms. I don't mind letting them hang out a little bit.

I plan to do the epoxy this weekend. I have a triathlon on Saturday so I need to be somewhat rested for that but once that's over I'll be good to go!
 
RVD said:
6150982541_dc35438929.jpg


I started the sanding and scraping off of paint off the dropouts. I have to do the same on the torque arms. I'm being careful not to remove too much of the actual metal on the bike...I want to get the paint off and that's it.

I won't cut through the torque arms. I don't mind letting them hang out a little bit.

I plan to do the epoxy this weekend. I have a triathlon on Saturday so I need to be somewhat rested for that but once that's over I'll be good to go!

lol i love the irony... a tri-athlete riding an e-bike! very nice to see that

...i wouldnt worry about removing too much metal. i dont think its possible, plus you will be epoxying a crazy thick dropout next to it. as Dr B suggested, cleaning the surface of paint and other contaminants are key.

good luck on the race!
 
Hey RVD I would think about sanding the dropout with a Dremel or such if you have one (as opposed to hand sandpaper), you really want to make sure you have roughed it up good and got all the paint off. Unless you are committed I imagine hand sanding will take a lot of work to get it rough enough and clear of paint enough - just a thought.

@- Spacey - Let us know how you go with the 'Borg, I am about to do the same myself with mine when I get some time, so any tips or traps would be good.
 
i ended up using sandpaper to get all of the paint off. it wasn't too much work. it probably took about 5-10 minutes per dropout to get all of the paint cleared off so that it's just bare metal.

i set up the non-drive side first. i was a little nervous working with the epoxy but you have about 20 minutes and that's more than enough time to work with this stuff.

i built a small plunger with some wooden chopsticks but it didn't work too well. i ended up having to push the epoxy out and estimate how much i used. i think it's pretty close.

i used another wooden chopstick (similar to doctorbass' video) to apply the epoxy. i cleaned off some excess with a paper towel.

i built a small hairdryer oven. it got up to about 140 degrees F in there which i think is pretty good. i let it cure for almost 2 hours. i then let it cool down while i went out for a few hours. i started at 2pm, ended the curing at almost 4pm, got home at 8pm and it was very hard. i didn't do any type of scientific test but i tried with my hands to pull it apart and it was solid.

i am doing the drive side now. it is currently curing.

a few more points:

1) i think it's actually hard to get the torque arms to line up perfectly. in addition, if it's off by even a little bit, it may end up too tight in there for the wheel to fit. i believe that one should have a nail file type of thing ready to do some final adjustments after installation. but we'll see...

2) on the drive side, i wasn't able to get the torque arm to fit perfectly lined up with the open screw. however, the screw on my rear derailleur isn't long enough to go through the torque arm + frame anyway so it's probably more important to line up the torque arm with the drop outs than lining it up with the screw.

3) the epoxy is pretty convenient. i used nitrile gloves at all times and washed my hands thoroughly but the stuff is pretty easy to use. there was no odor, no mess, etc.

4) in room temperature it takes a really long time for the epoxy to fully cure. the hair dryer oven works well. i left the epoxy that i used out in the garage and 6 hours later it's hard but there are still some parts of it that are a little liquidy...

5) i used the off-white color epoxy. seems like there's no difference from the black one so i'd get whatever is cheapest (or goes well with your frame).

6) i didn't go through a full scientific cleaning, etc...i just did the best i could. so if mine ever fails, it's probably my fault, not the epoxy's fault.
 
btw, this is done! later that night, the epoxy finished curing and i installed my rear wheel.

as i feared, the alignment wasn't perfect on the non-drive side so i had to slowly file the dropout a little bit to make the wheel fit. it was very small (less than 1 mm probably).

the bike runs fine and everything seems to work pretty well. i went for a quick test ride of about 5 miles and when i got back i checked the screws and they were still tight.

i'm still make some tweaks to my bike so it will be ready again for commuting next week.
 
Just done one side and have it clamped inside a home made oven with a hair dryer. Taken lots of photo's which I will upload when I get home.
 
Nice job guys! I can't wait until I get mine :) I was thinking about maybe wrapping my axle in a few layers of saran wrap and then putting it in the dropouts. I would then install the T-A's with the axle in place and protected from the epoxy with the plastic saran wrap. Does anyone see a problem with this working?
 
I would just line the up as best you can, mine were a tight fit but I did it by hitting each end of the axle.....with a nut on it....gently until it was on.

Tighter than a girl who just lost her brown wings :p
 
I did, couldn't risk gluing the axle to the frame. Can't believe how much time I spent fixing up my bike yesterday ..... Have to go back today to do the rest.

It is my only form of transport and never let's me down so it is worth it, have re done the Lipo cabling so I can't connect the battery to itself again!

Jobs to do:

Fix derailleur to rear wheel

Fit rear disc brake

Fit rivets to hold the Greyborg case on

Wire up CA and try to get the power throttle mode working

Fit on/off switch so I can leave the Lipo connected up but just turn off the controller.....it's the on/off red lead that goes into the infineon controllers. Not sure how much power if any it uses doing that but it would be small enough to last between charges. Have soldered on charge leads using XT60 connectors that hang down where the lower part of the Greyborg cover goes.

This part of the cover will be held on with Velcro for easy taking off so I can charge. Have extended the balance leads for when I need to balance every two weeks.

I think when you mix the Araldite up, best to let it harden just a little before applying so that it's not so runny. I used cotton buds dipped in Acetone for cleaning up the over spilled bits.
 
Torque arms are holding up perfectly as in they just do not move at all....so everything on Doc Bass's end is 100% cool :D

On the actual axle on my HS3540 though when applying the regen brake I see the axle nut move about 5 deg's and then back when accelerating. This is with the rear wheel off the floor with no load.

I was hoping that the axle would not move at all as the fit was so damn tight I had to beat the axle in with a hammer, the amount of straight edge on the HS3540 axle is laughable compared to the 9C and Mac motors, hopefully it will be ok for regen as I rely on it for breaking.

Love the torque arms Doc Bass.
 
Back
Top