electrifying a cannondale bad boy 700

e-cannon said:
adrian_sm said:
Does that mean when it is powered on the side panel might be able to slide off while you are riding.
no. while riding the lock is always in "pos. closed". it's a push-button switch (push once - ON, push again - OFF).
Ah. Very nice. Knew I was missing something, as you have thought through everything else so well.

e-cannon said:
adrian_sm said:
Sorry for all the questions. But I have been inspired, and am now thinking of tackling something similar myself.
no prob. I would like to expect something like that: :D
:lol: :roll: :oops: Maybe I'll try the electronics enclosure first. Don't know if I trust my life to my fibre-glassing skills. Last thing I made was a windsurfer about a decade ago, turned out all right, but I should have vacuum bagged it, because it turned out pretty heavy. If that broke I just hit water at 30 knots. Don't know if hitting pavement at 50km/hr would be as easy on the body.
 
adrian_sm said:
If that broke I just hit water at 30 knots. Don't know if hitting pavement at 50km/hr would be as easy on the body.
Well, 30 x 1.852 = 55.56 km/hr impact on water is somehow comparable to 50 on pavement beside the abrasions... :?
wipeout.jpg
 
Yeah. Only really hurts when you crash still hooked in to the harness, and manage to hit the boom or mast. If you hit the water it is all good.

Although once we did have to pull a girl back to shore that managed to knock herself unconcious.

Back on topic.... So is there anything you are not happy about with your build. Surely it can't be that perfect. :D
 
adrian_sm said:
So is there anything you are not happy about with your build. Surely it can't be that perfect. :D
Of course. :oops:
The mounting and dismounting of the battery is a bit tricky, I knew it from the beginning but I just accepted it. Best is not to dismount it and charge it while the side panel is slightly open. I live in Zürich in a rental flat. We have a bicycle room where of course there is no electric plug (otherwise the 24 parties would have to pay part of my electricity bill). That's the main reason I wanted to make the battery removable for charging at home. It turned out that its better to charge it while I am in my office because here I have more space and I just take the bike upstairs (elevator) to charge it without removing and remounting again... (distance home - office < 1km, I could walk easily... :D )
If you don't have such problems to get the plug to your bike directly I would suggest to make a case that's screwed together and has to be opened just occasionally providing a charging port on its outside.

Another thing is the placement of the Cycle Analyst and its display (by the way its two 3 mm acylic glass plates glued together and then fully glued in, there's no way for water to ingress). As I decided to place it also in the case this was the only reasonable position. Means I did not plan that in the beginning. Best place for me would have been at the top front where the controller sits but there was no space left. I do not need the CA while riding so I don't care. Just sometimes it would be nice to read the velocity but that are exactly the moments it is to dangerous to look between your legs and not on the road... :roll:

Then finally one important decision is how you fabricate the fibre glass thing. you have two option: positive or negative. I read in those forums as a beginner it's a good choice to do it the positive way. pros: easy cons: you lose your form, there's need of grinding a lot but that's negligible if you just fabricate one piece THEY SAY.
I say: negligible? It's f***ing arduous! Really I spent days in just making the surface planar...
Consider doing it in two peaces if you can, with the visible surface lying on the form. That would be professional.
View attachment formenbau.pdf
It's German but take a look at the images.
 
Great job! Best battery box I've ever seen. Outstanding use of materials, and clever and unique elements.

Have you considered using RC LiPo packs? You just might fit 3x the energy storage inside your beautiful enclosure. Perhaps 10-20x the power as well if you happen to be looking for more.

Best Wishes,
-Luke
 
Thanks liveforphysics.
Yes I considered using those when my battery is getting older and they had gotten hopefully cheaper till then...
Best Wishes too.
 
as a composites guy and fellow electric cannondale rider- I salute you!
 
Nice job, I have been planning to do something similar. You’re the first I’ve seen to do a decent mold and layout for a bike.

For those interested in composite fabrication. This is one of the best sites to learn about it. http://www.rcgroups.com/composites-fabrication-210/

Use of laminating epoxy, mylar and and vacuum bagging can give you a very professional finish. Best to have a ventilated hood setup. I made one from an old kitchen hood and plastic drop cloths, with a hanging plexiglass front, setup much like a chemical hood found in your chemistry shop. I can do small to medium sized layout work in my basement and use it when I solder, sand or glue anything that I don’t want to be exposed to. Currently building a bigger version in the garage for anodizing stuff as well as bigger mold projects. The fumes are quite bad for you.
 
That really is impressive work. I love triangle cases, in my view it's the ideal place for the battery.

I was playing with the idea of doing fibreglass when I started my build, but thought plastic would be easier and less work. Your box looks much more professional though, and I like the idea of being able to open the case easily. I've had to open my headway pack about 5 or 6 times now and it really is a pain in the a**. The best part was after I last closed it up last week I see the piece of compressive foam needed to hold one set of cells in place, so this weekend will be another opening!

Would you be able to rate the skill level required to do all the work. How much time did you spend researching he process, and did you make something small as a test before you started?
 
e cannon you've done an excellent job there. Very impressive.

I don't know if I missed it, but how did you mount the box to the frame? I'm gonna have a go at something like that myself soon I hope.
 
patrickza said:
Would you be able to rate the skill level required to do all the work.
No special skills needed. I think every one with a bit tinker flair can do it easily. Especially if you do it - like me - from a positive form. I think important are maintaining the temperature conditions while laminating and also be precise in maintaining the mixing proportion between the resin and the curing agent. I used a digital letter balance for that.
patrickza said:
How much time did you spend researching he process,
All in all maybe 6 hours, but always distracted and fascinated by the stunning stuff other people have done... :D
patrickza said:
and did you make something small as a test before you started?
Nope. Couldn't wait...
 
lynchy said:
I don't know if I missed it, but how did you mount the box to the frame?
Beside the four drink holder holes I had my bike shop drill two additional holes at the top tube and place inserts in it. The box then was mounted with screws from the inside using hard plastic spacers between frame and box. No way to dismount the box without my key or brute force...
 
e-cannon said:
lynchy said:
I don't know if I missed it, but how did you mount the box to the frame?
Beside the four drink holder holes I had my bike shop drill two additional holes at the top tube and place inserts in it. The box then was mounted with screws from the inside using hard plastic spacers between frame and box. No way to dismount the box without my key or brute force...

E cannon, do you remember the type of inserts used and size? How are they fitted, welded or clinch nuts, or something else?

Thanks :D
 
lynchy said:
E cannon, do you remember the type of inserts used and size? How are they fitted, welded or clinch nuts, or something else?
something like that:
http://www.hig-hannover.de/html/avdel/blindnietm/dla.htm
my dealer said he will put in original cannondale inserts.. whatever. the holes were drilled with an 7.5mm drill I think. Maybe 8.5mm, can't remember.
 
Thanks e-cannon. They're clinch nuts if I'm not mistaken. You can fit them with standard tools, a nut and bolt, but the proper tool is better.

Will get onto something similar to your build in the new year. Hope you don't mind if I steal some of your ideas :D
 
hi e-canon, i got inspired by ur work on the badboy, its awesome.

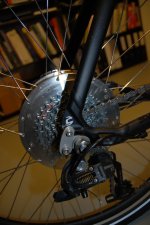
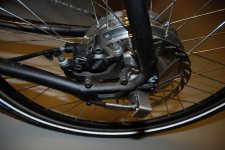
Can u post some pictures / specs of ur rear mech/freewheel combo?

Im having some doubts about compatibility with tread-on freewheel chainrings and the slx (shimano megatrain) rear mech of my bike. ur input hould help me.

Anyway, thanks for sharing ur work.
 
sjacome said:
Can u post some pictures / specs of ur rear mech/freewheel combo?
View attachment 2
Image00002.jpg
Image00003.jpg
maybe those pics will help you. the 9 speed freewheel I got also from ebikes.ca.
there's also a technical drawing with the dimensions of the rear eZee hub:
http://www.ebikes.ca/store/diagrams/MeZeeR.pdf
cheers
 
I've been farting around with cardboard mock-ups instead of CAD while pecking and staring at a laminated pink foam form for about a month now.
The edges of the triangular battery box form need to be squared so the box doesn't end up twisted.
I'm doubting the ability of a hot wire to cleanly cut it because of the glue

As with most of my attempts to get EBII tuned in, it will probably take three tries before I settle for the results.
 
Zoot Katz said:
As with most of my attempts to get EBII tuned in, it will probably take three tries before I settle for the results.
sjacome said:
hacked ur design in my bike, i like it ---- a lot.
yeah, go for it guys!
in winter it's harder to get the epoxy cured for non professional equipped people like we are (using probably natural ventilation). be careful with the vapors.
 
Zoot Katz said:
The edges of the triangular battery box form need to be squared so the box doesn't end up twisted.
I'm not sure if it is my English but that one I do not understand... :?:
 
Back
Top