keyboard just got wierd so all lowercase for now; if i hit shift it acts like i'm using ctrl or alt so gotta open it up and see if there's dog slobber in it.... 
spent the entire day until almost midnight getting the door setup and swapped out, and i am exhausted but can't sleep, aching in places i didnt remember i had places.
but it is now operational, if not completely finished.
i forgot to take pics of most of the process, but i got some of the doggie door stuff photographed.
i still have to fill and sand a long join between two sections at the latching edge, and paint the door, as well as making a covering for the edges of the doggie-door hole so water/etc doesnt' get into the particle-board core when it rains.
the first thing i had to do to the door was finish the cut i started maybe nearly a year ago, months at least, that i couldn't do tehn because i couldn't make a straight cut despite a cutting fence/guide clamped to the door. i think that somewhere between then and now i found and installed a different blade than i used at the time, because resuming hte cut today was easy and quick...but the old cut was pretty screwed up, so i had to restart the cut and take a little more off than i originally intended.
that made the door too narrow, by about 1/4", so it wouldn't even have met the frame at the latch/knob side. i have a second door but don't want to modify it, because i want to use that as the new front door, and it should fit unmodified.
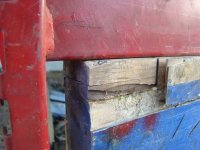
but i still have the edge of teh door i just cut off, and while it's loose-particle board core, there's 3/4 inch of wood at the edge.
so i trimmed the door enough more to clear that 3/4 inch. but becasue it's loose-particle board core, there's nothing to glue or securely screw the wood edge to, except at the top and bottom ends where there is also wood, an inch at the top and two inches at the bottom.
the obvious way to fix this is to use some of the outer laminated wood that's outside teh core on the cutoff edge, to overlap the door's edge, and glue it there. ideally it'd be the other way around, using the laminate from the door to overlap the edge piece, but i already cut that off with the edge piece....if i'd realized how it was constructed i'd've started out differently, so this is the best compromise.
in order to fit the edge wood with laminates over the door edge, i had to take off the same amount of laminate from the door edge itself; this was pretty easy, just setting up the guide rail for the circular saw and depth of cut to just the thickness of laminate, about 1/16 inch. then use the chisel to pop the laminate off from one end to the other.
but getting the core material out from between the laminates on the edge piece...that was another story. i'ts loose, but not that loose, so a chisel popped some out but not lots, without way more work and time thna i had. so i set the circular saw to the depth of the core material only, so as not to cut into the wood, then clamped the edge piece so the core faced up, then using it as a handheld cutting tool i ground away the core material with the circ saw.
dangerous if i slipped, but i just did my best not to. thankfully all my slips just ended up with damage to the workpiece, not me.
half an hour later i had it cleared and trimmed. i had some old harbor freight 'wood glue' that was still about half full, so i filled the rest of it with water, mixed it up, and let it sit for a while as i did other things, including finding some other old glue that needed to be used before it went bad, and was already turned into orange snot. :lol:
then i used the watered down glue to soak into the core material exposed on the edge of the door, to help stiffen it up. i used the orange snot to glob into gaps and holes, then used my 'real' wood glue bought for the trike's wood stuff to spread on the inside surfaces of the edge piece.
then i used the mallet to tap the edge piece onto the door edge, and clamped it down with bar clamps on a piece of 'elephant rack', which is very straight and stiff, making a very heavy but otehrwise ideal clamping bar to spread clamping pressure across the whole door edge.
after it had been clamped for a bit, i removed the clamp and countersunk 3 inch long drywall/deck screws thru the edge piece into the door's core material, about a handspan apart, all along the edge. then i put the clamp back on, and let it dry another couple hours while i did other things.
i chiselled out the hinge areas, which are in different places on this door thant he original. i had thought about using the new door's much stronger/heavierduty hinges and hinge spots, but that would mean a fair bit of work altering the house's doorframe which i don't want to do. so i used the original hinges and spots and screws. if i have trouble with the hinges i'll swap them out, but tests so far show it should be ok.
i also drilled a doorknob hole as the new door doesn't have one, just a hole for a deadbolt tht was cut away with the edge piece, and way too high up like at eye level. i didn't have a 3/4 inch drillbit for the latch hole so i did the same thing to make the hole on the trike for it's lock, i used a 1/2 inch bit, the biggest my drill can hold, and started a hole wiht it then swirled it around to widen it, then filed it out bigger and straight with a round file. then chiselled out the recess for teh latch plate.
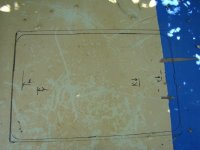
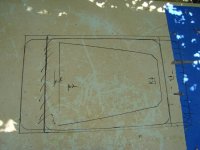
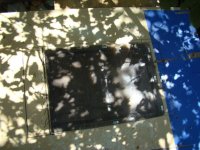
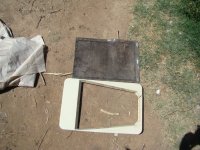
somewhere in all the above, i also marked out the doggie door hole to cut it out. this was a process that ended up taking almost two hours, because i had to make some decisions and find stuff because of those decisions.
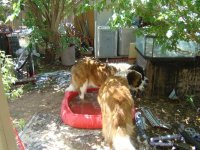
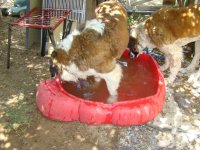
basically, as the pics show, kirin and yogi are almost 3 inches different in height at chest/shoulders. unfortunately the doggie door i was using in the window has an opening that is not tall enough to accomodate that difference--one of them would be scraping either their chest or their back when running out the door, which is going to happen.
wasnt' an issue in the window, because they had to slow down some to climb up, and neither one could just fit right thru the door with out crouching down/etc anyway. only tiny ever had it easy with the door there, cuz i set it up for her in the first place.
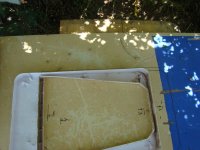
so...i remembered i had a flap, not a whole door, but a flap, for a bigger door that should clear both of them ok. but it wasnt' where i remembered, because i'd moved it along with other stuff to one of the sheds, some months ago, maybe longer, probably before tiny died, but didnt' remmeber which shed. so i spent more than an hour before i found it, though i got more shed sorting done while i was at it.
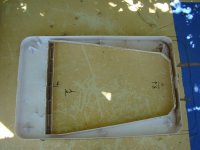
so i went with this flap, which almost allows fo both to fit fine, they'll have to duck / step over a bit but not as bad by inches as the other one. if it doesnt' work out i can always cut the extra hole space out and go back to the other doggie door.
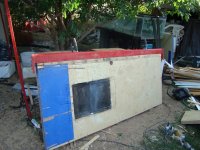
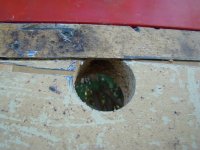
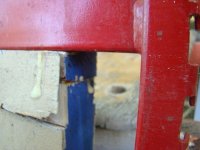
for the moment the flap is just screwd to the ouside of the top edge of the hole, but i will be cutting a groove in the center of the top edge so the flap will be centered between inside and outside, and then run bolts thru the door to secure the flap.
i also have to smooth the hole edges and cover them with something, like plastic sheet, so it doesn't disintegrate with water when it rains.
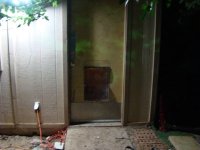
after dark, i finally got to unclamp the door and start installing it. very heavy so hard to hang but got it and the hinges lined up perfectly whcih ididnt' expect, and even the latch ended up perfectly lined up wth the hole for it in the door frame.
buuut...teh door ended up about 1/8 inch too wide at the top and nearly 1/4 inch too wide at the bottom, because i must've measrued/cut the edge of the door wrong in my initial removal of the edge piece and the subsequent trimming to fix the screwed up cut.
the easiest way to fix it would be to unhang the door ad take it back out to the workbench, clamp it down, and circular saw it, but i would probably screw it up again, and i couldn't check it without rehanging it again. and hanging it is very hard cuz it's so heavy.
so i left it hung and used the chisel/mallet, and the plane to take off larger thicknesses as long chips, then the belt sander to smooth that out and take it the rest of the way down. it took me basically from dark until almost midnight to get it where it would close and latch, but it's stilla very tight fit and will need further sanding or planing to get it just right.
between all the stuff i managed to forget to eat anything at all all day long, and while it won't hurt me to skip a meal or two
")
i used a lot of energy and ended up eating a large bowl of chili from thepot i made teh day before, and still being hungry....
anyway, the door works, and yogi uses it with just a little hesitation, but kirin is going to have to relearn it all over again. if i hold the flap open she'll go thru with coaxing, but she won't go thru with it hanging closed, and won't go on her own. she wants to, when yogi goes out she's right behind him but then she gets nervous and shies around at it instead of going thru. she'll go if i get right behind her and put my hands on her butt, but that's more becuse she' doesnt' like her butt being handled.
just so there aren't any accidents, because the window is now bakc in palce and closed, i blocked off the the window so they can't see it, and mvoed the sofas away from it leaving the wall blank below it.
now if i can just get to sleep i'll continue tomorrow if i have time.