-Epoxy removal on PCB-

waynebergman

100 kW
Joined
May 7, 2011
Messages
1,016
Location
Pender Harbour British Columbia Canada
I have a hall sensor to replace on a mac rear motor. I am looking at the Printed Circuit Board for the hall sensors and I feel I need to free this PCB and the halls and the hall wires from the stator. Any tips on removing the epoxy with out wrecking soldered joints or wires? I was leaning towards boiling water as I know it breaks down epoxy at a little over 200 far but not sure if this is a good idea?

Any tips appreciated. Thanks Wayne
 

Attachments

  • Screen Shot 2013-09-09 at 9.28.52 AM.jpg
    Screen Shot 2013-09-09 at 9.28.52 AM.jpg
    53.9 KB · Views: 820
arkmundi , you were saying
" epoxy, once cured is impervious" . Not sure what you mean by this. I am not trying to disolve it with water I am trying to break the epoxy down with a controlled temprature. It is the temprature of the boiling water that is of interest and why I got to thinking this may work. The boiling water out of a kettle is not going to get any hotter than 212 degrees and that is enough to break down the epoxy or should be with some patience. My question is I guess, will the boiling water wreck the other components like the PCB, solder, wire, hall sensors?
 
Heat is the trick. I've used boiling water or just a heat gun to heat up the epoxy. At normal temperatures, it's hard as a rock. When you get it up to 100C, it becomes 'rubbery' and you can use a small screwdriver or pick to scrape it away. As it cools, it will get hard again, so you may need several cycles to complete the job. Water won't hurt the hall sensors or the board as long as you let it dry out before applying power.

With a heat gun, it's easy to overheat it. The hall sensors will fail around 150C, but with no power on them they might handle more.
 
Thanks Fletcher, this is exactly what I was hoping to hear. I have the confidence to tackle the rest of the repair now. Slow and steady with the boiling water and I should be able to take things apart in a way that leaves the working components intact and then repair the one messed up hall complete with its wiring. Awesome!
 
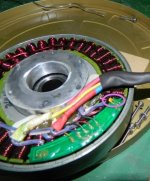
Not so fast. A hard and set answer is of course impossible because there's all these different resins, how high do you suppose the melting temperature is for resin on an F18 or Dreamliner? Depending on what they might have used as a filler, this goes up. Keep in mind that even worse than the epoxy itself is what they might have used as a filler. These could have some nasty fumes.

There is a Glass Transition Temperature, Tg that is affected by the cure temperature of the original resin. First of all it's about 135c, give or take something for the filler. The higher the temperature of the cure, the higher the Tg We might assume electronics is cured at 25c, but we're back to talking about Chinese quality control at that point. (For all we know the individual company might not be using epoxy at all, it could be vinyl ester, polyester, GLYPTAL, etc. Is it red?) Get it hot enough and it loses it's tack/stickiness. It can still be fairly solid but will peel/pry up as something close to a block. Or a piece of it might break off. (A lot of low temp epoxy unsticks in boiling water, supposedly electronics aren't hurt by that BUT. . . .) Some electronics epoxy is modestly pliable to begin with, it's the fact it's sticking to the board that keeps you from knowing. I THINK Glyptal will have the Tg around 70c , that's from memory when I couldn't find it online, and you get wonderful fumes to worry about. I suspect worse than the polyester would give you.

But again depending, epoxy can resume curing. I don't really expect you to get it that hot, but just don't go nuts with it. They do in fact recycle carbon fiber by melting the epoxy off. Must be quite a process though.

Oh, one other thing, but what's the danger to the electronics if you spray freeze? The epoxy has a way of becoming brittle and coming loose, BUT. . . .
 
I changed the Halls on my MAC last spring. It was easy, just use a heat gun or a hair dryer. As the epoxy heats it gets soft and you can slide a xacto blde under it and peel it away.

If you have 3 new halls, I would replace all 3 while youve got it apart.

You will probably need to unsolder the halls from the pcb to get to the chips to remove them. While in the process be sure to write down the color order to th board. Just incase the wires break or come unsoldered.

Dan
 
Thanks guys ...... Dauntless , no it is not red its more clear. Good tips on the fumes, I will do this outside and try and keep my nose out of things.
......................DAND214, good to know you have been able to do this with your mac. Also good idea to do all three halls while I am at it. I have 10 spare halls so why not.
 
Screen Shot 2013-09-09 at 9.28.52 AM.jpgUpdate and question please........OK I got the PCB and halls etc free from the windings and stator with a combination of boiling water and heat gun. I am now wondering if this PCB is worth re using because by the time I get all the epoxy off of it I may wreck something on the PCB. I figure I will just bypass it. The way I figure it i just have to spice the all the hall power leads and all the ground power leads to one common lead from each hall before it goes into the controller. Seems simple enough. My question is, if I don't use the little yelo cap shown with the purple circle around it will this cause me any grief? From what I gather it is to help with unwanted frequencies but I am not really sure if its important or not?
 
Back
Top