Frankenstein (Hoverboard + E200) build

Joined
Feb 19, 2010
Messages
369
Location
Antioch, CA
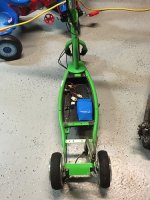
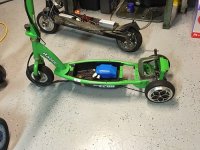
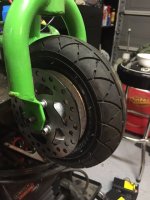
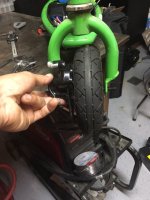
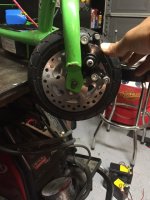
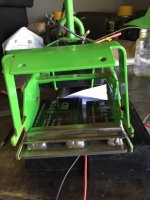
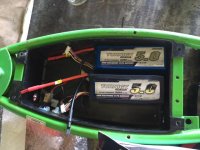
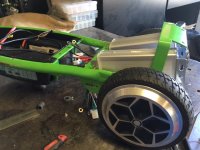
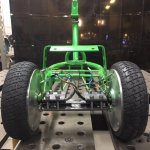
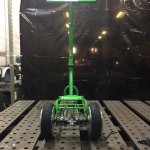
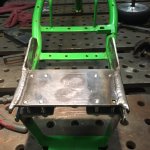
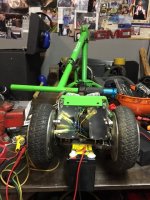
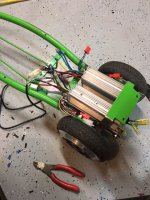
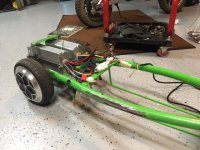
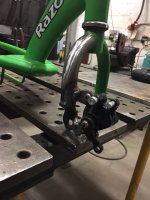
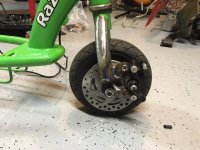
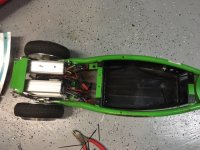
So the other day I was headed to work on my hoverboard from the hardware store in SF and all of a sudden it lost power and threw me off at 10 mph with no warning. I stuck the landing and reset the board, everything seemed fine then it happened again. I'm guessing its voltage sag, but I don't care to look into it. Instead I decided to make something more practical out of it. So I pulled the motors and mocked them up on a razor e200 my neighbor threw out and it seems like the perfect fit. I decided to go with 2 motors instead of one (duh 2 is better than 1, 3 is better than 2 lol) because I want it to be as fast and torquey as possible. I'm finishing up the motor mount this week and plan to have it welded to the frame this week. I've ordered (2) turnigy 6s 5ah 30C packs for a 50v 5ah pack (for now), (2) 500w speed controllers, and a throttle. If everything comes in this week I can maybe have it running this weekend. I really need to get something together, I walk quite a bit everyday (ontop of working out) so I could use a break. I'll be back with more progress and pics, bear with me.
 

Attachments

  • image2.JPG
    image2.JPG
    45.5 KB · Views: 1,861
  • image1 (1).JPG
    image1 (1).JPG
    46.3 KB · Views: 1,861
Like it a lot awesome, ive wanted to see one of these made for a while now very cheap and it should be fairly eco too 12s is the way to go.
 
I think 12s is the sweet spot on these motors, we'll find out soon. I was able to get the motor mount 95% of the way there, I just need to do some fine tuning on it and drill some holes. I spent the whole weekend thinking about how to stop this damn thing. I pulled the motors apart and realized there isn't a whole lot to work with in making a hub, but it can be done. I decided to use regen for the rear and a disc for the front. I was able to get the rotor mounted on the rim and have started making the axle spacers dialed in. Lipos came in along with some silicon protectors. Hopefully the power electronics come in this week and I can get it moving next weekend, this thing should rip!
 

Attachments

  • image1 (2).JPG
    image1 (2).JPG
    64.3 KB · Views: 1,769
  • image2 (1).JPG
    image2 (1).JPG
    65.7 KB · Views: 1,769
  • image3.JPG
    image3.JPG
    68.9 KB · Views: 1,769
  • image4.JPG
    image4.JPG
    68.9 KB · Views: 1,769
  • image5.JPG
    image5.JPG
    58.3 KB · Views: 1,769
Yes there will probably be lots of understeer. I'm ok with that though, I want this to be a fun scooter to ride. I'm hoping wheelies aren't a problem when both motors are wired up. So I've been working on the motor mount here and there when I have free time, work is the craziest its ever been. I finally for the mount done and welded to the frame. All I need to do is cut and weld the tabs for the disc brakes and mounts for the controllers. I really can't wait to ride this thing it's going to be a blast. I'll be back with more updates and pics.
 

Attachments

  • image6 (1).JPG
    image6 (1).JPG
    64.8 KB · Views: 1,638
  • image5 (1).JPG
    image5 (1).JPG
    59.3 KB · Views: 1,638
  • image2 (2).JPG
    image2 (2).JPG
    80.2 KB · Views: 1,638
  • image3 (1).JPG
    image3 (1).JPG
    74.6 KB · Views: 1,638
  • image1 (3).JPG
    image1 (3).JPG
    80.6 KB · Views: 1,638
So as usual work and home life have been hectic, but ITS ALIVE!! Finally got all the fab done for the controller mounts and the brakes. I mounted everything last week and wired it up with a 5ah pack (need to upgrade). This thing is a wheelie monster! You can be going 8-10 mph and pin the throttle and it will still ride a wheelie. My 230 lb coworker couldn't stay on it to save his life. Top speed is only 15 mph, but the acceleration is unreal. I hooked a watt meter up to each motor and they're pulling 1,000w a piece (20 amps). The brakes work awesome when the front wheel is on the ground. It is really fun to ride in SF, I like bombing down the sidewalk and accelerating hard around people. I hammered it this past week and nothing has broke, and nothing gets warm. Next steps are to add more capacity, paint it,and maybe regen. Still need to clip a bunch of connectors I'm not using and get the charging connectors mounted externally. I'll be back with more updates and I'll try and take some video.
 

Attachments

  • image6 (3).JPG
    image6 (3).JPG
    85.9 KB · Views: 1,525
  • image3 (3).JPG
    image3 (3).JPG
    83.3 KB · Views: 1,525
  • image1.JPG
    image1.JPG
    65.5 KB · Views: 1,525
  • image5 (3).JPG
    image5 (3).JPG
    65 KB · Views: 1,525
  • image4 (3).JPG
    image4 (3).JPG
    55.4 KB · Views: 1,525
  • image3 (4).JPG
    image3 (4).JPG
    61.4 KB · Views: 1,525
  • image2 (5).JPG
    image2 (5).JPG
    82 KB · Views: 1,525
Well done I like it a lot, bet it gets alot of attention cruising around.
 
do you have a list of these supplies? Id love to repurpose these motors on a project myself!
 
Back
Top