Jamis Dakar XLT 10T MAC 64v

Nips

1 mW
Joined
Apr 18, 2012
Messages
18
Location
Brisbane
This is my first eBike build so its not going to be power monster.

I have an old 2005 Jamis Dakar XLT 1.0 that I used to ride offroad with. The Jamis is super comfortable to ride on the road as it has very plush suspension. Its basically a burly XC bike with 5" of travel front and back. http://www.bikepedia.com/quickbike/BikeSpecs.aspx?year=2005&brand=Jamis&model=Dakar+XLT+1.0

The idea was to convert it into a commuter bike. I live in a very hilly area. The commute home involves one long nasty climb of about 20% grade. Most of the commute into the city is along dedicated bike paths and is about 25km return. This means I wasn't after top speeds, but decent torque to go up hills. Along the route there are a few light XC trails that would be fun to fang through. No big jumps or anything just some easy single trail. I don't need huge range. I decided a top speed of at least 50kph and a cruising speed around 30~40kph would be nice.

I like the idea of having a well balanced eBike that still feels like a bike. The goal was to keep the weight low down and central inside the frame.
Being a daily commuter I wanted a no fuss battery system, so I ruled out using LiPO's and went with LiFePO's instead. (Plus I think LiPO's on my first build is not a great idea.)

I worked out what sort of battery configuration I could fit in the frame. The usual suspects didn't quite work out in the frame due to the rear suspension linkage.
20130828_204804_smaller.jpg

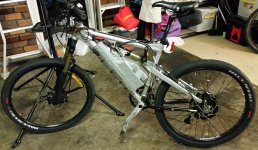
I ended up getting a custom battery made to fit. It uses 10Ahr LiFePO4 pouch cells in a 20s configuration for 64v and 70ish off the charger. The cells can handle 3C continuous and 5C peak, so the battery can handle 30A continuous.
View attachment 1

I wanted to find a suitable hub motor that would suit 30A @ 64v and provide good torque. The MAC 10T seemed to fit the bill. In particular the upgraded MAC 10T from cellman. (Upgrade stator, wiring, temp sensor, etc.) The geared motor suits the torque requirement, as well as being fairly light and inconspicuous. The ability to freewheel also had great appeal. From a bit of math the MAC 10T should do about 50~55kph with 64v in a 26" wheel.

A smallish controller able to put out 30A continuous and support 64v was also in order, as well as a few chargers, a CA3, and quite a few spares.
I decided that most of this could be ordered from cellman as well to save quite a bit on shipping.
 
My chargers arrived. One is an 8A charger, the other spare which I may leave at work is a 5A charger.
20131218_164802_smaller.jpg

This should be able to charge my fully depleted pack in about 1.5 hrs however I am guessing it will take closer to an hour after a normal two way commute to work and back.
 
After receiving the package from cellman I proceeded to unwrap and test fit the MAC 10T and check that it all worked. Talk about fantastically packed goods!

After the test fitting the MAC it was clear that the rear hydraulic brake calliper fouled on the MAC hub body. No adjustment was possible to resolve this. Some sort of bracket could be possible though. However, I was already considering some new brakes so this sealed the deal. I have some new larger eBrake compatible hydraulic disc brakes on order. The larger disc utilises a larger calliper mount offset which should fix this issue. It should also help enable the use of cruise control and provide better stopping power for the additional weight.

Spin up test. [youtube]AjlX70JvGFU[/youtube]

Of course I then set about doing the obligatory "duct tape" build of the bike. :p A lot of the wires are way to long and some connectors are redundant and should be removed. The battery mounting system is still under development but the outside battery frame is mostly in place. (More details to follow.)


I'm also still working on some torque arms which I will get laser cut, along with some brackets to mount the battery to the frame. No torque arms, the duct tape and the lack of a rear brake will necessitate a lower power first run.
 
DAND214 said:
How long is your trip, 25 or 50km?

It's gonna be a full drain if not more if 50km.

Where are you located? Don't see it in your profile?

Have you ridden it yet, how far and speed?
Dan

Thanks, Dan.

I'm an Aussie from Brisbane.

It's about 23~25km return. (12km one way.) Also I am still trying to stay fit so I will be peddling and mostly keeping the speed around 30~35kph. I agree that range could be an issue if I keep mashing the throttle. But keeping it limited in "road mode" to the legal limit of 200w I should have plenty of range. :(

I have snuck out for a quick low powered run. :) Assistance drops to basically nothing at 60kph. On the flat it seems to do a little under 55kph.
Good news is that even with low power it seems to climb very well.
 
Being only 25km, you should be fine.

Don't go out and rip it up till you put the TA's on it.

10t on 66v should be a fairly quick bike. What's legal limit 250w? No problem you'v got it covered. Wish it was minimum wattage of 250, be a lot easier.

Any rate it's lookin good and you should have a great time with it.

I''m runnig a 8t big 26" tires on 14s lipo. On 12s lipo it was able to hit 35mph with no wind, top 40 with a tail wind. I have and had DD's but like the small light hub the MAC is. Great power with little effert.

One more time TA's a must.

Enjoy.

Dan
 
Nice work so far.

I'm also in Brisbane, and also in the process of putting a MAC motor on my mountain bike.
Where abouts in Brissy are you?

How much are the torque arms going to cost for materials/cutting? Do you know someone who can design or do the cutting, or are you doing it yourself?
I want to get 2 for my bike, but don't really like all of the currently available solutions.
 
Hi,

I'm from Sydney and I ordered a few days ago my MAC 8T. Will fit it on a 26er carbon MTB with 2 torque arms and 12S. I was a bit concerned as well by the brake clearance and having to place some washers to fit brakes.

Anybody could please recommend if fitting 203mm requires less clearance than 180mm ?

Cheers,
M
 
A 203 rotor is a lot easier to setup with little to no spacers on the brake side. You might need to space the disc off the hub a little. I did to get the disc to line up with the caliper on the frame. that was on a Mongoose not acarbon frame. make sure your torque amrs fit properly and are tight. You'll love that MAC on 12s.

Dan
 
Hey Nips,

Good to see you've got it up and running, It's always exciting to get it spinning in the garage, and then get on for the first ride. Nice work.

Brakes will be shipped tomorrow after I get back to Oz.. I saw gazillions of cable clamps of all sizes over here too and thought of you for your battery brackets..

anyway,

talk later
Andy
 
ruitget and nips, If you guys are out on the Gap side by any chance would love to meet up for a spin.

We got a bit of community of riders out this way always looking to expand. Might have met you already?

good luck with the builds.
 
Hey John. We haven't met, but no doubt it will only be a matter of time before we all catch up for a ride. All going to plan, my bike should be together in about 3.5 weeks.
 
Hey John, likewise, we haven't met.

Few things to properly sort out yet.

Looking forward to finishing and hopefully catching up.
 
Ok, some more progress. I've got my new hydraulic eBrakes on.

They aren't hooked up electrically yet, but the idea is I will eventually be able to safely use the cruise control feature of the CA3.
They're massive and stop the bike really well. They take more force than some of my other brakes to really pull up fast, but I think that is perfect for the intended use, as they provide excellent modulation. I also like how they make the MAC motor look tiny. :p


I've also slightly improved the throttle mounting position. (Hard to see in the photo.)
The current shifters I have are a pain since they have gear indicators which take up a lot of room.

Any suggestions on a 7 speed shifter that leaves plenty of room for throttles etc?

Some new bits will be on order soon, including some larger more comfortable tyres.
 
Just keep an eye on motor temps! Easy to burnl at that sort of power in our climate. .. if it's a new motor it should have a temp sensor in it already?
 
Spicerack said:
Just keep an eye on motor temps! Easy to burnl at that sort of power in our climate. .. if it's a new motor it should have a temp sensor in it already?

Yeah it has the temp sensor hooked up to the CA3.
Definitely will keep an eye on them. Good point with regards to the weather here.
At this stage I haven't been feeding much power at all. I'm still working on my torque arms.
 
Nips said:
Some new bits will be on order soon, including some larger more comfortable tyres.

Brakes look good, nice big disc there.

I ordered some hookworms today from pushys.com.au, cheapest price I could find. $40 each.
The site has a bunch of other stuff on sale, including the Maxxis Holy Roller tyres which are only $21 each.
 
Well its been a while since I last posted!

It turns out the first battery pack I had was faulty and I put things on hold, like the battery bracket, until I was certain that I had a working replacement battery.
The supplier came through, so I was able to get some laser cut parts done for my torque arm and battery bracket.

Thanks again Animalector for your help with the CAD design for the laser cutting. It worked out a treat!

The drive side torque arm is just a cut down (by hand) version of the brake side.
I think the battery bracket is just a wee bit over-engineered. :)

TODO:
  • Mount the battery and bracket to the bike
  • Fatter comfy tyres
  • Grind down brake stand offs (adaptors) for improved pad contact
  • Hook up the brake sensor wires to the CA3 and enable cruise control
  • Shorten unnecessary long wires from the battery to the control and clean up cabling
  • Make a battery pouch to improve the look. Possibly wet suit style material and velcro or a zipper?

20140603_181316.jpg
20140623_155940.jpg


20140618_174940.jpg
20140618_184005.jpg
20140618_184019.jpg
20140622_144659.jpg
View attachment 1
20140622_121926.jpg
 
Well I've got to say I am very happy with the way the battery bracket worked out.

It was very fiddly trying to align the interfacing rubber between the battery brackets and the frame. I also had to take the shock off the bike to get it on, which is a bonus since the battery will be more theft-resistant.
Its not going anywhere. I can lift the whole bike up from one side of the battery bracket. :eek:
I used the soft thin packing sheets that my MAC came in to cushion the battery from the bracket.
The shock swing arm clears the controller by about 4mm. I was cutting it fine!

The bike has fresh new rubber which has noticeably increased drag, but its way more comfortable to ride.
I've also put on a larger chainring set with a 48t main gear which suits the bike much better, not to mention a bottom bracket that no longer wobbles.
 

Attachments

  • 20140622_181004.jpg
    20140622_181004.jpg
    221.8 KB · Views: 1,673
A while back I asked if anyone knew of a good 7sp shifter because the spacing on my 9sp shifter was all wrong resulting in terrible gear changes.

I'm not sure if something like this has been shared before, but here is something that worked out well for me. (Note this depends on the type derailleur. Some may not be compatible.)
9 speed cassettes or clusters have a reduced spacing compared to 7 speed. (2.56mm vs 3.15mm between each gear. 23% off.)
So for each gear up or down my 9sp trigger shifter moves the cable 2.56mm instead of the required 3.15mm I need for 7sp.

Using a little bit of Pythagoras, I tried the following in an attempt to increase the distance the derailleur moves relative to the amount the cable is moved.
I shifted the cable mounting position from below to above. See the image below. (The red line represents the normal attachment position for the cable.)

20140623_165729.jpg
I'm not going to say this works perfectly, but it does work very well. It actually shifts through all the gears nicely now.
 
Nips said:
It actually shifts through all the gears nicely now.

I'd forgotten you had shown me about this, I'll need to have a look at mine, because it's not working so well with the new shifter.

Bike is looking great, that mount is awesome, so solid!
 
Back
Top