GMUseless
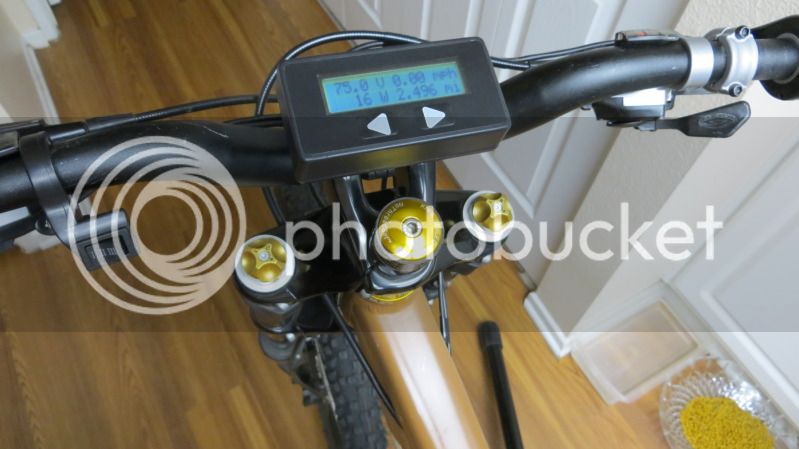
100 W
Another Hubmotor Commuter Build (yawn):
Well I managed to run my first build for about 6 months before starting on number two. I’ll start by saying there was absolutely nothing wrong with the first build (link). I was getting a solid 25 Wh/mile, at an average speed of 25 mph for an 18 mile commute.
The main motivation for build number two was really just an accumulation of many smaller issues:
1) I wanted a higher top speed for the sections of my commute that don’t include bike paths.
2) The donor bike for my first build was a light, all-mountain Cannondale that I’d like to return to a pedal only bike for off-road and state park trails where I’d rather not take an eBike.
3) After seeing how kick-ass they are, the wife wanted an eBike. So it was a good chance to get myself an upgrade without having to ask.
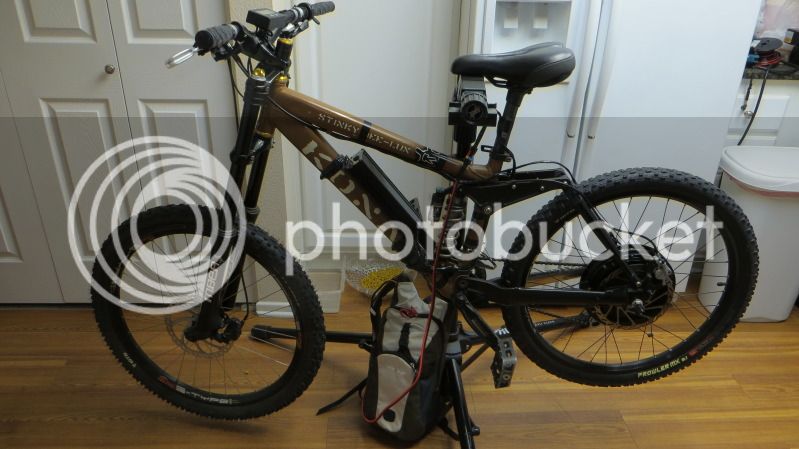
Anyway, the donor / core bike for this build was a 2007 Kona Coilair Supreme. I got it off eBay, on which the auction included the 7 inch travel frame, Fox DHR shock, Marzochi Bomber fork, and seatpost and saddle.
The goal was a top speed of 35mph, the ability to have as much pedal input as possible, a 20 mile range, and consumption target of less than 35 WH / mile.
Frame Overhaul and Component Spec:
I didn’t start taking pictures until I began to rebuild the frame…so I don’t have much BEFORE to show here.
After receiving the frame I removed the fork, headset, and other misc components. Then I broke apart the rear triangle, pulled all of the bearings and pivots, and removed the swing arm. Pulling the swing arm was a bit of a bitch. I finally managed to press the bearing out using an 8” vice, a ¼” drive 1” hex socket, and a brass napkin holder ring (which provided an offset between the frame and the vice allowing the bearing somewhere to be pressed to.)
Once I got everything broken down, I thoroughly inspected the frame and each piece of the triangle…looking for any show stopping cracks or damage. There were plenty of paint chips, but no major damage. There was a small indention (like 3 mm across) on the bottom of the frame just above the bottom bracket. Other than that, everything looked pretty good.
Also, the previous owner had recently replaced all of the bearings and bushings…so there was very little play in the rear triangle and all of the pivots in looked in pretty decent shape.
The pic below is the first one I took of the build, which at this point I had already re-attached the swing-arm. The paint on the rear triangle is just a flat spray coating, with a Hammered finish spray paint on top of that. That paint has a bit of polymer in it so you get a slight rubbery feel to the finish…and it seems to hold up well. But, really it looks nothing like a professional paint job.

The frame came with a Fox Air DHX 5.0 shock that I popped in here. There’s a choice of placement that affects the head angle. I believe the front one being the less aggressive of the two. I could be totally wrong here.

I then re-assmbled the rear triangle, the floating brake arm, the dropouts, and the front headset and fork.

On my last build, I rarely used the rear derailleur, leaving the rear almost always in the 11T. I did most of my switching in the front derailleur. So on this build I got a decent Shimano XT front D, and a craptastic SRAM 3 rear D.

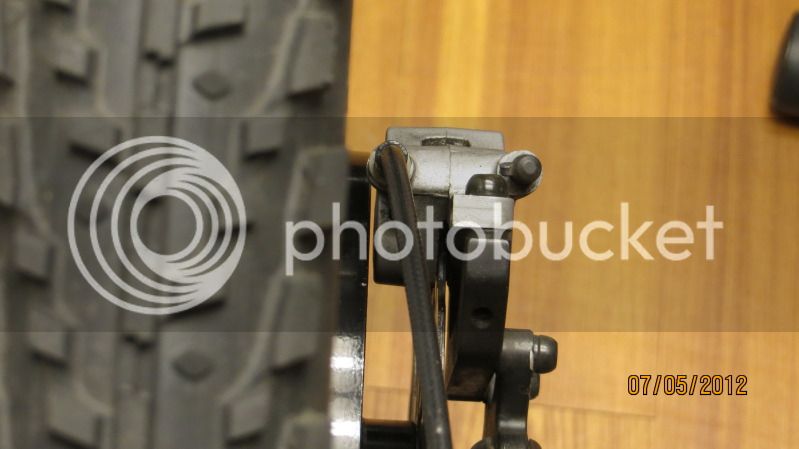
In these shots you can see how the floating brake fits into the rear dropout. Also, since the dropouts are removable, I actually fit the dropouts to the wheel first, then attach the dropouts to the bike.


I got an FSA crank set, with a 48T large ring and square taper drive. So I picked up an old school Shimano UN73 bottom bracket (68mm shell) with a 122.5 mm length. From measuring the best I could, I figured this would just accommodate the 48T.


Once I got the crankset on, I indeed got lucky with the clearance. I’ll have to wait and see if it rubs the swing arm when the suspension bottoms.


Well I managed to run my first build for about 6 months before starting on number two. I’ll start by saying there was absolutely nothing wrong with the first build (link). I was getting a solid 25 Wh/mile, at an average speed of 25 mph for an 18 mile commute.
The main motivation for build number two was really just an accumulation of many smaller issues:
1) I wanted a higher top speed for the sections of my commute that don’t include bike paths.
2) The donor bike for my first build was a light, all-mountain Cannondale that I’d like to return to a pedal only bike for off-road and state park trails where I’d rather not take an eBike.
3) After seeing how kick-ass they are, the wife wanted an eBike. So it was a good chance to get myself an upgrade without having to ask.
Anyway, the donor / core bike for this build was a 2007 Kona Coilair Supreme. I got it off eBay, on which the auction included the 7 inch travel frame, Fox DHR shock, Marzochi Bomber fork, and seatpost and saddle.
The goal was a top speed of 35mph, the ability to have as much pedal input as possible, a 20 mile range, and consumption target of less than 35 WH / mile.
Frame Overhaul and Component Spec:
I didn’t start taking pictures until I began to rebuild the frame…so I don’t have much BEFORE to show here.
After receiving the frame I removed the fork, headset, and other misc components. Then I broke apart the rear triangle, pulled all of the bearings and pivots, and removed the swing arm. Pulling the swing arm was a bit of a bitch. I finally managed to press the bearing out using an 8” vice, a ¼” drive 1” hex socket, and a brass napkin holder ring (which provided an offset between the frame and the vice allowing the bearing somewhere to be pressed to.)
Once I got everything broken down, I thoroughly inspected the frame and each piece of the triangle…looking for any show stopping cracks or damage. There were plenty of paint chips, but no major damage. There was a small indention (like 3 mm across) on the bottom of the frame just above the bottom bracket. Other than that, everything looked pretty good.
Also, the previous owner had recently replaced all of the bearings and bushings…so there was very little play in the rear triangle and all of the pivots in looked in pretty decent shape.
The pic below is the first one I took of the build, which at this point I had already re-attached the swing-arm. The paint on the rear triangle is just a flat spray coating, with a Hammered finish spray paint on top of that. That paint has a bit of polymer in it so you get a slight rubbery feel to the finish…and it seems to hold up well. But, really it looks nothing like a professional paint job.
The frame came with a Fox Air DHX 5.0 shock that I popped in here. There’s a choice of placement that affects the head angle. I believe the front one being the less aggressive of the two. I could be totally wrong here.
I then re-assmbled the rear triangle, the floating brake arm, the dropouts, and the front headset and fork.
On my last build, I rarely used the rear derailleur, leaving the rear almost always in the 11T. I did most of my switching in the front derailleur. So on this build I got a decent Shimano XT front D, and a craptastic SRAM 3 rear D.
In these shots you can see how the floating brake fits into the rear dropout. Also, since the dropouts are removable, I actually fit the dropouts to the wheel first, then attach the dropouts to the bike.
I got an FSA crank set, with a 48T large ring and square taper drive. So I picked up an old school Shimano UN73 bottom bracket (68mm shell) with a 122.5 mm length. From measuring the best I could, I figured this would just accommodate the 48T.
Once I got the crankset on, I indeed got lucky with the clearance. I’ll have to wait and see if it rubs the swing arm when the suspension bottoms.


") Very nice build!!!
Very nice build!!!