
You are using an out of date browser. It may not display this or other websites correctly.
You should upgrade or use an alternative browser.
You should upgrade or use an alternative browser.
Mommy
- Thread starter Bobby June
- Start date
Not enough battery?What's wrong, darling?
Bobby June
1 W
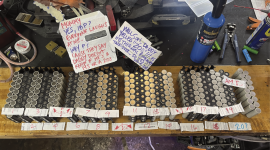
lol. I just can't figure out if the last row makes it a 20s. counting them says so but not at the same time. what's wrong with my noobie brain? ")
Bobby June
1 W
So what you’re saying is like 19 is the final series battery row but the fact that it has, what, a final connection back into itself turning it into a 20. I really don’t understand where the 20 comes from why don’t I understand that I’m just I can’t get the battery stuff I’m sorry
1s would be the first row (of double cells) of all the white cells (on the left) of 1s2p, 2s would be the 2nd row of black cells making it 2s2p..........20s would be the black that is 2nd from the farthest right, then 21s would be the white ones at the farthest right. Its neat looking at it, I dont think I've seen those holders before. The balance leads start with 0.So what you’re saying is like 19 is the final series battery row but the fact that it has, what, a final connection back into itself turning it into a 20. I really don’t understand where the 20 comes from why don’t I understand that I’m just I can’t get the battery stuff I’m sorry
Bobby June
1 W
Are they nice honeycomb mounts I really like them because I'm going to show the side of the cells out of a polycarbonate in casing so they look really cool. And let me try to understand so thank you for clarifying the one through 20 that really helps me especially since you told me what colors they are that helps a lot and that's great. I don't have to use that last row because I'm almost out of batteries and let's see the balance leads start with zero meaning that when you say balance leads, you mean the positive and negatives on either end zero meaning the + of #1 and the - of #19?1s would be the first row (of double cells) of all the white cells (on the left) of 1s2p, 2s would be the 2nd row of black cells making it 2s2p..........20s would be the black that is 2nd from the farthest right, then 21s would be the white ones at the farthest right. Its neat looking at it, I dont think I've seen those holders before. The balance leads start with 0.
Its best to draw out a diagram of what you have, as it can make it easier to visualize.
I mention it because I got a feeling thats perhaps where you are confused mentioning 19 and all.
Ground is 0 when buying balance lead adapter/connectors, so 19s connector or a combination of 19 for a 20s battery.
Routing of those balance leads and routing of the wires is important. Think about thermal management, what pathways will heat up and will you cross wires along those pathways.
You tab welding or soldering?
Last edited:
Bobby June
1 W
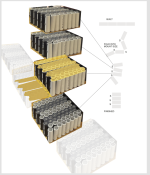
Okay great. I'm almost there. I will take your explanation out to the web to search and learn what now looks, at least, like the layout is valid. Now look at this shot. Or these two layouts. Which one makes more sense to you, Calab?
Attachments

Right picture - Adding those big bricks together (if you had two of the exact same layout battery) you only do one 1p, not two 1p (one at either end, like in your picture),because when you put them in serial, you place the 1p's of each big brick together. In your picture, you have a useless 1p sitting at the end of the pack. Unless perhaps thats the middle big brick, who knows what your up to.
Left picture is the way to go, way easier.
Im logging off.
Left picture is the way to go, way easier.
Im logging off.
Bobby June
1 W
Oh yeah, you know what I was trying to make a zero earlier this evening I guess I was trying to end it at like I don't know what I was trying to do anyway, OK cool good to know. Ok, how does this config look to you? folded wile keeping the series ends connected??
Attachments
Bobby June
1 W
okay thank you so much for your help. Have a great evening! :)
)docw009
1 MW
I see cells laid out for a 21S-16P in the first picture. Don't know why the note says 18P. Each column has 8 cells and there are two columns? That's 16 cells you're going to put in parallel.
Get rid of the last 16 cells on the right for 20S. Seriously, don't be making batteries til you can visualize these series/parallel layouts.
Get rid of the last 16 cells on the right for 20S. Seriously, don't be making batteries til you can visualize these series/parallel layouts.
Eastwood
100 kW
- Joined
- Jan 13, 2021
- Messages
- 1,479
Seriously, don't be making batteries til you can visualize these series/parallel layouts.
Yeah, this is great advice!
Just don’t rush your first battery build. I’m in the same position, been working on my first build, 4.6kwh. Make sure you’re 100% sure of your layout connections etc., before you start assembling.What's wrong, darling?
I agree. It looks like the paper label for "2" is shifted over for some reason, and just cascades from there (more obvious at 5 and 15, and at 20 of course).I see cells laid out for a 21S-16P in the first picture. Don't know why the note says 18P.
Bobby June
1 W
Yes, that is great advice. Trying to show it to you while grasping it after replies. The 21s was my first error. And yes, it's my first battery. Per your support of laying designs out to follow, I redrew the design for this battery and reshot the cells...thank you Docw009I see cells laid out for a 21S-16P in the first picture. Don't know why the note says 18P. Each column has 8 cells and there are two columns? That's 16 cells you're going to put in parallel.
Get rid of the last 16 cells on the right for 20S. Seriously, don't be making batteries til you can visualize these series/parallel layouts.
... Reshooting it was because my loose shot before gave the idea that a mistake might be being made, which complicated involvement due to smart people not wanting to address the dumb stuff like a mislabeled item. Good note, E-HP.I agree. It looks like the paper label for "2" is shifted over for some reason, and just cascades from there (more obvious at 5 and 15, and at 20 of course).
And thanks Eastwood, Let's get these done perfectly.Yeah, this is great advice!
Just don’t rush your first battery build. I’m in the same position, been working on my first build, 4.6kwh. Make sure you’re 100% sure of your layout connections etc., before you start assembling.

Bobby June
1 W
I think you are right. It's like there's a mental corner I have to turn to get an ah-ha! For example, when you got me into chucking the thought of 21 and even 20, my brain said, 'oh, well that seems right because 1 and 19 meet (not really) at the end of the system so '20' is the invisible connection between the last rows of - and + on both sides. So when my brain wants to kick in with it's fresh out tha womb conclusions, it's it's well at least interesting to see raw happen.Its best to draw out a diagram of what you have, as it can make it easier to visualize.
I mention it because I got a feeling thats perhaps where you are confused mentioning 19 and all.
Ground is 0 when buying balance lead adapter/connectors, so 19s connector or a combination of 19 for a 20s battery.
Routing of those balance leads and routing of the wires is important. Think about thermal management, what pathways will heat up and will you cross wires along those pathways.
You tab welding or soldering?
So, yeah. I'm soldering. And at this point, everything. My Glitter 411A spot welder doesn't do, or let me be accurate, I can't force it to do sandwich welds. So it's all just .25 copper. P, S and Bbars
Oh yes. About the after path like crossing the balance leads. That stuff didn't have as much thought but now it does. Thanks. Those wires will not only not cross but be secured down.
Speaking of heat and a battery, what do you think about the use of super high quality silicone as a battery-to-battery glue? I'd like to put the cells next to each other touching. And then syringe the silicone into the chambers between them. Now I know the pearl clutching that happening. Even if very secure and rigid, would you say 'battery NeVer touch!' It's not dry yet but here's it applied (pardon the slight sloppy).


You numbering labels are for connections between the groups and not the number of groups, so there are 19 of those for 20 groups.I think you are right. It's like there's a mental corner I have to turn to get an ah-ha! For example, when you got me into chucking the thought of 21 and even 20, my brain said, 'oh, well that seems right because 1 and 19 meet (not really) at the end of the system so '20' is the invisible connection between the last rows of - and + on both sides.
docw009
1 MW
With a folded battery, it's tricky to get them to fold exactly in the middle of the metal, so the blocks stay straight when they are stacked. If the box is a snug fit, this could be a problem squeezing them in.
I'd consider making each block with copper tabs that come out. Stack them straight and solder the tabs together later,
And with 320 new cells, you have a lot of money in this battery, like over a thousand bucks? Maybe you should buy a better welder. Easy to ruin those cells with soldering,
I'd consider making each block with copper tabs that come out. Stack them straight and solder the tabs together later,
And with 320 new cells, you have a lot of money in this battery, like over a thousand bucks? Maybe you should buy a better welder. Easy to ruin those cells with soldering,
Bobby June
1 W
A group meaning a group of P only, correct? Wow, you're right. I thought I was labeling, 'and these two Ps together make series #1, etc. I want to get that shot deleted and put up a revised series labels. Basically 1-20 goes one each P group, right? Row 1 and 2 get #11 Still seams like if series has numbers, mine being 20, then you must be able to label themYou numbering labels are for connections between the groups and not the number of groups, so there are 19 of those for 20 groups.
Bobby June
1 W
Thanks for putting that to bed, E-HP.You numbering labels are for connections between the groups and not the number of groups, so there are 19 of those for 20 groups.
I'm hoping that your pack turns out great. I've been planning on building a pack for a while, so I'm watching these battery builds closely, including Eastwood's (I don't think you could buy a pack with that level of build quality). What cells are you using?Thanks for putting that to bed, E-HP.
Bobby June
1 W
Okay, let me try to wiggle out from your headlock.With a folded battery, it's tricky to get them to fold exactly in the middle of the metal, so the blocks stay straight when they are stacked. If the box is a snug fit, this could be a problem squeezing them in.
I'd consider making each block with copper tabs that come out. Stack them straight and solder the tabs together later,
And with 320 new cells, you have a lot of money in this battery, like over a thousand bucks? Maybe you should buy a better welder. Easy to ruin those cells with soldering,
On the folding. I might have a solution for the snug fit by gaining some room but it involves yet another issue. That would be removing the cell dividers and letting the cells touch and then squirting in the gaps between then good quality silicone. Roofing repair stuff. So I think I have room even if I let in the dividers as mu pack has changed with you all helping me.
MAKE TABS AFTER ERROR OCCURS - So about 'attempting' to fold the blocks and if it doesn't work, I am left with a misaligned battery that I cut at the bend and the length of that copper would be designed to, when folded, protrude about a quarter of an inch. Then the copper can be cut at the fold, overlap and be soldered once alignment is made.
IT ONLY FOLDS ONE WAY - I can make the length of the copper tight so that it can fold at really only one point so tight that getting a 1-2mm sheet of silicone between them, and it raising the top block, causes new concerns.
SAMPLE IT - Now after writing all that, your tabs all of a sudden feel quite loud and in charge. So I will be making a small 7 cells + 7 cells sample and folding to actually go through it.
On the soldering. Listen, in front of this group, I dare like a fool. I'm 'okay' at soldering, which says you win hands down. And yes, we can easily say near $2k for the cells. But my damn money has disappeared.
$60 = UGLY YET POWERFUL WELDER - If I gave you $60, could you fashion an emergency car battery welder (craig's list, hand making the pens somehow...struggling to make it work which when it comes to tool making, can do. my shop is solid), how would you build it? I'm willing to spend $60 to try. And we can tear down the Glitter to any level to sacrafice it for parts.
FIGURE OUT THAT DAMN GLITTER - I'll be taking apart the machine to see if there's anything wrong and make it usable.
NOW TO SOLDERING - Okay, I'll list my todos so that I make my side have a degree of hope.
• With Windex on a rag, simply clean both ends of all batteries and sides for glue.
• Dremel sand spots on each side of each cell for good and quick adhesion.
• Again, Windex only the ends.
• Set up the cells in total, + up and tape them firmly into one big rectangle.
• Apply not a dab but a thin coating of flux to each cell.
• After testing to know the size, cut lengths of the solder and bend in half and then place each solder on top of each cell (or in groups of 10-20, let's say).
• Clean newly made bigger flat/angular tip made just right to cover the entire + pad on these cells. Keep cleaning pad close and use it after each cell touch for small waist but killer predictability.
• Now touch each cell for 1-2 seconds. I have a tip temp from 400-650 degrees. The edge of the solder hopes to not look bubbly but more blended angularity into the cell. But if it looks bubbly, don't do another 1-2 seconds but know that your next hit will include pressure and copper and more solder, so chill.
• Now flip and repeat.
• So both sides of the cells have a solder spot. But a towel over them and get at the copper.
• Assuming all copper is cut, holes punched, edges sanded, tops and bottoms are sanded (for adhesion), now Windex them clean and pound flat with a mallet and wood.
• Each cell is soldered through a hole drilled out at each contact point. Holes seem to size out at ⅛" (perhaps 3/32"?). This lets soldering happen from above with visual understanding/confirmation, while also error correction if more solder is needed.
• On the underside of each copper sheet, solder a nice ring around each hole. It's ok if the hole gets filled..it most likely will on each hole. Just make sure the circumference is solder coated. And know the diameter of your + pad. Do not exceed it, and actually retract solder from near it. When both copper and battery get molten and join, one must account for accumulation.
• Addressing solder volume on both the tinned battery and copper sheet can be done by taking a Dremel and reducing the solder amount until you're sure that when both surfaces are joined, that solder /surely/ will not flow down into the + pressure release gap.
• Now that both sides are ready, and you have practiced on junk cells, start on - side as it's easier. Get them all soldered! Remember, after each tough, the tip is not just cleaned by shoving it into a Brillo pad alone but wiped with a quick tip grab with rag in hand.
• However, the copper sheet needs to be held down to the cell while and as solder cools. Make a stick out of thin yet rigid metal or wood that has a tip that is flat and angled and a slot cut for soldering tip movement. Think of a tiny spatula with a half circle cut out it's leading tip. The part that tries to get under that egg.
• Press down with one hand and heat up and solder with the other. Hold down with the spatula hand until the solder goes from shiny to a mat finish. A dream bench to do this on would be a bench with matching holes so that a battery tester could be contacted on both sides to check the connection.
• When the connection is made at the points where folding is going to happen, one can see the results and possibly repair if the folding makes a connection disconnect.
• Once finished, battery test it all and continue with solidifying it and boxing.
How did I do boss?
Bobby June
1 W
Well I'll go take a look. I wanna get as much info as possible. I'm using Molicel 21700 P42A. Fardriver wants up to 800 amps in so I'm below it's limit but I'd love to be at least half way there. Using 2 AWG wire, killer cold-crimped lugs and a 273 motor that needs work. A new axle is ready so that I can get those 2 AWG wires into the motor as I have drilled out the other side of the axle for one of the three 2 AWG wires to go and get directly soldered to the stator. Right now it's my weak burn spot as I'm using the stock phase wires cut short near the motor in spot. Temp sensor is hooked to the site where the 2 AWG meets the 12 AWG. Yikes!I'm hoping that your pack turns out great. I've been planning on building a pack for a while, so I'm watching these battery builds closely, including Eastwood's (I don't think you could buy a pack with that level of build quality). What cells are you using?
What do you have going down on your build?
Nothing as big as what you're working on, but still having fun. Those Molicels look like a pretty attractive value for their specs. I'd be building a 20S5P pack and interested in those cells as well as the Sony VCT6A.What do you have going down on your build?
Similar threads
- Replies
- 0
- Views
- 136
- Replies
- 5
- Views
- 166