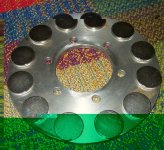
MULE1.2 Axial flux test motor/bicycle specific

I'm not sure you'll gain much by trying to create air passages internal to the stator. As Fechter said, there's just not enough space to permit very much flow unless you're able to create a very substantial pressure differential. I think the vaned rotors are a great idea, and you'll probably get a pretty good amount of cooling from the high-velocity airflow across the surface of the stator.
 
Wedge magnets deliverd today. WOOT!(thanks LFP & RWP, this is going to be kewl before were done)
disc magnets here tomorrow.

I am working in the shop tonight, Mostly on the eddy brake dyno is the plan. I think I will set it up to foot pounds scale & do the math for the diferent tourque describing formats. laser Tach on order/amp/watt meter in hand. Photo's If I have anything substantial to share later.

Add edit. small epoxy rotor failur while dynoing my lathe :lol: lathe 1 dyno 0 very cool unit though will be super cool once redesigned.(thanks for the suggestion LFP)
 
Hi have you decide the dimension of the wire in the coil and turns? What are the size of the magnets? My project looks simular I will use diam 25 mm x 7mm magnets,
Article ID: S-25-07-N
Shape: Disc
Diameter: 25 mm
Thickness: 7 mm
Tolerance: +/- 0.1 mm
Weight: 26 g
Coating: Nickel-plated (Ni-Cu-Ni)
Magnetisation: N42

Dimension of rotor 200mm
But I do not know how many turns of wire, I do not know how to calculate this, I am aiming for 48V max 25 A, but my driver could handle up to 100A 75V..
Any ideas?
Project home: http://code.google.com/p/diy-bldc/
 
Hello cobree,
I have a few wire combo's to try. The 1st stators will be wound with 14 AWG magnet wire. I am going to try to match the copper density of a large outrunner on the 1st few attempts. hopefully all will work out.

I got a little busy in the afternoon with family stuff but made time to fire up the foundry & cast a couple magnet rotor blanks for the mule.
Why cast? properly designed castings are incredibly light & can be wonderfly strong. All without spending hours tediusly turning the handles on a mill or lathe. It is also far more cost effective than cncing parts from an expensive oversized billet. As a woodworker, I can make just about anything & reproduce it in metal.
here is tonights fun pictorial.

This is my home built super efficeint furnace, I am fireing with propane. looks totaly ghetto as a recycled paint can
I have poured cast iron from this set up.

PC060022.jpg


A crucible full of old geo metro head. the high infra red radiant messes with the camera its not quite that bright
PC060027.jpg


There is the pattern & behind is a mold all ramed up with gates & risers in place
PC060026.jpg


poured & cooling off. I poured these at 1280f.
PC060028.jpg


To the band saw to cut off the risers
PC060029.jpg


I did a little clean up on the lathe & got the all important hole in what will become the center of the part.
PC060034.jpg


you can see another one in the background. It is important to allways have an extra cast. Once you have 2 of something, all your set ups will be perfect & you won't need the spare :shock: if you only cast one, it is garenteed you will brake a drill bit off in it somewhere along the line. I still need to cut the depth for iron flux ring & magnets, then machine off a little weight. I was a bit conservitive on the pattern to make molding it easy & avoid any shrink issues. Then it will get polished like a new dime.
(ignore all that sprocket clutter on the bench in the back ground. that is for a project to be unveiled soon :wink: )
 
this forum needs more smileys.

specifically one thats bowing its head in respect .
 
enoob said:
this forum needs more smileys.

specifically one thats bowing its head in respect .

I second that. Great work Thud! How much casting experience do you have under your belt before great quality parts are possible like yours?

John
 
Like this one I just borrowed from FreakBikeNation's forum:
bowhs.gif
and I think we could use these three, too:
sawzall.gifweld2.gifnuts.gif

I could really use that last one for my own stuff. :lol:


So...how do I build that little furnace, Thud? I feel the need to melt things down into other things now!
 
lol i cant tell you guys how hard i just laughed for the last few minutes. for a few reasons. toooo funny .

first - thud cough it up . i too want the diy on your furnace build (1 reason im laughing as your busy enough)

secound - i doubt the furnace is hard to build its using it without horribly disfiguring yourself thats the real trick.

lastly the smileys . yup those are the ones i was thinking about , and amberwolf for myself id change the order a bit . starting with the nuts one for what im about to do with the sawzall ending with the welder to fix what i just messed up with said sawzall
 
Guys you embarass me. Thanks for the props.
Metal casting is the oldest form of metalworking, & beleve it or not it is one of the easyest. Pattern making is where the real skills come into play. Advanced methods such as "lost foam" are well within anyones reach.
We had a foundry in our industrial arts program back in HS. So i been doing this off & on for awhile.

my best furnace design is this 19mm thick "hotface" cast in a form made from roof flashing & some scrap melamine board.
P2210010.jpg

the refractory Is comercial stuff I bought localy its Sparcast brand & rated to 2800f. Just add the right amount of water & you can't go wrong.
The key to efficancy is to insulate as well as posible. Using the same refractory I made up a much thinner batch & added a couple squirts of dollar store dish soap & foamed the snot out of it! using a rubber paddle designed for foaming. & poured it around the facing.
P2280014.jpg

then I toped it off with another batch of properly mixed stuff for durability. I don't have any photos of the tyere or burner.
This unit will melt 8lbs of aluminum from cold in 14 minutes with an atmospheric burner.
If you are serious about getting into this I would go to a library & check out C.W. Ammens books on metal casting. Every thing you will ever need to know is in thoses.

Here is a forum dedicated to back yard metal work
http://backyardmetalcasting.com/forums/index.php?sid=e3e14c2e765cb2318ad8e8f5a3003071

Best lost foam primer on the web:
http://www.buildyouridea.com/foundry/lost_foam_howto/lost_foam_howto.html

Here is a very interesting guy you all should recognize.
http://www.theworkshop.ca/


Thats enough thread drift for this morning.
 
I am seriously impressed here! Wow! Fantastic work!
 
I still don't have a small bench-top lathe or a drill-press (a tear slowly rolls down Rons cheek), but I always wanted to do some metal casting, and here's another home-made foundry website with lots of detail and pics (from the archive, my file of "things I want to do, but will probably never get to"). Thud, last week I thought there was no way I could ever be more jealous of you than I already was, but now...

30 page tutorial on building and using a small home-foundry, (website is from one of those "over-unity" guys ::wink:: , but the foundry section is very good)

http://www.oupower.com/index.php?dir=_My_Projects/_Shop_Projects/Foundry
 
Thud, my hat's off to you! Very nicely done. You can tell you have been doing casting for a while. Your blanks are perfect, and void free. You will be a survivor in the coming ice age... :mrgreen:
 
Aw shucks you guy's, aint nuttin you couldn't do.
I got to work today with the intention of prodding my buddie to see if he can fit my flux rings into his schedual. hehe there was an e-mail waiting for me, All done, pick em up, & my favorite, no charge....I want to see that motor spin! 2 pc of laser cut concentricity 8 Gage plate.
disc001.jpg

disc002.jpg

Thanks Charlie, you da man!
build back in progress.
 
Finished turning the acumilator for the sab....er....rotor for the touque machine tonight.
(you guys slay me!)
PC210006.jpg

PC210007.jpg

PC210008.jpg

my scale seems to have died....I need to weight the thing before going all "Kim" on it with the drill press. :D

Nothing bonded in final position yet. I am just hoping to be able to make the jump to light speed.
Luke has been awfully quiet the last week or so......he may be creating a worm hole of magnetic flux in the great north west.

enoob, whats the sky look like to your south? :lol:
 
8) me likey .

now that you mention it there is a big swirling vortex that my compass seems to think is north now. :shock:
 
Hi Thud and all,
I have read all this thread with great interest as I am designing and building a motor for a similar purpose and reasons. My vehicle will be 3wheel, driving each of the 2 front wheels with direct drive motors. I am impressed with this groups ability to collaborate and get things done. I have the parts for a 6", 2 rotor, prototype. It will have a 3ph coreless serpentine stator. To determine the number of windings needed, I will assemble the motor without the stator, mount one loop of wire in the air gap, spin the rotors at a reference rpm and measure the back emf and divide that value into the desired drive voltage at that rpm.
I have thought about using vanes on the rotors to force cooling air past the stator but most of the cooling will be required at low rpm and at high rpm it would add significant drag to the motor. I plan to work on the cooling as I test the prototype. For a test dyno I plan to mount two motors on one shaft; run one as the motor under test and the other as an alternator for a variable load and feed the power back to the batteries.

Thank you and I hope I can contribute,
Jerry
 
Yes, Welcome J,
Allways good to see new blood & your designs sound interesting.
Any thing we can do to help?....Just ask. I am certain you will find this ES comunity very helpful & willing to go an extra mile to find information & methods to do anything your hearts desire. Phenominal gathering of humans here! Post up some pics when you get time. I hope I haven't de-volved any motor theroy to baddly yet & am glad some one thinks this is interesting as well. I couldn't have gotten this far without the groups contribution.
Looking foward to seeing your success.
 
How thick is 8ga?

The flux rings should be thick enough so that the steel does not saturate, or at least not by too much. One way to tell if they are saturated is to use a paperclip or small screwdriver and test to see how strongly it is attracted to the backside of the plate. If the metal is saturating, there will be a strong attraction where the magnets are. If the metal is thick enough to avoid saturation, the attraction on the backside will be quite weak. If you need more thickness, using two rings stacked would be equal to a single thicker one.
 
8 gage = .172"

A paper clip will stick (barely) to the back side. & will fall off easily. Back to back the flux rings fully loaded are better than I anticipated regarding saturation. I would describe it as "trace" magnetic attracttion. (way less than the cheapest fridge magnet)
I may be over building with 1/4"t magnets.
Way more magnetic potential than any of the outrunners I am trying to emulate, add that I have a huge advantage angularly speaking.
Big issue will be core materials. I am still playing with the idea of a bunch of small wires,insulated & bound for a induction fighting core.
I have also figured a home built rolling shear to cut sheet stock for flat wound coils 8) haven't had time to fab it up yet...but will have that as an option soon.
need to get rolling soon if I am going to make the mid feb. time line to spin this baby up.
then there is the dynomometer (!) thread to start....time schmime LOL
 
Here are pictures of my rotors and a drawing of the stator windings. It is 12 pole 3 phase, 1/8" x 1" N42 magnets, .25" planned air gap (magnet face to magnet face) and .125" stator thickness in magnet path. Since only the stator conductors perpendicular to magnetic flux travel is active, this type of winding allows very high copper fill, high flux density(due to small air gap), high back emf and low winding resistance; at least in my mind :) These parts will be an alternator for a 150 volt microhydro generator but uses all the same principles as the motor and will let me workout construction details and experiment with the air gap and stator. Next I will build the two small motors on one shaft; using one as a dyno to test the other, returning the power to my batteries rather than burning it up as heat. I'm totally off grid and don't like to waste the power :)DCP_4387.JPG
DCP_4389.JPGstator.jpg
The stator will be supported on the outside edge.

Jerry
 
Thud said:
8 gage = .172"

A paper clip will stick (barely) to the back side. & will fall off easily. Back to back the flux rings fully loaded are better than I anticipated regarding saturation. I would describe it as "trace" magnetic attracttion. (way less than the cheapest fridge magnet)

That sounds good. .25" magnets are not overkill either.
 
One interesting thing you'll find is that the flux increases dramatically when the motor is assembled due to the closed flux path. While the iron may be OK while the motor is apart, you may find it's saturated when it's assembled.
 
Back
Top