John in CR
100 TW
My lead POS car battery crapped out a few months ago. Since I had some A123 M1's not in use, I decided to make my own car battery. All of my M1's were balance charged about a year ago after capacity testing them, so I picked 24 that were the closest in capacity and current voltage. Matching based on capacity and self discharge seemed good enough for me.
Build procedures:
First, I used polyurethane glue to the cells in a 6p x 4s arrangement. They're the original paper wrapped kind.
All had tabs on both ends, so soldering six 4s strings was simple.
Then I stripped the insulation off of some 14ga zip cord to parallel all 6 at the cell level.
First I tinned a spot on the tabs for the parallel connections between the tab weld to the cell and the edge of the cell with the
positive end (the flat end on M1's) at that series connection. The button end have + from the can and - at the button in
close proximate, so I minimize work there.
Then I soldered a single piece of the bare 14ga to all 6.
At the positive and negative ends, I used 6 equal lengths of 10ga, 1 connected to each tab, to join together as one with a
piece of normal car battery cable that already had an automotive size ring connector. These are taped up to prevent shorts
all the way until the battery is ready to install in the car.
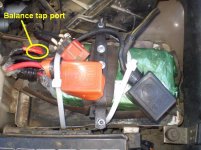
For the balance tap I attached a normal 4s plug and wires used for RC.
Then I painted it with a couple of coats of electric motor high temp spray paint, and gave it a good double wrap of duct tape
for good measure.
The 4x6 fits perfectly in a 3L soda bottle with smooth straight sides, so I cut the top off one and slid the pack in.
Using a stovetop burner it shrunk down nicely, saving the open end for last. After feeding the terminal leads through holes,
I trimmed and folded the end so it was mostly closed.
Then I used silicone to seal it up, and let that cure for 48hrs, so no acetic acid vapors would be sealed inside in the next step.
Then I cut the bottom out of another bottle, slid the terminal leads through the top and slid the whole battery in and shrunk it
and sealed the bottom end in the same manner as the first bottle. I also used silicone to form a plug around the wires exiting
the soda bottle top.
After the silicone was cured a nice wrap of electrical tape near and on the soda bottle top holds everything in place and limits
the flex of the terminal leads so they can't get worn through over time on the lip of the soda bottle.
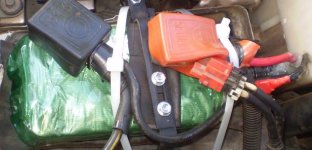
Sorry I forgot to take pics while building it, and I waited until having it in service for a few months without issue to post about it. It has only a human BMS. I checked it for balance after each use at first, then weekly, and now that dry season is starting it will be when I think about it....monthly at the most frequent. For a long trip I'll just connect to the balance tap with a long run and have an HK cell level alarm in the car. It's been perfect and functions far better than lead, with the minimal sag really showing in a faster cranking starter. It ain't pretty, but it's protected enough that with a bit of attention to seal the terminal connections and balance tap, I'd have no problem using it in a boat or on an ATV.
The straps and battery terminal covers were required to pass vehicle inspection here, which it did with flying colors.


