
You are using an out of date browser. It may not display this or other websites correctly.
You should upgrade or use an alternative browser.
You should upgrade or use an alternative browser.
My series parralel changer
- Thread starter Tench
- Start date
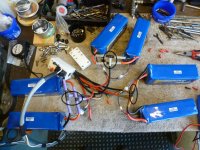
I made them, it is a brass tube machined so the bullet connectors fit in either end with a hole drilled in the middle to solder the cable into. Then I shrink tubed the 2 ends of the tube, laid a strip of glue backed shrink tube up the cable over the tube and back down the cable with another piece of shrink tube slid up the cable to cover the ends.
The shrink tube colour on the cable also depicts which packs connect to it, same with the balance connectors, all colour coded to help eliminate mistakes.
The shrink tube colour on the cable also depicts which packs connect to it, same with the balance connectors, all colour coded to help eliminate mistakes.
Rutiger
100 W
Tench said:I made them
I just want to say, Tench, the quality of your work here and in your other threads is amazing.
The solutions and parts you have created are brilliant.
gwhy!1
100 kW
You can also make P adaptors like this..


Sad Planet
1 µW
Tench said:I made them, it is a brass tube machined so the bullet connectors fit in either end with a hole drilled in the middle to solder the cable into. Then I shrink tubed the 2 ends of the tube, laid a strip of glue backed shrink tube up the cable over the tube and back down the cable with another piece of shrink tube slid up the cable to cover the ends.
The shrink tube colour on the cable also depicts which packs connect to it, same with the balance connectors, all colour coded to help eliminate mistakes.
I was worried you were going to say that. Excellent work.
friendly1uk
1 MW
itchynackers said:Tench and others. If you use these connectors, be sure to get rid of the metal frame edge (around the male/female pins). I had a setup like this, and if you aren't careful (me) and you accidentally put the metal frame in contact with 2 of the male pins while you are plugging in, then pins/wires will melt. Don't ask how I know this.
Adam
It should be female bike end and male from the charger. Then only the chargers balance wires can get shorted out. I think you may of got it the wrong way round if your melting wires.
friendly1uk said:itchynackers said:Tench and others. If you use these connectors, be sure to get rid of the metal frame edge (around the male/female pins). I had a setup like this, and if you aren't careful (me) and you accidentally put the metal frame in contact with 2 of the male pins while you are plugging in, then pins/wires will melt. Don't ask how I know this.
Adam
It should be female bike end and male from the charger. Then only the chargers balance wires can get shorted out. I think you may of got it the wrong way round if your melting wires.
Exactly! which is why I did it that way, and also connect the plug before turning the charger on.
I looked at all types of multi pin plugs for this purpose and decided on the D-sub because any adjacents pins have a low voltage difference between them that cannot be achieved with the round plugs.
sacko
10 kW
Inspired my last charge lead.
http://endless-sphere.com/forums/viewtopic.php?f=2&t=43770#p651006
Battery - female bullet, male shroud
Bike - male bullet, female shroud
..the above prevents shortage.
http://endless-sphere.com/forums/viewtopic.php?f=2&t=43770#p651006
Battery - female bullet, male shroud
Bike - male bullet, female shroud
..the above prevents shortage.
Neat job Sacko, that is pretty much how my current build is going to be.
Have you seen the D-sub combination plugs?
http://www.cablecomuk.com/hp_dsub.jpg
i tried very hard but could not find one that was quite perfect for my needs on the new bike.
Have you seen the D-sub combination plugs?
http://www.cablecomuk.com/hp_dsub.jpg
i tried very hard but could not find one that was quite perfect for my needs on the new bike.
Obiwan007
1 kW
Ok, Tench is a magnificent bastard! It has been said that the devil is in the details but Tench shows us that the glory is there as well. I have been enamored with his artful shrink tubing technique for his t-bar wire connections for some time. Tried like crazy to figure out how it had been done. It was not until the post above that I finally got the last piece of the puzzle. I like these so much that I have put together a short photo series with my method of performing the "Tench T-bar". Tench, I hope you will chime in after and straighten out any of my technique missteps. First, Tench used a custom made brass connector for the basis of his splice but this method can be used for any type of 90 degree splice. I started with two pieces of 10AWG silicone wire and stripped a section out of the middle of one and the end of the other

For speed I simply fanned out the wires of the stalk and wrapped them around the center and soldered (badly I know)

Now is the time to get all of your shrink tubing onto the wires and slid down out of the way if the opposite ends are permanently connected.

Now for the base shrinks on either side of the arms. These need not be long but they should have a little dog ear cut on one end.

This allows the tops to overlap and seal. I used 1/4" adhesive lined shrink for this and every other part of this except the over-wrapper which I will talk about later. I shrink using my weller portable butane soldering iron with a little heater tip on it for good control.

I shrink the overlap section first and let it cool slightly so that the adhesive will prevent it from pulling apart when the rest is heated.

Now comes the part that flummoxed me for so long. Originally I thought that the method was to take another piece of shrink, split it up the side and use this as the over-wrap.

Well of course shrink tubing does not shrink that way. What you need to do is get a piece of BIG tubing and cut it cross wise like this

The biggest tubing I had on hand was 1/2" and it is too small. I would suggest 3/4" or 1" adhesive lined for this part. Anyway, after cutting a piece to the proper width to cover your joint with some overlap, dog-ear the bottom corners slightly. Leave about 1/2" full width, cut in an arc and then straight down to the bottom like this.

And then snip through the bottom.

Roll the bottom legs between your fingers to give them a little arc.
View attachment 1
I'm going to finish this up in the next post so I don't go over the picture limit. See you two lines down. Obiwan.
For speed I simply fanned out the wires of the stalk and wrapped them around the center and soldered (badly I know)
Now is the time to get all of your shrink tubing onto the wires and slid down out of the way if the opposite ends are permanently connected.
Now for the base shrinks on either side of the arms. These need not be long but they should have a little dog ear cut on one end.
This allows the tops to overlap and seal. I used 1/4" adhesive lined shrink for this and every other part of this except the over-wrapper which I will talk about later. I shrink using my weller portable butane soldering iron with a little heater tip on it for good control.
I shrink the overlap section first and let it cool slightly so that the adhesive will prevent it from pulling apart when the rest is heated.
Now comes the part that flummoxed me for so long. Originally I thought that the method was to take another piece of shrink, split it up the side and use this as the over-wrap.
Well of course shrink tubing does not shrink that way. What you need to do is get a piece of BIG tubing and cut it cross wise like this
The biggest tubing I had on hand was 1/2" and it is too small. I would suggest 3/4" or 1" adhesive lined for this part. Anyway, after cutting a piece to the proper width to cover your joint with some overlap, dog-ear the bottom corners slightly. Leave about 1/2" full width, cut in an arc and then straight down to the bottom like this.
And then snip through the bottom.
Roll the bottom legs between your fingers to give them a little arc.
View attachment 1
I'm going to finish this up in the next post so I don't go over the picture limit. See you two lines down. Obiwan.
Obiwan007
1 kW
Ok, back at it. Now wrap it over the splice and, holding it together with your fingers, slide the bottom 1/4" piece of shrink over the legs and push it up nice and tight to the joint while working the legs of the over-wrap down inside.

Now heat the shrink carefully right around the neck. This will cinch down the legs of the over-wrap and hold it from pulling out when you shrink it. Keep in mind that you need to heat up two layers of shrink here (the outer one and the legs of the over-wrap) so I keep the heat moving but leave it going a little longer than normal so the heat can sink into both layers and activate the adhesive. It should look like this.

Now finish off the rest of the shrink tubing on the stalk.
 and then shrink the over-wrap section.

Cut the two final sections of the color shrink you want (if you are color coding like Tench you should make the bottom section of the stalk the same color). Cut a slight angle on one side of each of these so that it will fit right into the little triangle where the over-wrap meets the shrink on the stalk.

Here is a pic of it just short of where it fits.

And up tight as it should be.
Now I heated it jus around the edge next to the over wrap and then gave it just a bit of inward pressure to force some of the adhesive around the joint. Let that bit cool slightly and then shrink the rest of it. Do the same to the other side. There you have it! A "Tench T-bar", and a finer looking splice there never was. Of course Tench's look nicer than mine but I have made all of one so far. Alas all of the harnesses are done on my current build but now that I have this little trick in my bag I will be looking forward to using it on my next one. My project has me pulling my hair out. It is close to being done but I have found it more than a little difficult to find a 150mm swing arm for my Giant DH team. It's gonna be great when I do though. Obiwan
Now heat the shrink carefully right around the neck. This will cinch down the legs of the over-wrap and hold it from pulling out when you shrink it. Keep in mind that you need to heat up two layers of shrink here (the outer one and the legs of the over-wrap) so I keep the heat moving but leave it going a little longer than normal so the heat can sink into both layers and activate the adhesive. It should look like this.
Now finish off the rest of the shrink tubing on the stalk.
and then shrink the over-wrap section.Cut the two final sections of the color shrink you want (if you are color coding like Tench you should make the bottom section of the stalk the same color). Cut a slight angle on one side of each of these so that it will fit right into the little triangle where the over-wrap meets the shrink on the stalk.
Here is a pic of it just short of where it fits.
And up tight as it should be.
Now I heated it jus around the edge next to the over wrap and then gave it just a bit of inward pressure to force some of the adhesive around the joint. Let that bit cool slightly and then shrink the rest of it. Do the same to the other side. There you have it! A "Tench T-bar", and a finer looking splice there never was. Of course Tench's look nicer than mine but I have made all of one so far. Alas all of the harnesses are done on my current build but now that I have this little trick in my bag I will be looking forward to using it on my next one. My project has me pulling my hair out. It is close to being done but I have found it more than a little difficult to find a 150mm swing arm for my Giant DH team. It's gonna be great when I do though. Obiwan
Obiwan007
1 kW
Thanks Tench. I hope it helps others. I feel a debt to contribute in small areas where I can in repayment for the body of knowledge that has been deposited here to help noobs like me. Your posts have been among my favorites. Obiwan
Your welcome mate, I have learnt a lot from the collective here on ES so I too like it when i can be of help to others.
I have another build under way at the moment, it has a few unique features as always!!! 8) but my style is to wait until completion before starting a build thread so it will be a while yet, i still have the frame to make.
I have another build under way at the moment, it has a few unique features
as always!!! 8) but my style is to wait until completion before starting a build thread so it will be a while yet, i still have the frame to make.Obiwan007
1 kW
I'll be on the edge of my seat to see it.
longwise_suck
10 W
Oh man thanks for making this post i have looked for exactly this for 6 months on the web!!
Obiwan007
1 kW
My pleasure. I found it interesting that soldering tips and tricks are easy to find on the web but very little regarding shrink tricks.
longwise_suck
10 W
That is very true but i was refering to the how to wire up the balance leads, i have seen a few posts using serial connectors but never an explanation as to how but your diagrams helped me a great deal in understanding it, tommorow im off work and will be in the workshop doing just that!
Similar threads
- Replies
- 11
- Views
- 1,986
- Replies
- 14
- Views
- 451
- Replies
- 53
- Views
- 6,858
- Replies
- 19
- Views
- 3,068
- Replies
- 2
- Views
- 1,105