Norco Aline build with custom frame - new pictures

BATFINK

10 kW
Joined
Aug 7, 2011
Messages
598
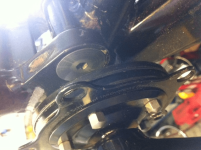
Ello guys I already have a norco e-bike I converted and at the moment I'm using a backpack battery but I was inspired by a recent build on here and want to house all my batteries and controller and wiring inside, I have just bought a frame for this:

Norco a-line 2003
I know the frame is hollow so I basically want to widen it to make a good internal area.

I will probably send this frame to an engineering form my friend works at but any tips with regards to modifying alluminium would be greatly appreciated as I keep reading about heat treating after fabrication, any input greatly appreciated,

I don't have 3D modelling software and wouldn't know where to begin with it so I am going to collect a few images of bikes with a similar idea to draw the best from those.

Also does anybody recommend me going down the RC mid mount motor route?

Sent using Endless-Sphere Mobile app
 

Attachments

  • image-1738075871.png
    image-1738075871.png
    82.9 KB · Views: 7,764
I thought taking the frame down to the support that runs from the head tube to the bottom bracket to take advantage of the hollow space there too. Would love you guys input in this

Sent using Endless-Sphere Mobile app
 
I was inspired by this build by iovykind:
http://endless-sphere.com/forums/viewtopic.php?f=3&t=39746&p=584515&hilit=norco#p584515
 
And Timma2500 Intense M3 build

http://endless-sphere.com/forums/viewtopic.php?f=6&t=34719&hilit=intense+m3&start=90
 

Attachments

  • 001.JPG
    001.JPG
    153.2 KB · Views: 7,725
Frame mod plan 1.jpg
This is what i was thinking for the frame, joining the whole side panel together to make a larger area inside the frame and widening out the panels as much as i can without affecting the pedals
 
I need about 20/30amps of lipo in there with minimum of 48volts for my mac hub

Sent using Endless-Sphere Mobile app
 
I need enough space for 20/30amp at 48v

Sent using Endless-Sphere Mobile app
 
BATFINK said:
I will probably send this frame to an engineering form my friend works at but any tips with regards to modifying alluminium would be greatly appreciated as I keep reading about heat treating after fabrication, any input greatly appreciated,

Also does anybody recommend me going down the RC mid mount motor route?

1. I hope he's a very good friend who can get you a good discount. I'd expect that to run into the thousands of dollars. Yes, it would need to be heat treated. That's expensive as well. 20 to 30Ah of battery will probably need a new frame designed to be able to hold that size battery.

2. If you're still not sure what type of motor you want, then you shouldn't even be considering modifying a bike yet.
 
He's a good friend. I dont expect to pay more than a few hundred British pounds. I have a Mac motor just now but I am intrigued by the climbing ability of an RC motor. I might just go with my Mac. I have 48volts 20amps as 2 series ping batteries and with the work I'm planning they would go in there just fine but I want to fill it with Lipo. I don't see any implications to that as long as the frames hollow is big enough to take it. Timmas build has 20s 10amps so a similar amount of Lipo isn't a huge challenge. I think the challenge is keeping good strength in the frame.

Thanks for the advice

Sent using Endless-Sphere Mobile app
 
rc motors is more of a challenge to build, but the offroad performance of hubs is pretty poor by comparison. a mac is probably a good middle ground, but wont handle as much power as a DD or a RC drive.

Love those old frames, great to know they can be chopped and survive! I like your idea of extending the frame down too, though getting 30ah in there would be a big challenge. If you widen it to ~12-15cm you could make it though, assuming you use a hub motor.
 
Cheers for the confidence sn0wchyld, I could live with 20amps anyway and possibly leave a small port to be able to connect a booster pack anytime I need to for longer distances. My occasional commute is 30 miles and just want to be able to enjoy it without worrying about battery levels. I will stick with my MAC motor for now and probably get a shclumpf clone and run a fixed gear at the rear. Excited to be building another bike.

Sent using Endless-Sphere Mobile app
 
Anybody good at 3d modelling to help me design it?

Sent using Endless-Sphere Mobile app
 
Heres My actual frame:
Image 1.jpgphoto.JPGImage 5.jpg
time to get it down and start drawing and measuring to get an idea of how the design is going to go, watch this space
 
Heres my new Schlumpf drive, i just unscrewed it and slid it into place to see what it will look like and to check for clearance, I'm not sure but i think i am going to need some spacer washer between my bottom bracket hole on the frame and the actual edge of the schlumpf drive as the chain wheel might hit my frame, its difficult to tell so i might need to fit it and then check clearance and then remove it again before the frame modification.
 

Attachments

  • schlumpf resting.JPG
    schlumpf resting.JPG
    56.4 KB · Views: 7,447
The good news about that chainring clearance is, since you have 1:1.6 overdrive, your chainring can be smaller. You can run a 30t up front there and get the equivalent of a 48.
 
Well went to get the Schlumpf fitted as I do n have the tools (basically you just need the special socket driver that mates with the schlump to tighten it, you could get by with a few normal tools if you had this) and there just happens to be a LBS for recumbents who know how to install them as they do then regularly. I did have clearance issues as the Schlumpf sits very close to your bottom bracket housing and I had to get a little taken off a weld that would have rubbed and the bolt that holds the rear swing arm on had to be shaved down a couple mm on the lathe because it was sitting a couple mm proud of the edge of the bottom bracket. Something to watch out for if doing this sort of drive on full suspension bikes after the shaving and lathing was completed the Schlumpf is a perfect fit. I only installed to measure how far from the frame my chain wheel and crank arms sit from the frame so I know how much I can widen the frame in fabrication. Good news is its ready for the chop and welding :)

image-3622788094.png

This bolt at the suspension was the one causing problems


image-2630215186.png

This is the same bolt lathed down a few mm :)


image-2832366526.png

Chamfering the bottom bracket

Sent using Endless-Sphere Mobile app
 

Attachments

  • image-3622788094.png
    image-3622788094.png
    178.8 KB · Views: 6,293
  • image-2630215186.png
    image-2630215186.png
    161.4 KB · Views: 6,293
  • image-2832366526.png
    image-2832366526.png
    141.4 KB · Views: 6,293
Local Bike shop I used was in Glasgow Scotland, name of the shop is kinetics, expert advice and very friendly service from the one man outfit ran by Ben Cooper, ironed out a few problems for me there and then. Can't recommend that shop enough. "if there's a tool you need and it's not in that shop then you shouldn't be in a bike shop" brilliant.

Sent using Endless-Sphere Mobile app
 

Attachments

  • image-2594334387.png
    image-2594334387.png
    51.9 KB · Views: 6,290
Well that's the frame away for fabrication :) should be back in around a week then time to put it all together. Can't wait.

Sent using Endless-Sphere Mobile app
 
Well here a quick update as I am in the final stages of comp,Erin, here is the progress I have made but. Have decided to change a few things at this stage to make more space inside the frame and have more strength but ilost those changes as they happen,

Frame sketches, frame laser cut, looks like vaders ship, origami e-bike, box put together, tack welled on frame

Sent using Endless-Sphere Mobile app
 

Attachments

  • image-72679321.png
    image-72679321.png
    38.6 KB · Views: 6,225
  • image-2777644222.png
    image-2777644222.png
    227.2 KB · Views: 6,225
  • image-4109931773.png
    image-4109931773.png
    28.6 KB · Views: 6,225
  • image-1147097190.png
    image-1147097190.png
    185.2 KB · Views: 6,225
  • image-1440545939.png
    image-1440545939.png
    124.2 KB · Views: 6,225
  • image-2463855394.png
    image-2463855394.png
    107.4 KB · Views: 6,225
  • image-3150330848.png
    image-3150330848.png
    110.4 KB · Views: 6,225
  • image-2373289705.png
    image-2373289705.png
    203.8 KB · Views: 6,225
Please look at those pictures in reverse order

Sent using Endless-Sphere Mobile app
 
Before and after frame mods, but I'm going to make a few more changes before finalising and
Older coating then just a case is sticking it all together

Sent using Endless-Sphere Mobile app
 

Attachments

  • image-2946480702.png
    image-2946480702.png
    181.4 KB · Views: 6,225
  • image-638952043.png
    image-638952043.png
    203.8 KB · Views: 6,225
Can someone move this thread to e-bike>photos/video as its quite alot of photos and may be of interest to others

Sent using Endless-Sphere Mobile app
 
Back
Top