NOT hub motor bearings - corrosion inside motor... need help

dnmun said:
the water came in through where the axle bearing is. on the 9 continentsmotors i got from jason at ebikekit.com there is a seal on the axle to keep water out of the hub.

What is the seal made of?

I am going to at least pack a heavy grease around the outside of the bearings after the motor is reassembled. Ideally I am going to replace the bearings with RS series bearings (RS indicates double sealed bearing vs. ZZ single sealed I am told.)

I reassembled and mounted the wheel in the forks and it spins MUCH more freely. But there is still a (much smaller) arc of significant drag as the wheel turns. I can get three to four rotations out of the wheel now instead of the 1.5 before cleaning it. I must have missed a ridge of corrosion... back to the bench!
 
the seal on the 9Continents is just a shaft seal, not a grease seal for the bearings. i think if you start riding th ebike more and it stays hot then it will stay dry. the water inside yours was likely from sitting out in the rain and it runs down the forks into the hub, then never dried out over winter. seems most likely from what you said. these direct drive wheels never spin free, the bemf is always stoppping the wheel when it spins.
 
Well I cleaned the magnets and facing surfaces or the stator arm with Naval jelly and sand paper on the magnets and a VERY small amount of naval jelly and sand paper on the stator arms.

No go.

I am fairly certain my battery packs are fine. I built two additional sets and they all charged fine on my desulfator/conditioner/charger. No matter which pack or packs I put on the motor the power cuts out WAY too soon.

The bearings are fine as far as I can tell. The really high friction is mostly gone after cleaning off the magnets and outer facing surfaces of the stator arms. But there is still some. There is a noticeable judder under load, but the phase sensors all read correctly.

Looks like the corrosion that occurred over the winter affected the windings and the they are probably shorting at higher current. This is what I gathered from a R/C hobbyist friend of mine. So I have no choice but to replace the motor. (sigh) Saving my pennies...

Thanks for everyone advise! I sincerely appreciate it.
@dnmun: I don't EVER leave any of my bikes out in the rain. I am guessing that at the end of last fall, just after daylight savings time changed, was when I neglected the motor. I was caught in a rain storm and my one battery bag shifter and broke three spokes. I had to limp to a bike shop were they repaired the wheel,but by then it was too dark to ride without lights. So I hitched a ride with a friend with the bike in the back of his truck. I unloaded the bike at home and parked it and there it sat. I think that's were the moisture came from and I didn't run it after that until spring so it never heated up to evaporate the moisture. Lesson learned hopefully.
 
I found a washer in one of the two of my golden wheels. It tested fine and after a 6mths I tried to use it and scrapin scratchin. It works fine now and am using it to get some good mileage.

Corrosion? Give the stator a light sand and clean out the magnet ring with a rag. You dont need to take much off. Make sure the housing is clicks the stator in the centre when you put it back together, sort of do the housing bolts up like a car wheel opposites at a time and till you here the statoir click into place.

If you think your windings are shorting after the job look for some scratches on the coils and hit them with some varnish. You really should avod anything acidic around your coils as it will certainly stuff them up.


http://www.thestuccocompany.com/maintenance/Naval-Jelly-as-a-Paint-Remover-221114-.htm
 
dnmun said:
ok, cutting out is not your motor, it is in the controller or battery BMS.

Yes, I know. I am of the opinion that the controller is operating fine and cutting power when the SLAs sag from high current. I am told that damaged windings would do this under load as the shorting wires would result in higher current as the voltage applied went up. I don't have a watts-up or any onboard meter to monitor this. The SLA packs do not have a BMS, only the controller's low voltage cut out.

From just watching the el-cheapo LEDs on the power gauge, the batteries appear to be dropping off just before the power cuts out... just like the controller is supposed to do.

Considering the amount of corrosion on the motor and the fact that the batteries seem to charge properly each time, I think this is the most likely issue.

You could still be right of course, it could be the controller. I just think it's a lot more likely that the already damaged motor is the root of the issue.
 
317537 said:
Corrosion? Give the stator a light sand and clean out the magnet ring with a rag. You dont need to take much off. Make sure the housing is clicks the stator in the centre when you put it back together, sort of do the housing bolts up like a car wheel opposites at a time and till you here the statoir click into place.

If you think your windings are shorting after the job look for some scratches on the coils and hit them with some varnish.

Thank you. That's exactly the procedure I did per the instructions from discussing it with the owner of kit vendor. It's out of warranty so it was either try to fix it or shell out the cash for a new motor.

At this point I am going to save my pennies for the new motor and re-visit the windings later. I'll probably have a look at then again while I'm waiting for the new motor.

One additional comment was made on the vendors forum where on owner accidentally dinged his motor housing while tightening down the bolt on a new kick stand. It was enough to deform the housing enough to throw of the tolerances between the stator and magnets and caused the motor to grind away at itself until it failed.
 
if you don't have money for a wattsup or CA, then go buy a harbor freight voltmeter for $3 and cut off the probes and solder the leads directly onto your battery leads and then tape the voltmeter on the top tube so you can see it.
 
dnmun said:
if you don't have money for a wattsup or CA, then go buy a harbor freight voltmeter for $3 and cut off the probes and solder the leads directly onto your battery leads and then tape the voltmeter on the top tube so you can see it.
Excellent idea! I don't see a $3 meter but I do see a $5 multimeter, two of those and I could hardwire it in to watch volts and amps.
 
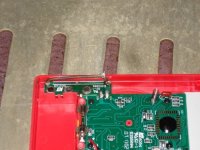
If that is this HF multimeter, the red one in the middle:
dsc01684.jpg
which is just about exactly the same as the yellow one closest to it, be careful using it to measure current directly, because even it's 10A rating is only a short-term (few seconds) rating, or you'll probalby melt the shunt's solder connections, and vibration will shake it out. I speak from experience. :(

http://electricle.blogspot.com/2009/09/melted-multimeter.html
dsc01733.jpg dsc01729.jpg
 
all the electrathon guys had two of them in the cockpit, V&A(but the A scale was the voltage reading on a shunt), every one of them was the harbor freight special. but i bet they don't blow them up as fast as me.

i found that the plugs on the cheapos came loose because they put an extra length of shielding around the end of the plug that goes into the jack built into the pcb ( i presume the extra sleeve is there to prevent accidental electrocution if someone held the opossite end while inserting it into high voltage). i had one that the probe leads would always fall out of because when you pushed the plug into the jack, the jack mounted on the surface of the pcb flexed away to the inside of the case so it did not seat all the way.

to solve that i cut the plastic shield off the plug back up to the main part of the plastic casting to stop the interference from the outer plastic cover, and then i took a piece of a plastic straw from a dutch bros coffee that bill had left behind one day and used it to support the pcb from underneath. i had saved the straw for some unknown reason in my special recycling pile, but i am a reuse to the max kinda guy.

anyway i cut the straw to length and put it inside the case directly under the jack where the lead plugs in so the pcb could not deform and bend away from the incoming jack tip pushing into the spring clip of the plug. the plastic straw was non conductive, went from flakey to total solid reliability, never popped out again.

these little meters will not carry the kinda current that the hubmotors require since they are limited to 10A so you need to use a shunt to measure current, like the electrathon guys do. but that is easy, and overall is still a cheap hack if you can get them on the $3 special.
 
Do you happen to have a link to the hack? My 5 minute google search failed to find one. Before I do a more in-depth search, if you have it handy, it would be helpful. Otherwise I'll just start searching harder. :)
 
amberwolf said:
Do you happen to have a link to the hack? My 5 minute google search failed to find one. Before I do a more in-depth search, if you have it handy, it would be helpful. Otherwise I'll just start searching harder. :)

i don't know that there is one, but you would do something like put ten 10mohm shunt resistors in parallel, inline and put the voltmeter across it. so at 40A, the voltage would be 40mV on the voltmeter reading for the current through the shunt, and power 40^2 X .001=1.6W though.
 
That makes sense. I've also been considering putting a much larger shunt just outside the meter, and a voltage divider of some type from the shunt output to calibrate the reading to the meter's current circuit (with the built-in shunt removed), to allow display of up to 19.99 amps. At least one of the HF analog panel meters is done similarly, with the shunt separate from the driving coil and a potentiometer in the path from the shunt to the coil, to calibrate it.
 
Money. :( That I don't have, and it seems to get worse every time I turn around.

Plus, my whole project is based around recycling, so even when I do have money (or I skimp on groceries to get something, which I can't do very often) I only buy things that are "used" or would potentially have ended up in a landfill if they weren't bought by whoever I bought them from.

Kind of a fragile justification in some cases. :) But I really do try to only use things that are literally someone else's junk, that they would have otherwise thrown away and would never have been reused.

Besides, I really like the challenge of making disparate things work together in ways they were never intended to. ;)
 
I took Karma up on his offer to rebuild my GM motor.
He got it a couple weeks ago and has it fixed already.

Apparently it was the bearings as well as the corrosion on the stator and magnet wheel.
I had already sanded the stator and magnets but apparently not enough as there was still interference between the two. And one sides bearing had too much play in it. I had also looked at the bearings as well and thought they were OK. So I evidently completely underestimated how tight the tolerances are in side the motor. Live and learn.

The videos he posted show the before, inspection and after.

before
http://www.youtube.com/user/karmabike1911#p/u/2/HbDSkI9qq5Q

inspection
http://www.youtube.com/user/karmabike1911#p/u/1/9VjGkqY21NY

after
http://www.youtube.com/user/karmabike1911#p/u/0/l2G-EXd1W60

No rewinding was necessary as he went over the entire stator and found no evidence of shorted wires.

HUGE thank you to Karma!
 
Back
Top