walls99 said:
casainho said:
1. Why did you code in assembly and not in C? C would be easier to understand (at least for me) but I must say your comments on the code are great - thanks.
Sometime I ask myself the same question when I try to re-read my own code
")
. The practical answer is that C would be better for many good reason but not fast enough on the PIC 18F. Also, I'm doing this project for fun and I like the challenge!
Seems you are using your PIC at 40MHz (10MHz each CPU clock cycle). I am using a cheap ($10) 32 bits ARM7 board running at 48MHz, so, 4.8 times more processing power as your board (or even more since your PIC version is 8 bits).
KU63 controller drived my Cute-85 motor with PWM signal of 15.6KHz. The lowest velocity have a 31.6ms period of each phase commutation. The highest velocity, 2.24ms.
I hope my board at 48MHz will work ok. Even I think my e-bicycle motor have a lower rotation than yours motor.
I really think we need a kind of Arduino on e-bicycle controllers, I mean, an OpenSource and well documented controller. Also with commercial success.
I would like to get help, developers and testers joining my effort.
walls99 said:
casainho said:
Could you please give a look to the
schematic KU63 controller I am using and provide your opinion about it?
I did, it's very similar in principle to my controller. It's simple and low cost, so definitely a good starting point.
Good to know that is simple and low cost, that is what we need
-- it works perfectly on my bicycles.
And the KU63 BEMF circuit seems similar to yours, however KU63 BEMF circuit have a signal (PWM), CPU-34 on the schematic, from the controller that interacts with BEMF circuit. This PWM signal is only used at startup/low speed.
Could you please explain your BEMF circuit, logic behind it? How do you use the output of this circuit in the firmware?
walls99 said:
casainho said:
Could you please tell me what strategy I could use to startup the motor in sensorless (my motor don't have hall sensors).
Check above
Positioning by current sensing
Thank you for your explanation! The oscilloscope pictures and your explanation are great - thank you for sharing.
I will energize the motor, using the 6 steps, with 50us each step and look at the current with oscilloscope. I hope to see the same as you. I will report later.
After I will implement your strategy of searching the rotor position and energize the "next" (+120º) phase.
walls99 said:
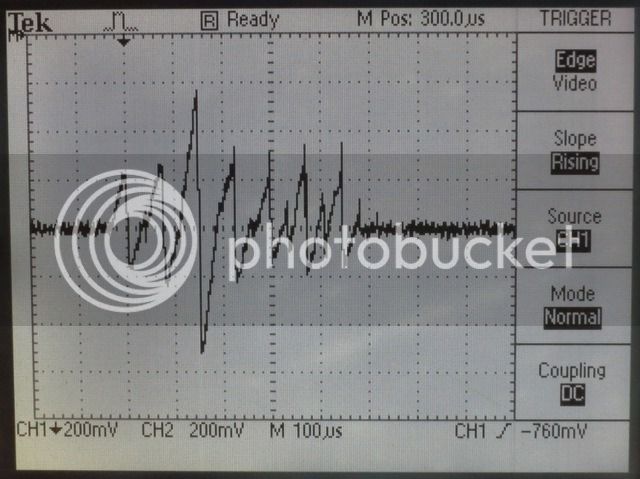
The permeance varies significantly from one electric position to the other and the permeance is minimum for the electrical position that is aligned with the mechanical position. Also with this type of low inductance motor, the 6 positions scanning is fast enough not to reduce the starting torque (~500us in my case). This approach gives me ~90% of the full potential star-up torque at 5ms sampling rate and it's good for speed up to 100RPM where the BEMF is strong enough to detect Zero Crossing...
See below the position sensing cycle, the current is maximum when the permeance is lowest:
The principle is simple, I'm using the standard 6 steps of the trapezoidal control for BLDC Motors, energizing each step for a fixed time (~50us in my case) and measuring the current delta for each step. The step with the highest current delta is is the most likley to be aligned with the mechanical position of the rotor. From there, I energize the mechanical position + 2 steps or 120 degrees advance in constant current/torque mode, wait for 5ms and repeat the 6 steps scan + 5ms drive until the motor speed is fast enough to cover the 2 steps advance in less than 5ms. At this point I switch to the BEMF sensing method.