fourbanger
100 W
Well, for my first pack build I thought I'd make things as difficult as possible for myself so I decided to go with a cylindrical pack using a 4" PVC pipe as a container. Wow. Ok, here goes...
View attachment 17
After scratching the terminals with some medium grit, applying the insulation ring around the positive terminal and pre-soldering both ends of each cell, the next step is to start gluing them into the shape I need.
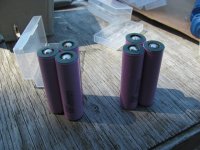
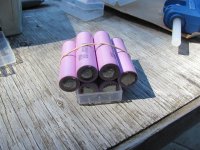
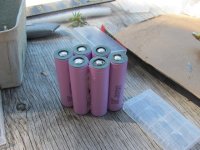
Ok. So once I've gotten 3 groups of six together like this I now need to arrange them all in a happy little circle. BUT, I'm already kind of pissing in the wind not using cell spacers of any kind, so the least I could do is make some attempt at keeping the parallel groups from rubbing up against each other too friendly like.
View attachment 13
View attachment 12
Righteo, now for some insulative material. Packing foam engage!
View attachment 11
View attachment 9
So now for the really gruesome part. I've got a few lengths of 10 gauge marine grade wire that I poached from the marina where I was working at the time. In my infinite wisdom, I thought it would be a good idea to have these act as both parallel and series connectors. All I have to do is cut them to size, strip an appropriate amount of insulation off each end, divide the strands into six "tendrils" of equal number at each end and solder them in series. What could be easier??
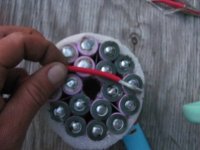
View attachment 7
View attachment 6
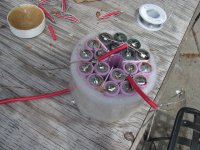
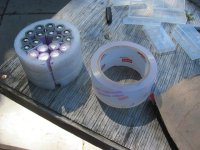
According to my camera roll, this is around the point where I start getting too pissed off/lazy/ashamed to keep taking pictures, so I'll try to give you the play by play and you can use your imagination to follow along. Basically, the next piece of sush is butted up adjacent to the one pictured above, the series connection is soldered and the one is folded over top of the other with a circle of corrugated plastic (a realtor sign, I believe) placed in betwixt. The whole thing is taped up in a cylinder because I don't have any PVC heat shrink and then we sit back any admire our *ahem* handiwork.
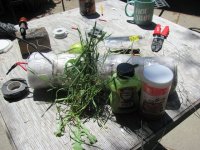
Once the guts are ready, I need to do a bit of light fabridoodling to the end cap of the pipe it's self. Again I slacked on the photos, but drills and little hand files were involved. I'm pretty sure you get the idea..
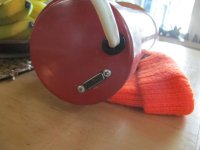
After not having any fun at all and ruining one DB15 trying to solder in the speaker wire, a trip down to the electronics store revealed that these connectors can be had for ribbon wire. All you need to do is clamp the connector to the ribbon and the little teeth cut through the insulation and make the connection. If I'd known I wouldn't have bothered screwing around with speaker wire... Oh well.
View attachment 2
Pretty much done but for the crying at this point. Gently cram the whole works into the pipe and silicone the ends on in such a way that keeps water out but you can still get in with a sharp knife. But yea, it looks a little something like this.
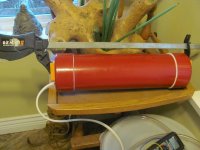
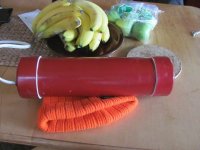
Well I wouldn't try getting on a plane with this thing, but there it is. TADA!
Things I'd do different if I were to do it again: Pretty much everything, really. For starters, trimming that 10awg wire to size and separating the little strands one at a time (and counting them to make sure they are all equal) was just WAY too tedious. I could have achieved the same thing by using six lengths of smaller gauge wire and pigtailing the ends, then stuffing said pigtail down that handy little hole in the center of the, uh, roll. Might even be a good place to use bullet connectors if I need to service a particular P group. On that note, I probably would have been better off segregating each group of cells individually (using PVC heat shrink rather than packing tape) instead of fastening three groups together like I did. Also, it would have made more sense to cut a long strip of packing foam and slide it into the pipe instead of wrapping the groups individually. Real insulation paper of some kind rather than a plastic sign board would have been a boon (in addition to heat shrink) and would have maybe saved me enough space in length to fit a little BMS in there. Maybe. Also also cell spacers of some kind. Even though each cell has a *little bit* of breathing room, if I could find a way to keep them apart even a little bit more while still providing some cushioning from potential impacts, that would be better still.
When it's all said and done I'm actually fairly happy with the end result. This pack attached to the top tube of a "traditional" shaped diamond frame bike will give me the gas tank look I'm after.
So there you have it. I'm sure this has already been done before, but I haven't actually seen any really good examples of it so I thought I'd provide a bad one for you to avoid if you think you'd like to emulate this sort of thing.
As for me, I do believe I'll build myself a spot welder and the next pack I put together will be shaped like a RECTANGLE!
View attachment 17
After scratching the terminals with some medium grit, applying the insulation ring around the positive terminal and pre-soldering both ends of each cell, the next step is to start gluing them into the shape I need.


Ok. So once I've gotten 3 groups of six together like this I now need to arrange them all in a happy little circle. BUT, I'm already kind of pissing in the wind not using cell spacers of any kind, so the least I could do is make some attempt at keeping the parallel groups from rubbing up against each other too friendly like.
View attachment 13
View attachment 12
Righteo, now for some insulative material. Packing foam engage!
View attachment 11

View attachment 9
So now for the really gruesome part. I've got a few lengths of 10 gauge marine grade wire that I poached from the marina where I was working at the time. In my infinite wisdom, I thought it would be a good idea to have these act as both parallel and series connectors. All I have to do is cut them to size, strip an appropriate amount of insulation off each end, divide the strands into six "tendrils" of equal number at each end and solder them in series. What could be easier??

View attachment 7
View attachment 6

According to my camera roll, this is around the point where I start getting too pissed off/lazy/ashamed to keep taking pictures, so I'll try to give you the play by play and you can use your imagination to follow along. Basically, the next piece of sush is butted up adjacent to the one pictured above, the series connection is soldered and the one is folded over top of the other with a circle of corrugated plastic (a realtor sign, I believe) placed in betwixt. The whole thing is taped up in a cylinder because I don't have any PVC heat shrink and then we sit back any admire our *ahem* handiwork.

Once the guts are ready, I need to do a bit of light fabridoodling to the end cap of the pipe it's self. Again I slacked on the photos, but drills and little hand files were involved. I'm pretty sure you get the idea..

After not having any fun at all and ruining one DB15 trying to solder in the speaker wire, a trip down to the electronics store revealed that these connectors can be had for ribbon wire. All you need to do is clamp the connector to the ribbon and the little teeth cut through the insulation and make the connection. If I'd known I wouldn't have bothered screwing around with speaker wire... Oh well.
View attachment 2
Pretty much done but for the crying at this point. Gently cram the whole works into the pipe and silicone the ends on in such a way that keeps water out but you can still get in with a sharp knife. But yea, it looks a little something like this.


Well I wouldn't try getting on a plane with this thing, but there it is. TADA!
Things I'd do different if I were to do it again: Pretty much everything, really. For starters, trimming that 10awg wire to size and separating the little strands one at a time (and counting them to make sure they are all equal) was just WAY too tedious. I could have achieved the same thing by using six lengths of smaller gauge wire and pigtailing the ends, then stuffing said pigtail down that handy little hole in the center of the, uh, roll. Might even be a good place to use bullet connectors if I need to service a particular P group. On that note, I probably would have been better off segregating each group of cells individually (using PVC heat shrink rather than packing tape) instead of fastening three groups together like I did. Also, it would have made more sense to cut a long strip of packing foam and slide it into the pipe instead of wrapping the groups individually. Real insulation paper of some kind rather than a plastic sign board would have been a boon (in addition to heat shrink) and would have maybe saved me enough space in length to fit a little BMS in there. Maybe. Also also cell spacers of some kind. Even though each cell has a *little bit* of breathing room, if I could find a way to keep them apart even a little bit more while still providing some cushioning from potential impacts, that would be better still.
When it's all said and done I'm actually fairly happy with the end result. This pack attached to the top tube of a "traditional" shaped diamond frame bike will give me the gas tank look I'm after.
So there you have it. I'm sure this has already been done before, but I haven't actually seen any really good examples of it so I thought I'd provide a bad one for you to avoid if you think you'd like to emulate this sort of thing.
As for me, I do believe I'll build myself a spot welder and the next pack I put together will be shaped like a RECTANGLE!


