Phat Bike Build

The pic I have above is an old pic. I moved the controller to behind the seat post. switch is facing up, wires down. Winter is almost over here and Ill keep it where Ive got it. Dont want the hassle of moving it into the bag :p
 
Kinni420 said:
any chance you can give an ACTUAL link to that crank set you bought? I still need one but so pricey where Im looking.


Try this link, lemme know if it works:

http://www.vueltausa.com/components/cranksets/road-cranksets/corsa-pro-crankset-1.html

I put this on the Phat Bike and it turned into a wholly different machine!
 
That's a good price for a road crankset. Ebikes need that 52/53 or larger chainring. Just beware of clearance issues on some full suspension or other mtn bikes. (with the chainring)
 
veloman said:
That's a good price for a road crankset. Ebikes need that 52/53 or larger chainring. Just beware of clearance issues on some full suspension or other mtn bikes. (with the chainring)

neptronix turned me on to it - he puts those cranksets on all his conversions. I think his "da bomb" has one on it. I could not be happier with it, and it's made tremendous difference in the performance of the bike.

I'm not quite sure how best to describe the sensation of pedaling with that crankset. It does take some work and sometimes I even spin with it, but it's about 1/2 the effort of a manual bike to maintain 20-23mph. I can get to work fresh enough not to need a shower.

But on the way home, I can work it harder and move faster: I can sustain 23-25mph when working hard. I get home somewhat sweaty but not terribly so, and certainly far less than a manual bike.

More test data soon...
 
How's the clearance of that 53 chainring in relation to the frame? Id hate to purchase this and find that it hits the frame when I put it on. It would be a help if you could grab a ruler and let me know the approximate radius of that chain ring (In mm please!) 8)
Also, Road cranks generally have a smaller Q-factor than MTB cranks. Any issues with your new set rubbing the EV Falcon bag? I may just have to get a longer spindle length bottom bracket. I think Im running a 110 atm but not 100% sure. Might push up to a 117 or even a 122. I just dont want to throw off the chainline too much but considering Ill rarely be in the lower gears, that shouldn't be too much of an issue.

Lots of Bottom Brackets for pretty cheap, click here!
 
Kinni420 said:
How's the clearance of that 53 chainring in relation to the frame? Id hate to purchase this and find that it hits the frame when I put it on. It would be a help if you could grab a ruler and let me know the approximate radius of that chain ring (In mm please!) 8)

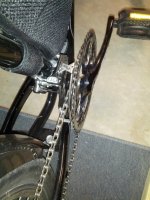
Easy Peasy! 8-5/8" diameter on the 53. I was a tad liberal with measuring and ran the tape measure over top of the crank attachment point so it's probably a tiny bit smaller, I'm guessing 8-9/16" or so.

Here's a view from slightly edge-on and behind, over the chainstay. If you look closely, you can see that there's some outward offset where the crankset attaches to the square taper bottom bracket. The crank forward frame of the Expedition Sport helps a great deal for chainstay clearance. It's kinda like a Yuba "Mini".

new_crankset_clearance.jpg

The biggest problem I had was getting the front derailleur moved and getting it to clear the battery bag. The bag sits right down on the front derailleur. It still works, but it's probably pushed toward the bag as far as it can be and still work dependably.
 
Heh, you know i just end up removing the front derailleur on my bikes just for that reason. The other reason, is that when it gets out of alignment, it's a pain in the ass to deal with. And on an electric bike with just the right gear ratios, you really don't need the damn thing anyway.

Dude, that bike is long. Definitely qualifies as a midtail. With a 24" wheel out back, you could even likely jam some batteries behind the seat tube, or mount a chain driven motor.

You could move the front seat forward a bit and adjust the bars to exaggerate this effect, if it's comfortable positioning anyway.
 
the ONLY reason I wouldn't remove my front derailleur is for the chain-guide effect. Tossing a chain at 40 mph could be a disaster. Cheaper than spending 50-250 bux on a regular chain-guide/tensioner and a one speed crank arm+BB. Ill never shift the front again. I plan on adjusting the front D screws to hold the chain in place on the big sprocket and removing the front shifter assembly completely except for the D itself.

JKB...Did you measure the spindle length on your BB before installing? If its 110-113mm I think it will work for me and thanks for the info. Both you and Neptronix! BTW hi again Nept! It snowed a foot today here but i still went for a sketchy ride in the slush!
 
Kinni420 said:
the ONLY reason I wouldn't remove my front derailleur is for the chain-guide effect. Tossing a chain at 40 mph could be a disaster. Cheaper than spending 50-250 bux on a regular chain-guide/tensioner and a one speed crank arm+BB. Ill never shift the front again. I plan on adjusting the front D screws to hold the chain in place on the big sprocket and removing the front shifter assembly completely except for the D itself.

JKB...Did you measure the spindle length on your BB before installing? If its 110-113mm I think it will work for me and thanks for the info. Both you and Neptronix! BTW hi again Nept! It snowed a foot today here but i still went for a sketchy ride in the slush!

No, and now I wish I had. I need to go buy the crankset tools (I borrowed to do the swap). Then I could pull everything off and measure.

I THINK I've got a 110 mm BB, but I don't know. Are there any tricks for measuring with the crankset on?

JKB
 
Yo kinni - in my experience, keeping the front derailleur only saves your butt if you've got a bottom bracket that is really hosed and has wobble in it. Then when you hit a bump, yeah - it can come loose. I had that situation for a while until i figured out what was going on.

I remember the crappy streets in Colorado, and we have streets like that here in Utah as well. I know why you'd worry!
Been slushy over this way too.

I run large chainrings, so my chains get stretched quite far, thus they are more tense than normal.
Even on my super long cargo bike, i don't need the front derailleur to prevent my chain from popping off - just lots of tension! you can get extra tension by removing links too, by the way.

That's just my experience. Mind you, i don't do curb drops and jumps and such, i just ride on the road and avoid the rocky stuff, so i probably have an easier time.
 
No, and now I wish I had. I need to go buy the crankset tools (I borrowed to do the swap). Then I could pull everything off and measure.

I THINK I've got a 110 mm BB, but I don't know. Are there any tricks for measuring with the crankset on?

JKB

Why fix it if it aint broke? Youve got a working part. Dont mess with it. My LBS will lend me the tools to do it in 1 minute for free if I buy stuff from them. You dont need to measure if youre happy with what youve got. Im just wondering so I dont waste 30 on a crank i cant use.

No tricks I know of for that measurement other than pulling the cranks.
 
The Phat Bike gets a new motor, a Crystalyte HS3540. Some things to note:

- The Crystalyte HS3540 is 33% bigger than the 9c 2810 - hoping for some more speed.

- Wiring for the Crystalyte is different from the 9c. I was lucky enough to buy a "matched set" to begin with. Now I'm having to search the forums heavily for information on pairing the motor and controller: http://endless-sphere.com/forums/viewtopic.php?f=2&t=31706&start=15

- When switching from one motor to another, you may have to hard-reset your CA: http://endless-sphere.com/forums/viewtopic.php?f=2&t=32844&hilit=crystalyte+wire+colors&start=25#p478623

Word of warning to people assembling an ebike for the first time: make sure where-ever you get the motor wheel and the controller, that you know how the wires need to be connected. If you are using a CA, make sure the controller works with the CA and that you know where to find the info on how to connect it to the controller. Right now the clearest info I'm finding is in one of pendragon's threads:

Infineon 45A/Original 28A to X5304
EDIT1: REMOVED THIS INFORMATION FROM THIS POST: THE HS3540 DOES NOT WIRE IN LIKE THE X5304. PICS OF ACTUAL TBD.
EDIT2: YOU DO NOT NEED TO RESET THE CA: THAT ONLY RESETS THE ACCUMULATING DATA, NOT THE PARAMETER SETTINGS.

The objective to replacing the motor is to get a little bit more speed and to achieve regen braking. The design of the Crystalyte motor puts the wiring exit out the left side plate of the motor (not interfering with the brake disc) allowing the installation of TWO torque arms without having to remove the wiring connector. This allows the implementation of regen with no problems from the added stresses in the opposite direction.

The Crystalyte wheel needs some work, it's too out of true to use as-is. Even thought it's installed, I'll have to remove it from the bike, take off the tire and tube, and re-true the wheel. The wobble in the rim and spokes is too severe to ride. Even so, the "fit and finish" of the motor is good and the axle fits well between the dropouts of the phat bike.

Fingers crossed for good weather for a test ride this weekend.
 
so you going to use a large spoke key to true it up? if i was you i would flip the bike and have a go at rueing it up, you can use a cable tie or two coming off the crame as a spacer to the rim.
there should be some tutorials out there... i think 12g spokes need 4mm spoke key.
 
pendragon8000 said:
so you going to use a large spoke key to true it up? if i was you i would flip the bike and have a go at rueing it up, you can use a cable tie or two coming off the crame as a spacer to the rim.
there should be some tutorials out there... i think 12g spokes need 4mm spoke key.

I have one of those big 'ol giant Chinese spoke wrenches, got it from Methods. It's like a steel hockey puck. It has the slot to accommodate the big ones. :twisted:

You're right: I could definitely rough true the wheel on the bike and will do that before I install the windshield. There's a good chance that 16 lb wheel won't fit my truing stand without breaking it, so on-the-frame truing might be my only choice - we'll see.
 
Quick update on the Phat Bike:

1) No commutes in awhile. About four good test rides with the HS3540. Lord have mercy it's nice!

2) The HS3540 "appears" to be MORE EFFICIENT than the 9c. I am skeptical, so I am still testing, but it seems to be.

There's a factor here I don't mention often: I am a "big boned" rider at 260lbs. I present both heavy loading and significant wind resistance, which I think puts the 9c deeper into saturation, where the HS doesn't go quite as far into saturation. I also think the 9c makes more heat at 20mph than the HS does. Would be nice to have temp sensors to verify that opinion.

Here's the CA after the ride. It's the northbound leg of a ride I've made many times with the 9c 2810:

HS3540_at_low_speed.jpg

I like the 9c - it works just fine. But the HS sure is delux. First thing you'll see is now nice the hardware and axle are: more precision than the 9c wheels. The rim and spokes are nicer and since the wires exit out the side of the motor case, you can put a torque arm on both sides of the dropouts. I am extremely pleased with the design and the way it works, I really like having two torque arms on an aluminum bike.

3) BAD NEWS: THE HS3540 MOTOR WHEEL IS DOWN FOR REPAIRS.

Until the HS gets rebuilt, the 9c is on the bike and that's what will be used on the upcoming commute runs. I seem to get better and better about installing these motor wheels the more times I do it: I've sorted out all the washer placements, the freewheel sits better on the motor and the rim is in the right place between the chainstays, so the left rear brake pad doesn't scrub any more.

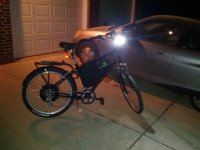
Here's a photo from tonight's test run showing the new crankset, new freewheel, 800 lumen ebay light and Blackburn rear bike light in action. The astute observer will see that the chain's not long enough - I have a to-do item to lengthen the chain to accommodate the new 53T chainring.

Phat_Bike_Rides_Again.jpg

JKB
 
Nice.. 19wh/mi is really impressive. :mrgreen:
 
neptronix said:
Nice.. 19wh/mi is really impressive. :mrgreen:

Not bad for a 260lb meat parachute! :oops:

I love this bike. If I can just get the motor wheel issues settled and refine the controller wiring and lighting, I'll be in business. Oh, and yes, the cupholder. I NEED a good cupholder. I want to be able to buy a huge "big gulp" style 44 oz drink, something that would give Michael Bloomberg nightmares. I want to carry it on the bike, sipping in luxury as I ride to work.
 
jkbrigman said:
neptronix said:
Nice.. 19wh/mi is really impressive. :mrgreen:

Not bad for a 260lb meat parachute! :oops:

I love this bike. If I can just get the motor wheel issues settled and refine the controller wiring and lighting, I'll be in business. Oh, and yes, the cupholder. I NEED a good cupholder. I want to be able to buy a huge "big gulp" style 44 oz drink, something that would give Michael Bloomberg nightmares. I want to carry it on the bike, sipping in luxury as I ride to work.


haha, that will increase your aero drag!

I think you should do a tail box, could help considerably since you are sitting upright. Put your stuff in it and definitely not in a wind catching pannier!
 
veloman said:
haha, that will increase your aero drag!

I think you should do a tail box, could help considerably since you are sitting upright. Put your stuff in it and definitely not in a wind catching pannier!

I have one - a near-perfect little plastic box with a clip-on top. I can't wait to try it out.

I have to move my controller to the seat tube (and modify the wiring on it). That will free up the top of the rack for this "tailbox tote".

When you see it you'll LMAO. It's ugly as sin, but the shape is perfecto.

JKB
 
I can't say enough good things about the need for improving motor wheel builds. If it doesn't have eyelet rims and quality spokes (I like 13/14ga butted) it will always need attention. Build with decent stuff mentioned you may not need to ever touchup again.

Unless it's dirt cheap I won't even consider buying pre-built motor wheels anymore. Learn to order spokes and lace yourself, kicks ass!
 
Well actually cell_man ( now em3ev ) spokes up quite a nice wheel, though i wouldn't bother mailing him your crystalyte HS.. :lol:

Some other vendors can do a proper wheel build for a fee.

My HS3548 in a 20" had the original 12ga crystalyte rim and spokes and was fine, but as your wheel gets taller, yeah, build quality gets more important.
 
Ykick said:
I can't say enough good things about the need for improving motor wheel builds. If it doesn't have eyelet rims and quality spokes (I like 13/14ga butted) it will always need attention. Build with decent stuff mentioned you may not need to ever touchup again.

Unless it's dirt cheap I won't even consider buying pre-built motor wheels anymore. Learn to order spokes and lace yourself, kicks ass!

Ykick, THANK YOU for that feedback, it makes me feel better. I'm getting Sapim 13ga spokes, which I understand are pretty good. In your opinion, do you end up with a superior wheel build for less money if you build it yourself?
 
jkbrigman said:
Ykick, THANK YOU for that feedback, it makes me feel better. I'm getting Sapim 13ga spokes, which I understand are pretty good. In your opinion, do you end up with a superior wheel build for less money if you build it yourself?

I used Sapim 13-14ga butted spokes. 13ga end fits the 9C hub perfectly (dunno 'bout Crystalyte?) while 14ga end fits eyelets and tensions nicely.

I'm an amateur wheel builder but I practiced on some old rims/spokes before diving in to lace motor wheels by necessity. Like most here, my 1st motor wheels were the usual Chinese crap and required constant truing/tensioning.

Best thing that could've happend was hitting a nasty hole ruining my stock 9C rim - that's when I sourced butted spokes from JRH, Mammoth Fat rim from somewhere and rebuilt it. Nearly 1-1/2 years, 4,000 miles later it hasn't been touched by a spoke wrench yet. That's why I will never, ever bother with pre-built wheels using those common Chinese eBike components. Justin and Paul may have this figured out, I dunno?

To answer your question, even as an amateur wheel builder I built a much better wheel than any of the 5-6 Conhis or 9C motor wheels I had bought up to that point. Mechanical skills can vary so it's hard to say but if I could do it, most people around here probably can.
 
So the re-installed the 9c 2810 motor wheel looks like it'll do the job, although a tad bit slower. I'll run with it until the HS3540 is back in action.

5 mile test ride today burned 1.5Ah, which means I can make the 33 mile ride to work with 10Ah if I'm careful. I've got a good route planned that will get me there without as much battery-killing up-and-down. The 9c 2810 can do the job at 72v, especially if I'm willing to do 18-20mph average and put in some work to get motor efficiency where it belongs.
 
Another short ride on the Phat Bike on mostly level ground, one slight uphill. 5 miles for 1.5Ah at 73v. Not bad. No commute yet until I get the chain lengthened and the bike light "finished". Soon to come: double-leg kickstand. Seems essential for dealing with a fully loaded ebike or fixing a flat on the motor wheel. I hear good things about the Pletscher product....

EDIT: Update Sunday 4/28/2013:
Got the chain lengthened - wow, now the derailleur shifts correctly with only very minor adjustment. How about that - the chain was so short, it was pulling the derailleur out of alignment with the freewheel.

We had great weather here this past Saturday, so I took advantage of it to ebike the 33 mile ride down to the LBS and back. (to buy the piece of chain) Had a strong headwind all the way in but the crankset and freewheel allowed me to contribute power to overcome the added resistance. Wh/mi still running around 20 for an average speed of over 18mph. The ride to the LBS is more challenging than the commute, proving that the bike can still do the job even after all the changes, mods and unplanned twists in the build. Yay LiPo!

LBS Trip1.jpg

LBS Trip2.jpg

Total Ah for the trip was 9.772, which is an improvement: usually 33 miles would need 10 Ah or more.

Started making the parts to "finish" the 800 lumen ebay headlight. (recall that it has an open hole where the wiring comes out - not a reasonable state for the light to be used) Cut a backside cover out of sheet aluminum using a fly cutter and drilled some screw holes. I'll install a switch and a power jack on the backside cover. This will provide the option of using any 12v power source instead of only the main battery.
 
Back
Top