Tomblarom
10 W
- Joined
- Jul 20, 2018
- Messages
- 93
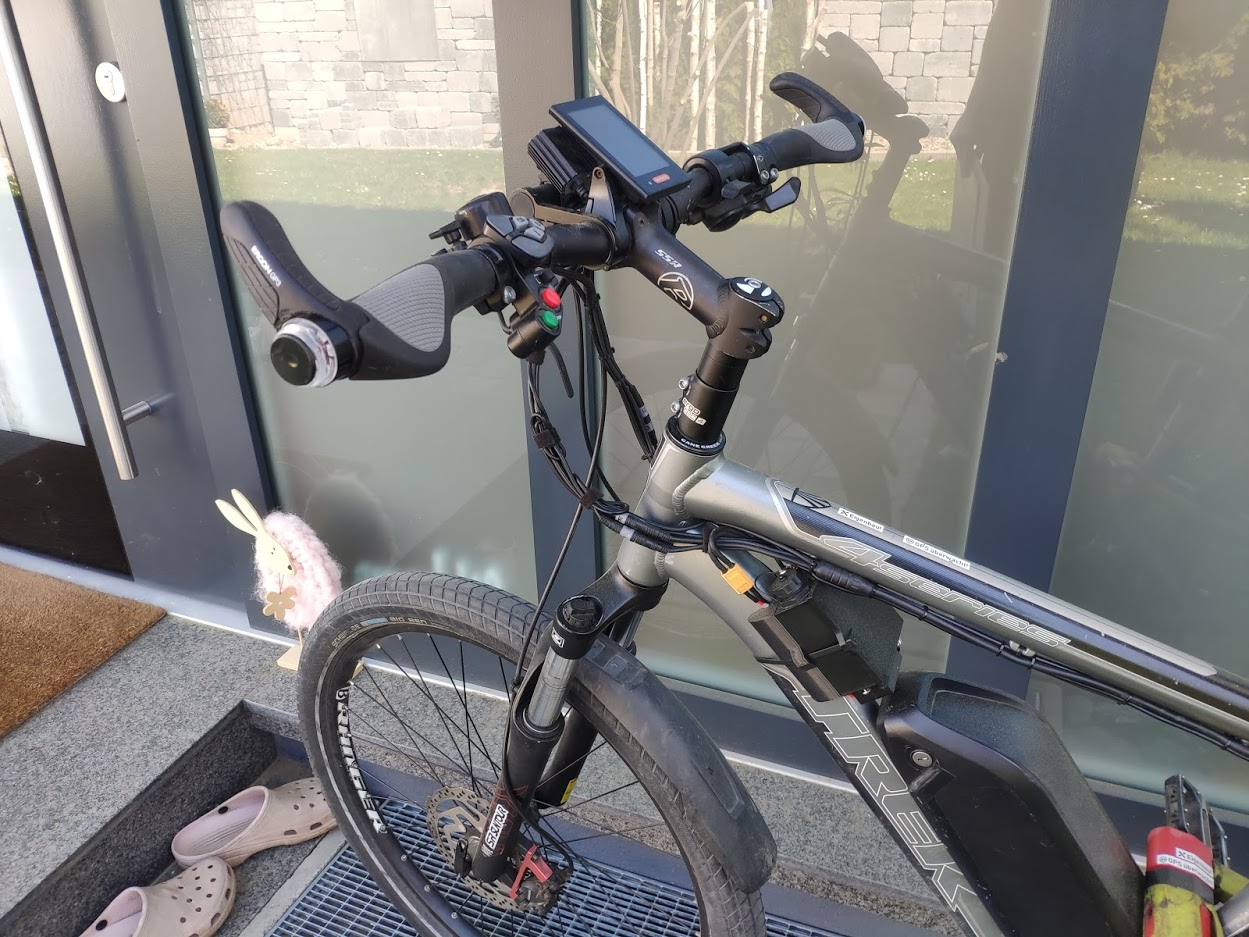
Because I live in a part of Europe where you are not allowed to ride unregistered bikes over 25km/h, I needed some kind of "protection". At the same time, I wanted to have brake-, turn- and front-light control, to be more visible to cars (and for fun, haha). My Bafang DP-18 display has a light switch + light sensor. Maybe this will come in handy later?
 Codebase and Credit:
At first I tried to adapt the display, but since it is waterproof and not too many developers work on it, I rather looked for other solutions. During my research I came across this thread (https://endless-sphere.com/forums/viewtopic.php?t=94850). MCC did a great job and my code is completely based on his findings. All credits to him! What I additionally did was to design a waterproof 3D-printed housing and connect brake-light, front-light, turn-lights, handlebar switches. All icons in this thread are from flaticon/freepik.
I extended the code of MCC, to fit my needs and was able to read light- and brake-states, through the corresponding HEX-values. Light control is now event-based (button, state-change). It took me quite a while, to figure out how to place the components, cables and which parts to use, to make it waterproof. I've pretty advanced Fusion 360 skills, which speeded up, the designing-progress, but still took me a few iterations (prototype images) to make it perfectly fit onto my ebike frame. (I'm also working on a HEVO)
 What is this?
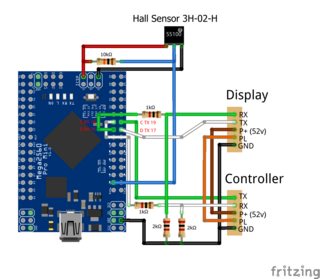
This box is a little circuit, that sits in between controller and display. It forwards each message, between controller and display, but is capable of reacting to specific events. The box has a small hall sensor+magnet, which reprogramms the controller in case you remove the magnet on the outside. If you're getting pulled over, you can seamlessly remove the magnet and thumb throttle will be disabled and also the maximum speed will be limited to 25km/h.
 Schematics:
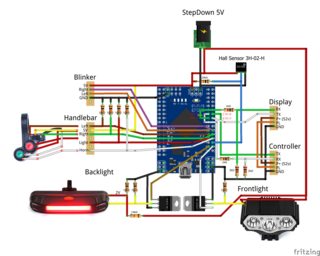
To me the schematics MCC made were quite confusing and I redesigned it using Fritzing. This version shouldn't have any flaws, since I used it to build my own version:
 Case building:
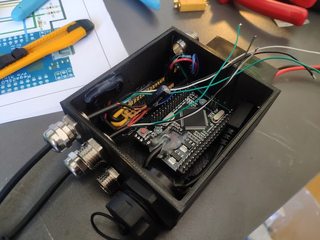
For a clean wiring setup, I used a dupont connector + pin-header system. Cable ties are used to mount it to the frame.
To cleanly distribute the power, I made a small power strip:
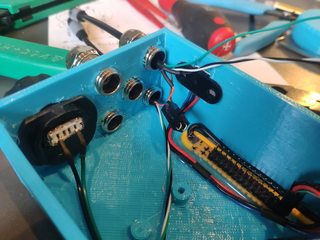
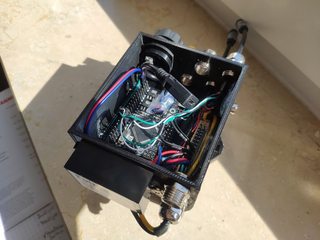
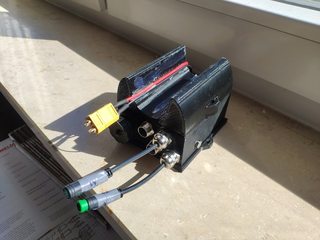
I replaced the surface mounted Micro-USB with an flexible female Micro-USB cable. I applied hot-glue to the surface of the curved piece, to prevent it from sliding down the frame:
 Power:
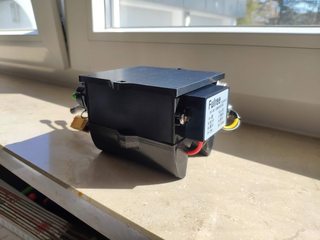
Typically you do not have 5V 3A on your ebike, since battery voltage is around 36-52V. I integrated a small 52V to 5V step-down from Fulree into my case design:
 Frontlight:
For this I used a basic XML T6 bike LED, cut the USB-plug and control it over pwm using a mosfet (0 or 255). This light has 4 states: off, low, mid, high. I ordered a second one to play around with the PCB. I want to skip the first state, so that it directly powers on in low, when the arduino turns it on.
--> Need help on this!
 Backlight:
Similar thing for the backlight. Bought a cheap 3V LED bar and made it dimmable with mosfet and some resistors.
 Turn-Lights:
The turn-lights I could find on Aliexpress were all 12V. Because of that, I replaced them with 5V RGB Rings. (Maybe add some rainbow effects in the future?) This turn-light kit is pretty neat, but break easily, if your bike falls over. I'm currently designing a 3D-printed version for the clear-plastic caps.
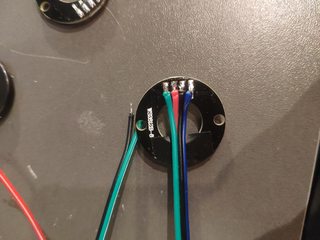
You need to remove the four small spacers and isolate the inside with electrical tape:

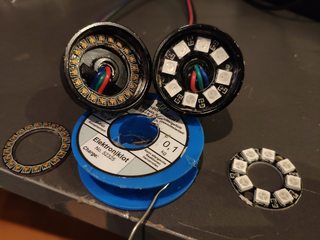
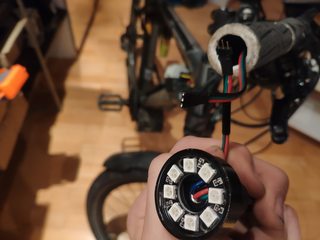
I also tried the SparkFun LuMini LED Ring 1 Inch, but the consumption is higher and the brightness lower, as the cheap ones. For the case I need to adapt things on my handlebar, I used a small RGB-pin-connector-pair to unplug the lights:
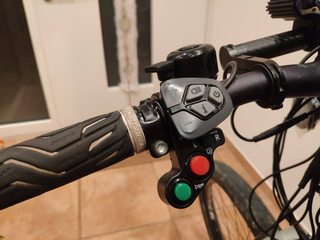
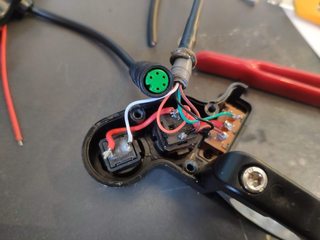
I used 4-pin HIGO cables for the turnlights and one 5-pin HIGO cable to replace the original one of the handlebar switch:
 Where to buy?
I can imagine, somebody comes across this and wants to buy it. Nope, this is a DIY-project. Get your ass up and start building! Here are the parts you need:
 Sources:
I attached a .zip that includes the following files:
So what else is useful on a bike that's way too fast and illegal? You're right! A 60V 105db horn that's way too loud and illegal! https://aliexpress.com/item/4000203825120.html (this addition is coming soon! parts are ordered)

At first I tried to adapt the display, but since it is waterproof and not too many developers work on it, I rather looked for other solutions. During my research I came across this thread (https://endless-sphere.com/forums/viewtopic.php?t=94850). MCC did a great job and my code is completely based on his findings. All credits to him! What I additionally did was to design a waterproof 3D-printed housing and connect brake-light, front-light, turn-lights, handlebar switches. All icons in this thread are from flaticon/freepik.
I extended the code of MCC, to fit my needs and was able to read light- and brake-states, through the corresponding HEX-values. Light control is now event-based (button, state-change). It took me quite a while, to figure out how to place the components, cables and which parts to use, to make it waterproof. I've pretty advanced Fusion 360 skills, which speeded up, the designing-progress, but still took me a few iterations (prototype images) to make it perfectly fit onto my ebike frame. (I'm also working on a HEVO)

This box is a little circuit, that sits in between controller and display. It forwards each message, between controller and display, but is capable of reacting to specific events. The box has a small hall sensor+magnet, which reprogramms the controller in case you remove the magnet on the outside. If you're getting pulled over, you can seamlessly remove the magnet and thumb throttle will be disabled and also the maximum speed will be limited to 25km/h.


To me the schematics MCC made were quite confusing and I redesigned it using Fritzing. This version shouldn't have any flaws, since I used it to build my own version:


For a clean wiring setup, I used a dupont connector + pin-header system. Cable ties are used to mount it to the frame.
To cleanly distribute the power, I made a small power strip:


I replaced the surface mounted Micro-USB with an flexible female Micro-USB cable. I applied hot-glue to the surface of the curved piece, to prevent it from sliding down the frame:


Typically you do not have 5V 3A on your ebike, since battery voltage is around 36-52V. I integrated a small 52V to 5V step-down from Fulree into my case design:


For this I used a basic XML T6 bike LED, cut the USB-plug and control it over pwm using a mosfet (0 or 255). This light has 4 states: off, low, mid, high. I ordered a second one to play around with the PCB. I want to skip the first state, so that it directly powers on in low, when the arduino turns it on.
--> Need help on this!

Similar thing for the backlight. Bought a cheap 3V LED bar and made it dimmable with mosfet and some resistors.

The turn-lights I could find on Aliexpress were all 12V. Because of that, I replaced them with 5V RGB Rings. (Maybe add some rainbow effects in the future?) This turn-light kit is pretty neat, but break easily, if your bike falls over. I'm currently designing a 3D-printed version for the clear-plastic caps.
You need to remove the four small spacers and isolate the inside with electrical tape:


I also tried the SparkFun LuMini LED Ring 1 Inch, but the consumption is higher and the brightness lower, as the cheap ones. For the case I need to adapt things on my handlebar, I used a small RGB-pin-connector-pair to unplug the lights:


I used 4-pin HIGO cables for the turnlights and one 5-pin HIGO cable to replace the original one of the handlebar switch:


I can imagine, somebody comes across this and wants to buy it. Nope, this is a DIY-project. Get your ass up and start building!
Code:
  Component    Pcs               Specification                                    Link
 ------------ ----- --------------------------------------- ------------------------------------------------
  Power          1   DC10-72V to DC5V3A                      https://aliexpress.com/item/4000109468868.html
  Case           6   PG7 Metal Caps                          https://aliexpress.com/item/32834631752.html
  Case           2   HIGO Bafang Cable 5-pin                 https://aliexpress.com/item/32856668603.html
  Case           2   HIGO Bafang Cable 4-pin                 https://aliexpress.com/item/32856668603.html
  Case           1   XT60 Male-Female Pair                   https://aliexpress.com/item/33061763696.html
  Case           1   RobotDyn Mega 2560 PRO (Embed) CH340G   https://aliexpress.com/item/32801785024.html
  Case           1   Micro-USB Cable Female                  https://aliexpress.com/item/32921536780.html
  Case           1   Hall Sensor 551000 3H-02-H              https://www.conrad.de/en/p/503655.html
  Case           1   USB-Port USB 3.0 waterproof             https://www.ebay.com/itm/124268298608
  Turnlights     2   WS2812 5050 RGB LED Ring                https://aliexpress.com/item/32833682980.html
  Turnlights     2   12V Bike LED Turnlights kit             https://aliexpress.com/item/4000004053269.html
  Turnlights     1   Handlebar Switch Panel                  https://aliexpress.com/item/32974601131.html
  Frontlight     1   Cree XML T6                             https://aliexpress.com/item/4001151370013.html
  Backlight      1   Bike Rear LED Bar                       https://aliexpress.com/item/4000810643579.html
I attached a .zip that includes the following files:
Code:
           File                                Description
 ------------------------- ---------------------------------------------------
  bafang_exBox-cs_v1        Schematics for ExtensionBox (without lightsystem)
  bafang_exBox-ls_v1        Schematics for ExtensionBox
  exBox_frame-base_v1.stl   3D-Model for exBox frame base
  exBox_housing_v1.stl      3D-Model for exBox housing
  exBox_lid_v1.stl          3D-Model for exBox lid
  bafang_light_extension    Arduino project
So what else is useful on a bike that's way too fast and illegal? You're right! A 60V 105db horn that's way too loud and illegal! https://aliexpress.com/item/4000203825120.html (this addition is coming soon! parts are ordered)

