• Howdy! we're looking for donations to finish custom knowledgebase software for this forum. Please see our Funding drive thread

Raised from the dead- 40ah lifepo4 cells at 0v

Riles

10 mW
Joined
Apr 30, 2008
Messages
20
I just acquired a 16s2p lifepo4 pack basically for free. It consists of 32 40ah Mottcell lifepo4 cells. Here is the catch- a balancer was attached to these things for the past year while the kit was sitting on the shelf, meaning they are all at absolutely 0v. My DVM reads to the thousandth of a volt, and I've seen as low as .000 and as high as .008 volts. On visual inspection, I can see that two of the cells have physical deformities- it looks like they have leaked something, or perhaps something else leaked onto them. The other 30 have nothing visually wrong with them. After doing some research on the cells, the Mottcell cell consists of 1s3p ~13ah cylindrical cells, so any Mottcells that are too far gone will be opened up to see if any of the cylindrical cells can be salvaged for future projects.

I've been working my way through the cells, 1 cell at a time, with a HobbyKing HK4B6 charger (4 channels, max output for each channel is the lesser of 5a or 50w per channel) and have been having decent success- I've reached "fully charged" status on 10 of the cells. 8 of the cells took between 35 and 45 amp hours during charging, and 2 only took about 20 amp hours. These capacity ratings are somewhat of a misnomer since the charge cycle takes anywhere from 10-20 hours, so some of the power coming out of the charger is lost to heat or other inefficiency. The HK4B6 puts 5 amps into the cell until it hits 3.6v, then the current drops. For the 2 that only took 20ah, the current dropped to <1a very shortly into the charge cycle. In reality, it means that 8 of the cells took probably somewhere between 30 and 40 amp hours and the other two took somewhere between 15-20 amp hours. I'm not putting too much credence into the first charge cycle, but will be more interested in how much charge they can take after a decent discharge cycle.

While I continue to work my way through the cells, I've built a discharger consisting of 10x 50w 12v halogen bulbs. By my math, I should be able to draw a 34a load with all of the bulbs hooked up if I run 3 cells in series, but only about 10 amps if I run a single cell at a time (circuit resistance is .288 ohms, yielding ~11 amps at 3.3v and ~34a at 9.9v). I'll probably group the cells together by relative capacity and run 3s1p at a time just to save time- I only get about an hour a night to work on this project. I will use a lifepo4 alarm set to 2.8v/cell to monitor the discharge and prevent further damage to these cells. I haven't started the discharge process yet but will likely get going on it sometime in the next couple days.

The ultimate goal is to get at least 16 of these up and running to use in a mild PHEV conversion for my Avalon-hybrid based Lexus ES 300h. That's how I acquired the cells- I bought an old PHEV conversion kit for roughly the price of the parts excluding the batteries, and the batteries were included for free. At the very least, I hope I'll be able to salvage some of the cylindrical sub-cells for use in an ebike battery. When the kit was running, it was pulling about 55 amps from the pack, which is under 1c discharge (80ah pack). If I can only get half of the pack going, I'll have to turn the power down on the PHEV converter to keep the draw around the 1c mark.

Just bouncing my methodology off of the group- anything you would change or add to my procedures to attempt to bring these back from the dead? I fully understand that I may get little usable capacity out of these things given how long they sat at 0v, but since they were free I figure it's worth my time to give it a whirl!

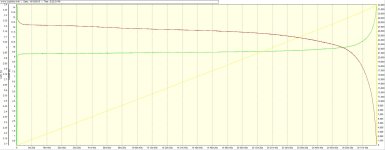
10/12/15 Update: At least 16 cells were measured to have at least 30ah capacity using an iCharger+logview. Some had as much as 32ah, and some were below ~15ah, but there were enough above 30ah to build a 16s pack (which is what I needed).
 
you need to do at least 2 or 3 full charge/discharge cycles imo to stabilize the capacity. by the end of that you should have a good handle on which will charge together and discharge together so you can build a balanced pack from them.

do a measured discharge on the last cycle to see how close in Ah they are and let us know.

i always use a single cell charger. a 40W kingpan, 4V @ 10A and i tie all of the available cells together in parallel and charge them all up to the 3.65v together. then i hook them together in series to do the discharge test.
 
dnmun said:
you need to do at least 2 or 3 full charge/discharge cycles imo to stabilize the capacity. by the end of that you should have a good handle on which will charge together and discharge together so you can build a balanced pack from them.

do a measured discharge on the last cycle to see how close in Ah they are and let us know.

i always use a single cell charger. a 40W kingpan, 4V @ 10A and i tie all of the available cells together in parallel and charge them all up to the 3.65v together. then i hook them together in series to do the discharge test.

That makes sense. Right now I'm still only about half-way through the first charge cycle doing one cell at a time.

As far as charging all in parallel at the same time, my charger only has the ability to output 5a per channel, so it would take about 7 days of charging to do all 32 cells in parallel at 5a. I could do 1s8p per channel though and cut the charging time down to about 2 days, so I'll do that on the next pass. Using my current technique of 1s1p, I can only do 4 cells per day since the charging cycle ends sometime in the morning after I've already left for work and can't get another 4 onto the charger until I get home. Actually it sounds like this is a GREAT way for me to speed up the charge/discharge process, now that I've talked it through! Big thanks for that time saver.

So to revise my process, first I'll finish this pass of 1s1p charging (or even bump it up to 1s4p to just finish it), then discharge every cell back to 2.8v, then do a charge cycle of 1s8p, then a discharge of all cells again, then a charge of 1s8p again. For the last discharge cycle, I'll do 3s1p discharging and measure the capacity there. I might also think about rewiring the discharger to allow for more cells in series to even further speed things up.

Really helpful tip, thanks again.
 
if you could just buy a DC-DC converter off of ebay and run it off of your 12V car battery and keep the 12V charged with a battery charger then you could wire them all up in parallel and charge them up together. then charge all of them up to 3.65V and adjust the DC converter to hold them at that voltage as they fill up to full charge. you should be able to find a lot of 100W DC converters you can use to create 4V from 12V that allow you to make the final voltage adjustment to 3.65V.

you should use a watt meter to make the work easier and faster and you will need a watt meter anyway later and they are so cheap on ebay. then line up all of the cells in series with jumper wires and discharge it at 5A into a heater while measuring the current with the watt meter so you know exactly how much charge each cell will hold. when the cell reaches the 2V level then remove it from the series and continue discharging the others and recording the Ah as they hit 2V and you remove them from the string.

that will give you reliable numbers and allow you to fully discharge the cells down to 2V and then recharge to 3.65V which you have to do in order to force the cells to accept full charge and balance.
 
dnmun said:
if you could just buy a DC-DC converter off of ebay and run it off of your 12V car battery and keep the 12V charged with a battery charger then you could wire them all up in parallel and charge them up together. then charge all of them up to 3.65V and adjust the DC converter to hold them at that voltage as they fill up to full charge. you should be able to find a lot of 100W DC converters you can use to create 4V from 12V that allow you to make the final voltage adjustment to 3.65V.

you should use a watt meter to make the work easier and faster and you will need a watt meter anyway later and they are so cheap on ebay. then line up all of the cells in series with jumper wires and discharge it at 5A into a heater while measuring the current with the watt meter so you know exactly how much charge each cell will hold. when the cell reaches the 2V level then remove it from the series and continue discharging the others and recording the Ah as they hit 2V and you remove them from the string.

that will give you reliable numbers and allow you to fully discharge the cells down to 2V and then recharge to 3.65V which you have to do in order to force the cells to accept full charge and balance.

For the charging, I think I'll just stick with the hobby charger since I can't be there to monitor the charge process and it's so good at administering the CC/CV algorithm. It's about 70 watts if I use all four channels so not terribly slower. Plus I also already have it so I'm being lazy about buying more stuff :D

I do happen to have a watt meter, but it only goes to 100v (but does allow 100a) so 32 in series would just slightly go over. Although, I'm pretty nervous about those two weird looking cells so maybe I just do 30s. I have 4x 8s programmable battery alarms so I could still do cell-level voltage monitoring. My concern is that one or two cells will hit 2v too early in the test (i.e. if there are a few really weak ones) and throw the reading off, but perhaps I just remove those at that point, record the capacity drawn, and keep going.

As far as getting 5a into a heater, the closest I've got is a small space heater that has a "low" setting that draws about 800w (~6a at 110v). Actually, that should be about 5-6a at 90v, pretty close. My math shows that it should do about 12a on high at 99v (30s). You saved me some real life time again! My discharge plan was going to take many days of rotating and recording, but all cells in series should take no more than 4 hours depending on the load; sounds like a nice weekend task. Realistically probably a lot less time for the first cycle since I doubt these cells are holding full capacity.

Thanks again!
 
you have to be careful using space heaters. i use either a radiant type heater or an oil filled pelonius type electric radiator to discharge the batteries into. some of the space heaters have a thermal link that will melt under the high currents the heater will draw.

do not switch the heater on and off either or the switch will fuse closed. i have made a duplex socket with anderson plugs on the input, and two 3 way extender plugs so i can plug in up to 6 heaters at the same time.

you do not have to use full voltage on the watt meter. i use a small 9V battery to power it through the aux input. you just have to find one of those little 2 pin JST plugs that fit the auxiliary pins and a 9V battery harness plug. which you can take from a dead voltmeter.

you want the meter to remain powered up during the discharge so it does not turn off when you open the series and remove each cell as it reaches 2V.
 
dnmun said:
you have to be careful using space heaters. i use either a radiant type heater or an oil filled pelonius type electric radiator to discharge the batteries into. some of the space heaters have a thermal link that will melt under the high currents the heater will draw.

do not switch the heater on and off either or the switch will fuse closed. i have made a duplex socket with anderson plugs on the input, and two 3 way extender plugs so i can plug in up to 6 heaters at the same time.

you do not have to use full voltage on the watt meter. i use a small 9V battery to power it through the aux input. you just have to find one of those little 2 pin JST plugs that fit the auxiliary pins and a 9V battery harness plug. which you can take from a dead voltmeter.

you want the meter to remain powered up during the discharge so it does not turn off when you open the series and remove each cell as it reaches 2V.

I'm a bit confused- wouldn't a space heater only be drawing it's design power under this scenario? My space heater is 110v and my battery array will be somewhere just under that; the heater is spec'd for up to 12a AC (1500w on "high"). Is it because DC is harder on the switches than AC?

Unfortunately for my watt meter, it's not a high quality unit. It uses the input voltage as both the power to the unit as well as for the voltage measurement. It gets the current through an external shunt. If I were to give it a lower voltage to turn it on, it would think that the total power is lower- it would see the correct current but not the correct voltage. Or at least that's my understanding. I also have a separate DC ammeter which ironically does have a separate voltage input for sense and for power to the unit, but it does not do the watt calculation; I'd have to keep track of the time on my own to calculate watts with that one. I'm not opposed to running the test twice though, once for 28-30 of the cells and then running the other handful through my home-brew 500w discharger.

Edit: The good news on my cheapo watt meter is that it has non-volatile memory, though, so it will keep counting even if I disconnect it a few times to remove 2v cells from the array.
 
it depends on the space heater if it has the thermal link. i have had them burn out before, also do not use heaters with the fan inside because the current will burn up the fan motor.

you could connect the meter halfway up the pack to reduce the voltage but usually they take about 100-120mA so it will imbalance your results a little bit depending on how long it takes to do the discharge. you can control for that by repeating the discharge and using the other half of the pack which was on top before as the lower part with the watt meter powered by it and then use the averages.

you can use a bunch of light bulbs for the discharge too. you can buy a package of jumper wires at the harbor freight. 10 wires for $2.99 as i recall. that may have been on sale though.
 
dnmun said:
it depends on the space heater if it has the thermal link. i have had them burn out before, also do not use heaters with the fan inside because the current will burn up the fan motor.

you could connect the meter halfway up the pack to reduce the voltage but usually they take about 100-120mA so it will imbalance your results a little bit depending on how long it takes to do the discharge. you can control for that by repeating the discharge and using the other half of the pack which was on top before as the lower part with the watt meter powered by it and then use the averages.

you can use a bunch of light bulbs for the discharge too. you can buy a package of jumper wires at the harbor freight. 10 wires for $2.99 as i recall. that may have been on sale though.

That's a good point- if I connect the meter half way, I would just need to double the watt/hours. Good call on the draw of the meter too.

The light bulb method was my original plan- I bought 10x 12v 50w bulbs for about $10 on amazon. I wired them in parallel to give 500w draw at 12v (only 340w at 3s though). Looks like I could wire them in series to get up to around 500w at 105v (8x bulbs in series gives 4.5a / 470w). Realistically I'd probably be happier discharging a large load through the space heater, but now that you mention it I only have a space heater with a fan and I'm not even sure if the fan would run on DC, let alone the fuse issue you mention; it would probably melt without the fan running. I'll have to think about how I can discharge >1000w so that I don't have to sit within earshot of the alarms for 8 hours. Probably still doable for a weekend day but I might think about wiring so I can do shorter stints and be around to tend to the flock. Perhaps just testing the pack in halves, or even in quarters. Or maybe I should just buy a bunch of big 110v bulbs for this test.

I also need to think about how I can discharge 3000w at 280v when it comes time to get these going with the PHEV kit, but that is a problem for a later day :)
 
once you can characterize the cells in their current condition then you can use that later in deciding the pack structure.

i am not sure what alarms you are talking about. if you connect all of them in series then you can just use the DVM to measure the cell voltage as you discharge the entire string.

if it goes slowly enuff then you have plenty of time to follow each one of them down to 2V. you will see the falloff in voltage coming easily. so 3-5A is plenty fast enuff.

none of them will have the full 40Ah anymore either.
 
Just to provide a progress report- this has taken much longer than I had hoped, but after much trial and error I was able to cobble together a usable 16s pack that has a capacity of ~30ah at a 10a discharge. I tried using the method of grouping them all together in parallel but it wasn't working because I have 4 or 5 really, really dead cells that seem to be internally shorted and they were throwing off the results. When I try to charge them on a hobby charger, the charger goes nuts and has to be turned off. When I charge them with a dumb charger, all they do is heat up and immediately drop back to 0.00v when the charger is removed. They made it really hard to do anything in groups larger than 1 cell because they weren't otherwise easily identifiable.

I was getting frustrated so I bought an iCharger 208b for its logging capabilities, and that got me back on track. I tested each cell by letting the iCharger charge it up to 3.6v at 20a (tapering to 2a), then discharge to 2.1v, then repeating the procedure a second time (all automated, thankfully). I felt this gave reliable enough data since it got the first charge/discharge cycle out of the way before logging the second discharge cycle. It was great- enough of the cells had a ~30ah (29 to 32) capacity to cobble together a 1.5kwh 16s pack. Quite a few had somewhere between 20-26ah, and a couple had under 18ah. The best cell so far was 32ah of the original 40ah capacity (I'e attached a pic of its discharge). Note that I chose to do the discharge at a constant power- 30w- instead of a constant current, because I'm impatient. It just made the curves drop off even faster as the voltage started to drop below 3v but still gave a good idea of which cells were good. Green is current, red is voltage, and yellow is capacity.

My goal is to get everything up and running in the next couple weeks in my PHEV setup and to keep working through the remaining untested batteries. Once everything is totally working, I plan to go back through the super dead cells and the weak cells to see if there are any good sub-cells that I can salvage into an ebike pack- each cell contains 3, 13ah sub-cells, so hopefully I can find at least 10-16 decent subcells. We have a baby due in a week or so, so this might be one of those projects that dies for a couple months over the winter.

These iChargers are awesome. My only pet peeve is that the discharge capacity on the 208b isn't that high (30w), but it was enough to give me a ~10a load. If I were truly pressed for time I would have opted for the 306b or even the 308duo, but right now my wallet is driving the project more than my desire to complete it.

Anyway, huge thanks for all your help in getting my bearings on this. I hate it when people start a thread and never check back in to update the status, so this is that status update :)

Tl;DR - of 32 40ah Mottcell batteries sitting at 0v for over a year, at least 16 have about 75% capacity, a few have less capacity, and a few were totally dead.
 

Attachments

  • A06.jpg
    A06.jpg
    136 KB · Views: 1,452
Back
Top