Razor A5: Electric Conversion

ApacheXMD

100 mW
Joined
Nov 5, 2008
Messages
41
I wanted a lightweight electric scooter to help with part of my commute. It's a "last mile" solution, so it needs to be light to carry on and off buses/subway.

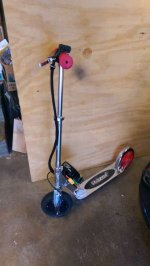
I bought one of these:View attachment 9

And the idea is to replace the front wheel with a hub motor.

So I bought a 200mm hub motor and controller from another forum member, shortcircuit911.

And I promptly took it apart:IMAG5104.jpg
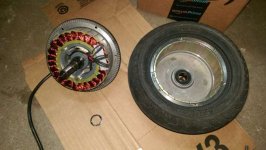
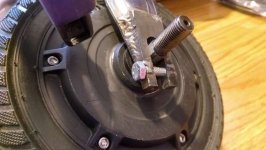
The motor was made for dropouts that were much wider than the stock fork on the Razor A5, so I needed to do some modifications.

The motor came with drum braking, and the drum was built into the motor casing, so I needed that to go away.
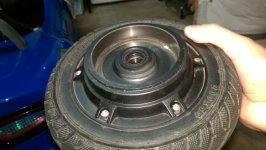
IMAG5106.jpg

After some time with the band saw, grinder and a can of paint, this is the result (tire off):
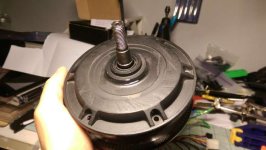
IMAG5220.jpg

Next will be grinding new flats onto the axle, and welding on some clamping-style dropouts to the front fork. That will come later. But first, we need to see about some batteries.

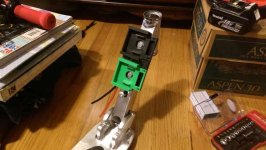
Now one of the features I like about the A5 is it's very low deck. It makes mounting/dismounting the scooter very easy, and also kicking is very natural and easy. But the low deck doesn't leave room for batteries, so I needed another solution:

3D printing solution:
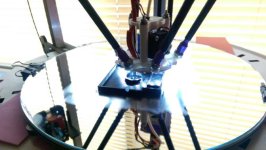
IMAG5193.jpg

Glued up solution (sorry bout the random filament color):
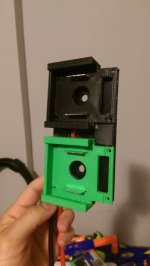
IMAG5215.jpg

Bolted on solution:
IMAG5216.jpg

Clipped in solution:
IMAG5217.jpg
These are 18v (5S) 3AH Makita LXT battery packs normally found in power tools. The 3d printed parts allow the battery packs to simply snap in place, just like on any other Makita power tool. The clip was printed in ABS plastic, and is mounted via 1/4-20 bolts to the down tube with rivnuts installed into it.

I work in construction, and I have Makita chargers at work. And of course I have Makita tools and a charger at home. So the idea is that I'll be able to charge wherever I am without having to lug around the charger. These packs add a little bulk. But the convenience of charging at work or home, plus being able to easily swap packs, makes up for it.


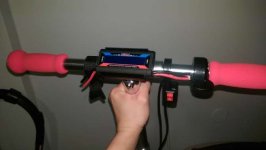
Ok battery is mostly figured out, time to work on the throttle and watt-meter stuff:

3D printed another part to snap into handle bar:
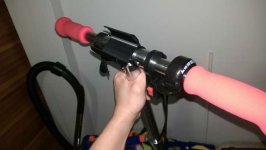
IMAG5211.jpg

Watt-Meter snaps right into place:
IMAG5212.jpg

The throttle and toggle are cheapies from ebay. And to the left of the watt meter is a velcro flashlight mount I got a long time ago that I'm finally putting to use.

So that's pretty much all I have done so far.

To do:

Grind new flats onto motor axle.
Make/weld on clamping dropouts for front fork
Figure out where to mount controller
Wire up controller
Rewire watt-meter for 3 wire operation
Test ride!
 
So I put in more work on the scooter. As I mentioned last time, I needed to grind new flats onto the axle. The problem here was that the motor was made for much wider dropouts than I wanted to use on this scooter (because of the built in drum brake). I got rid of the drum brake to narrow the drop out needed, but the axle doesn't have flats at the new narrow width, and there are no threads for axle nuts that far down the axle.

So I needed to grind my own flat sections, and needed to make clamping dropouts do eliminate the need for axle nuts.
See crappy welding:
scooter2.jpg

Next I was working on the wiring of the controller. I bench tested the motor/controller combo and got throttle working, but the "brake" wire was only a motor cutoff when grounded, and provide no braking to the motor. After some googling and searching on the forum, I figured out that if you bridge the DS pin and the X pin, you get braking via the brake wire and ground. I'm not seeing any reverse current on the watt meter when braking so I don't think it's regen.

So I got on eBay and bought a "ebike" brake handle with a switch built in. This is a normally open switch, so when I pull the handle, it grounds the brake wire on the controller. I still have the rear fender brake that came with the Razor A5.

I also wired up the watt meter using a three-wire method where I'm only running the large battery negative wire up to the meter; the positive is a small gauge wire.

The power switch to the right of the watt-meter simply cuts off battery voltage to the voltage regulator of the controller. Seems to do the trick, though when "off" I'm seeing about 1.5w draw from the controller.

And finally the throttle is the cheapest POS hall effect thumb throttle I could find on ebay. I've used this kind before on my son's Powerwheels quad to give it variable throttle with an RC esc.
View attachment 1


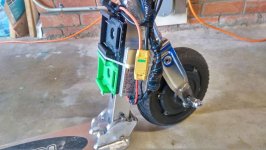
Here's a picture of the somewhat haphazardly mounted controller. With the low deck of the Razor, there isn't a whole lot of room to mount the controller. I have it just shoogoo'd to the down tube of the scooter; the zip-tie is temporary while the stuff cures. I've had good luck with Shoe Goo with my RC cars holding down ESC's and servos. We'll see how this holds up.

The big black bundle is all the controller connections wrapped in silicone tape. This stuff is kind of like electrical tape, but it's rubbery and not sticky. It actually just adheres to itself.
The power connectors are anti-spark XT-90S.
scooter4.jpg

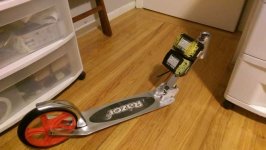
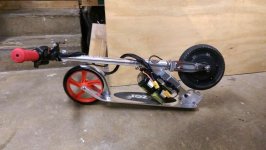
And finally here's the money shot!
scooter1.jpg

All-up weight is just 19.8lbs. Test rode it today for the first time but it was windy as hell and the two batteries weren't very balanced. Top speed was about 14mph. More extensive testing to come shortly!
 
I did some testing tonight with fresh packs. I live in a pretty flat area so I just took the scooter around the block and measured out the total distance travelled. Got about 5.8 miles as measured by Google maps. The watt meter shows 117watt-hrs used up. So about 20.1 Watt-hours per mile, just about what I expected so I'm happy. Pulled a peak of 13.1 amps which is right in line with what the label on the controller said, 13A.

Nothing fell apart or broke during the ride. Except it was darn cold!

Overall a successful test, and I think I may up the current a little bit by doing the shunt mod to the controller. I'll try for 18-20A or until I blow my 20A fuse.
 
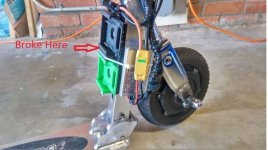
Had my first ride to work with the scooter, and of course, had my first failure.

About 3/4 of the way to work, part of the 3D printed battery clip failed and left one battery pack flopping around. So I had to kick/walk the rest of the way and ended up being 5 minutes late to work. :cry:

I have it zip tied back together, so we'll see what happens on the way back home. I've got a few ideas in my head for a repair and, eventually, a new printed part.

But up until the failure, it rode great! I found a route with a decent bike lane for part of the way, so it's looking good once I get the kinks worked out on the scooter.
 
Success! I repaired the broken battery clip with some ABS Glue and my 3d printing pen. It's pretty ugly, but it held up perfectly during this morning's ride in.

Battery clip broke.jpg

Repaired:
View attachment 1

I gooped on a bit more plastic elsewhere on the clip to make the fit to the battery a little tighter and reinforced some other areas. Hopefully this is a permanent fix. If it breaks again, I'll redesign the part and print it with greater in-fill.

I'm getting just about 5 miles per charge out of my dual Makita 18v 3.0ah packs (packs run in series for 36v). My commute is just about 5.93miles according to google maps. So it kinda sucks that I run out of just so close. I carry an extra set of batteries in my back pack. I can make the switch to a lipo pack with the range needed to make it to work, but then I'd be carrying a charger with me. I already have Makita chargers at work I can use. So it's either carry extra batteries or carry a charger....
 
So I've put about 50 miles on the scooter thus far and no more problems. I modded the shunt on the controller and am now at about 17 peak amps, compared to 13A stock. The scooter is fast enough as is, and I just wanted a little more oomph up the hills.

I've also noticed that regen braking is working. I mentioned it in a previous post that I bridged the DS and the X pad on the controller:


The brake switch is a normally open switch connected to the SL pad and ground.
My wattmeter doesn't show reverse current, but it does indicate a voltage rise when I'm on the brake and rolling down a hill. The brake comes on a little strong and with a tiny annoying delay, but it's something I'm used to now and it works fairly well at slowly me down. I still have my fender brake. I don't think regen really adds very much to my range, but it's better than nothing.

One thing I do want to do is make the deck of the scooter a little wider. I ride in my work boots, and it's a little cramped. I don't want to add much weight, but I think it'll make the 6 mile commute more comfortable. Maybe some aluminum side extensions somehow...

I've taken it on BART (San francisco's subway system), and with the scooter folded up, it fits between my legs when I'm sitting. There isn't anything to keep the headset from spinning and handle bars flopping about, but it's pretty easy to manage. It's light enough to carry up stairs and escalators.

But the best part of the scooting to work is not having to rely on the dumb bus. If the weather holds up, I'll be saving $70 a month on bus fare. The scooter will pay for itself is less than 3 months!
 
The best part of commuting by electric scooter early in the morning:

scooting_by_the_bay.jpg

Couple miles later:
scooting_by_the_bay2.jpg
 
Just a quick update. The scooter is still going strong. I ride it daily to work about 12 miles round trip unless its raining. And I try to take it to the grocery store and pickup takeout food. So far I probably have over 350 miles on it.

I had two hiccups. My electrical connectors are all wrapped under tape but my throttle and my power switch connector managed to work themselves loose on two separate incidents. Both time were quick fixes but annoying nonetheless.

Other than that, the hub motor, and the Razor A5 scooter have been rock solid. No new pictures because I haven't changed a thing on it since I finished her up.

Happy Riding everyone!
 
Back
Top