RIPPY CAT

RIPPERTON

100 W
Joined
Feb 26, 2013
Messages
228
Location
Sydney Australia
I bought a Hobie Cat 14 off Gumtree for $100 with trailer and busted mast. Serial number 5007, it was made in 1982
and its not in good enough condition to be refurbed as a sailing boat so it begins its new life
as a Gentleman's electric cruising yacht, possibly with solar range extender.
I googled these things and they are basically adrenaline junky gokarts for the water and
they have some weird geometry. The hulls arnt parallel ie 6cm wider apart at the stern
so they are like a skier snow ploughing. Not very efficient. Had to shorten the cross beams of the
tramp and will have to build some kind of bench seat in place of the tramp mat.
Removed all the boaty ropes and cables off it and threw it in the water...and it floats.
 

Attachments

  • CATAMARAN.jpg
    CATAMARAN.jpg
    1.3 MB · Views: 18
  • WATER (2).jpg
    WATER (2).jpg
    4.7 MB · Views: 18
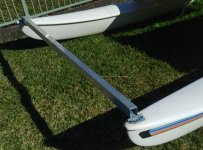
Suspended a 90lb trolling motor off a 50x3 squaare beam attached to the bow tips with hinges.
A green V rope at the bottom relays thrust from the motor to the hull. The motor is also on
a hinge in case I hit someone. Motor is actually heavy enough to not flip up when reversing.
There was aluminium frame embedded in the fibreglass of the bow tips to thread the M8s into.
 

Attachments

  • BUMPER 2.jpg
    BUMPER 2.jpg
    4.4 MB · Views: 11
  • BUMPER 3.jpg
    BUMPER 3.jpg
    1.9 MB · Views: 11
  • DC motor.jpg
    DC motor.jpg
    2.9 MB · Views: 11
The red rope turns the motor for steering. DC power cables zip tie to the steer rope and
connect to a cheapie Ebay pwm ctlr good for 56v. Building a 14s 16p LiPo pack using
old R1 racing cells that only go up to 3.9v. 3.8kWh.
 

Attachments

  • IMG_20241005_145201.jpg
    IMG_20241005_145201.jpg
    5.7 MB · Views: 7
  • Steer Head.jpg
    Steer Head.jpg
    831 KB · Views: 7
This is how much the hulls need to come together at the rear to make them parallel.
Also had to shorten the front tramp frame cross beam.
The front castings were very difficult to get off. Had to cut 2 slots to
loosen 42 years worth of corrosion. They will just get M8 through bolted and M6 bolts
in the other existing holes.
 

Attachments

  • IMG_20241004_071329.jpg
    IMG_20241004_071329.jpg
    4.6 MB · Views: 11
  • IMG_20241005_105045.jpg
    IMG_20241005_105045.jpg
    4.7 MB · Views: 11
  • IMG_20241005_124502.jpg
    IMG_20241005_124502.jpg
    6.1 MB · Views: 11
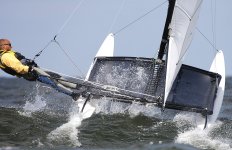
Dont know. Like Gokarts they are designed using witchcraft and not to be understood by mortals.
Anything that gets driven like this in 30 knot typhoons with the pilot suspended horizontally out
over the water has some weird 5hit going on.
sail.jpg
 
Yes well ther'l be non of that rowdy business, its a Gentleman's Cruising Yacht after all.
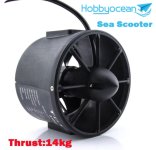
Probably end up with 2 of these bolted on the inner surfaces of each hull for some proper speed.
Could have 2 throttles for steer vectoring and on the spot pivoting at the ramp.
 

Attachments

  • Untitled.jpg
    Untitled.jpg
    468.5 KB · Views: 0
Building the pack with 10 year old 4Ah YGS cells from the eFXC race bike. 14s 16p 53v
These cells have done about 4500km of racing, practice and testing.
They dont charge up to 4.2v anymore, only about 3.9v but that makes charging easy as they cant over volt.
They kind of self balance at 3.9v. At about 3.4kWh I might not need solar panels or might not be able to
afford the weight of them or even the weight of a passenger. The hulls will be running low in the water.
The alloy plate with the blue wire is a bus bar that joins 2 blocks of 16 cells each

CELLS.jpg

START PACK BUILD.jpg
 
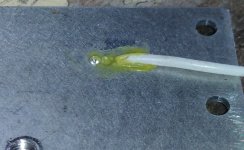
Attaching the balance wires to the busbars. Had no room for rivets or even a small M4 screw.
All the clamping screws are countersunk and will be covered with acrylic plate to insulate.
Drilled a 1mm hole diagonally through the busbar to insert the bared wire, then center punched
the plate over the drill hole and glued to secure the wire.
DIAGONAL.jpg

PUNCH.jpg

GLUE.jpg
 
Almost completed pack with cell log 8 monitors (low tech)
34A charger, might not need solar panels, just pull up at the fish shop and charge for a while.

PACK 1.jpg

MONITORS.jpg

CHARGER.jpg
 
SlowCo M8 thank you for those links.
Ive been looking for sensorless ESCs for my other boat.
The Trolling motor should do for a while but if I get bored with it I
will be shopping at Flipsky fur sure.
 
Hey with the Flipsky controllers, can you configure them with a usb cable and a laptop ?
If it is one of the VESC compatible ones, yes, you can configure via usb cable and vesc desktop tool.
You can also install a Bluetooth dongle on the controller and program with the Apple/Android phone app.
 
Already used up a full 6.5m length of 50x6 equal angle and this stuff isnt light but
I need this subframe to be strong as it could have to carry about 150kg. There 4 hangers
dropping down off the front tramp beam that will have 4 M8 through bolts.
Was going to bolt the whole subframe together but am shifting over to welding it.

SUBFRAME.jpg
 
Wondering if some of you guys can help with wiring the Flipsky for my other boat. dl the jpeg and edit it.
Like what is gear H M L and how to wire it. Is it like a rev limiter ?
Its pretty simple, has 2 sensorless thrusters, a pot throttle and a 3 pos switch for direction neutral fwd rev.
Also want to disconnect the battery for storage and charging so will I need a precharge res across the terminals
of the contactor ? Other questions, what is PPM (5v gnd S) plug 7 ?. Will I need CAN.
How does USB master slave work, which do I connect to laptop for config.

ESC 2.jpg
 
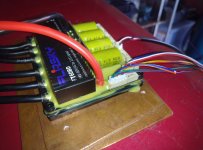
Booted the FT60BD on 24v and tried to connect to the ESC config tool but says cannont connect, check usb.
There is a win7 driver that came with the tool in the DL but dont know how to run the driver, any ideas.

FLIPSKY BOOT.jpg
 
Advert says this ESC supports sensorless motors but theres no such option in motor control.
After hours with tech support, they finally tell me to select hall sensor and then run the motor test.
Also took hours to figure simple FWD REV wiring because there is no wiring diagram.
Ive potted it in Selleys Kwik Grip and attached 2 copper plates to the heat sink.
 

Attachments

  • Potted.jpg
    Potted.jpg
    2.1 MB · Views: 1
Lots of difficulty welding. I took the subframe over to a mates workshop to try his TIG welder
but it ran the same as mine so that means I cant weld or Im not prepping the alloy properly.
So I rigged up a curtain to block out the wind that was blowing the argon away.
WELDING.jpg
 
Back
Top