RLT
10 kW
This was really supposed my project #3; I was planning on just slapping an old Amtek motor I bought years ago to build a wind generator with on to an old 10 speed for Project #1, just to learn a few things, then Project #2 was supposed to be a kart with a treadmill motor and my modified 120V YiYun 42 controller, just to prove that it could be done cheap.... But things just kind of fell in place for what was to be my first serious build to come before the practice ones.
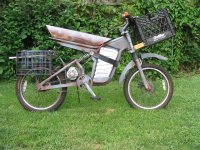
The main intention for this bike is for stealthy off road travel for my landscape / wildlife photography. I need long range, (I was hoping for 30 miles, but I'm only going to get about half that in the steep terrain that I will usually be traveling in) power for those long steep hills and my portly self and my camera equipment, ruggedness, and some comfort for my old 'stove up' back and knees.
Started out with a $130 Walmart special full-suspension mountain bike I bought about 6 years ago... A Mongoose 150. Aluminum frame, steel forks and steel rear swing arm. 21 Speed, Rim Brakes

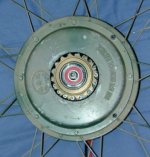
Added two Wilderness Energy BD 36 hubmotors from batteryspace.com:
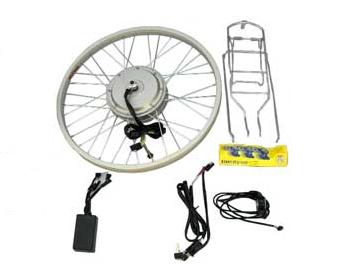
Sure, I'd have liked to use a couple of crystalites or some other high quality motors, but I was trying to do this as cheap as possible, at least until I knew if the concept was practical.
I'm very disappointed in the QC on these two WE brushed motors... three of the spokes were stripped on one of the them when I got them, both wheels badly out of true. Even after I replaced the bad spokes and trued the wheels, it was obvious that there was something out of weight balance in both of the motors, one much worse than the other. :x Added a little weight to the opposite sides and kind of smoothed things out to an acceptable level.
And since then, with very little use or abuse I have had to replace 10 more spokes. :x :x :x I should just replace them all and be done with it, because there are several more that look suspicious. PLUS, the joint on both rims were misaligned, had sharp edges and burrs internally and externally, enough to shred brake pads and inner tubes. I had to bend, grind and polish them out. :x :x :x :x
Decided to put both controllers inside a larger enclosure, add LED volt and amp meters and a three parallel 37-72 V DC-DC 5V 1A converters to power the meters and give me an output to power lights, Pocket PC-GPS etc.
View attachment 6

Decided to take Fechters advice ( http://endless-sphere.com/forums/viewtopic.php?f=2&t=278&start=270#p47990 ) and add a couple more freewheel diodes and a couple more capacitors to each controller. They are on a single board, but are isolated from each other:
The 8X6X3 project box got crammed pretty full by the time I finished:

Put the heatsinks from the original controllers on the bottom of the new box:

Oh, yeah... I also added a little solder to the shunts on both controllers to boost the amperage from the original of about 35A to a little over 40Amps each... They aren't perfectly matched... One will handle 44.1A the other 44.8A. I suppose it would be smart to see if I can get them better balanced. (no photo of shunts.)
Here is the top of the box with the meters:

Those meters turned out to be another mistake.
First of all, even though the ammeter was supposed to be internally isolated, the first one I installed blew fuses and surface mount components when I first turned things on powered through the DC-DC converter. So I ordered another and installed it with its own battery power supply. (4X) AAA Eneloops made into a tight pack. Should be able to power the meter for 30 hours continuous on a single charge. And the project box gets crammed even more full. There is a small jack on the front of the box to charge the battery pack, and a switch to turn it off to conserve power when you don't need it.
Unfortunately, You just can't read these meters in the sunlight... even on a moderately cloudy day, they are washed out. The green volt meter is worse... You can kind of read the red ammeter if you are in dark enough shade.
I think I'm going to go with using a couple of Cycle Analysts instead of the meters in Project #1 Mk2 if I can afford them. Or maybe buy an Eagle Tree for one pack and use the Watts Up I already have on the other if I decide I can't afford the CAs.
I had intended to be able to unplug one battery pack and just run one motor off of the other, since I had separate leads from each controller going to each motor, but I guess that tying the inputs from the battery packs together to run through the shunt for the ammeter, that the controllers outputs aren't isolated.... cut the power into one controller and the other one continues to send power to both motors... I guess by some sort of feedback through the inputs. I wasn't expecting that. It doesn't seem to bother either controller under normal use, and it may help keep the two battery packs in better balance because of it. But I think that in P1Mk2, I'm going to keep front and back batteries, front and back Controllers and front and back motors completely isolated, other than the single throttle input to both.
Oh, a word about throttles: I originally went with the thumb throttle that came with the motors. But between a mild case of carpal tunnel and a moderate case of arthritis, My thumb wasn't happy after even a short ride. So I went to a twist grip throttle. Another mistake; When I'm bouncing around offroad, hanging on for dear life, I was applying power when I wanted the exact opposite. So, I'm going back to the thumb throttle and minor pain, rather than the major pain of speeding up and running into a tree, a rock or off a cliff when I'm trying to slow way down.
.....
Let me save this before something happens and I lose it.
To be continued::::
The main intention for this bike is for stealthy off road travel for my landscape / wildlife photography. I need long range, (I was hoping for 30 miles, but I'm only going to get about half that in the steep terrain that I will usually be traveling in) power for those long steep hills and my portly self and my camera equipment, ruggedness, and some comfort for my old 'stove up' back and knees.
Started out with a $130 Walmart special full-suspension mountain bike I bought about 6 years ago... A Mongoose 150. Aluminum frame, steel forks and steel rear swing arm. 21 Speed, Rim Brakes
Added two Wilderness Energy BD 36 hubmotors from batteryspace.com:
Sure, I'd have liked to use a couple of crystalites or some other high quality motors, but I was trying to do this as cheap as possible, at least until I knew if the concept was practical.
I'm very disappointed in the QC on these two WE brushed motors... three of the spokes were stripped on one of the them when I got them, both wheels badly out of true. Even after I replaced the bad spokes and trued the wheels, it was obvious that there was something out of weight balance in both of the motors, one much worse than the other. :x Added a little weight to the opposite sides and kind of smoothed things out to an acceptable level.
And since then, with very little use or abuse I have had to replace 10 more spokes. :x :x :x I should just replace them all and be done with it, because there are several more that look suspicious. PLUS, the joint on both rims were misaligned, had sharp edges and burrs internally and externally, enough to shred brake pads and inner tubes. I had to bend, grind and polish them out. :x :x :x :x
Decided to put both controllers inside a larger enclosure, add LED volt and amp meters and a three parallel 37-72 V DC-DC 5V 1A converters to power the meters and give me an output to power lights, Pocket PC-GPS etc.
View attachment 6
Decided to take Fechters advice ( http://endless-sphere.com/forums/viewtopic.php?f=2&t=278&start=270#p47990 ) and add a couple more freewheel diodes and a couple more capacitors to each controller. They are on a single board, but are isolated from each other:
The 8X6X3 project box got crammed pretty full by the time I finished:
Put the heatsinks from the original controllers on the bottom of the new box:
Oh, yeah... I also added a little solder to the shunts on both controllers to boost the amperage from the original of about 35A to a little over 40Amps each... They aren't perfectly matched... One will handle 44.1A the other 44.8A. I suppose it would be smart to see if I can get them better balanced. (no photo of shunts.)
Here is the top of the box with the meters:
Those meters turned out to be another mistake.
First of all, even though the ammeter was supposed to be internally isolated, the first one I installed blew fuses and surface mount components when I first turned things on powered through the DC-DC converter. So I ordered another and installed it with its own battery power supply. (4X) AAA Eneloops made into a tight pack. Should be able to power the meter for 30 hours continuous on a single charge. And the project box gets crammed even more full. There is a small jack on the front of the box to charge the battery pack, and a switch to turn it off to conserve power when you don't need it.
Unfortunately, You just can't read these meters in the sunlight... even on a moderately cloudy day, they are washed out. The green volt meter is worse... You can kind of read the red ammeter if you are in dark enough shade.
I think I'm going to go with using a couple of Cycle Analysts instead of the meters in Project #1 Mk2 if I can afford them. Or maybe buy an Eagle Tree for one pack and use the Watts Up I already have on the other if I decide I can't afford the CAs.
I had intended to be able to unplug one battery pack and just run one motor off of the other, since I had separate leads from each controller going to each motor, but I guess that tying the inputs from the battery packs together to run through the shunt for the ammeter, that the controllers outputs aren't isolated.... cut the power into one controller and the other one continues to send power to both motors... I guess by some sort of feedback through the inputs. I wasn't expecting that. It doesn't seem to bother either controller under normal use, and it may help keep the two battery packs in better balance because of it. But I think that in P1Mk2, I'm going to keep front and back batteries, front and back Controllers and front and back motors completely isolated, other than the single throttle input to both.
Oh, a word about throttles: I originally went with the thumb throttle that came with the motors. But between a mild case of carpal tunnel and a moderate case of arthritis, My thumb wasn't happy after even a short ride. So I went to a twist grip throttle. Another mistake; When I'm bouncing around offroad, hanging on for dear life, I was applying power when I wanted the exact opposite. So, I'm going back to the thumb throttle and minor pain, rather than the major pain of speeding up and running into a tree, a rock or off a cliff when I'm trying to slow way down.
.....
Let me save this before something happens and I lose it.
To be continued::::


")